
Hi! First post of 2016, how wild is that? It’s a new year and I’m trying to get organized and plan ahead a bit. Dunno if it’s going to work or if I’m going to stick with it, but for now I’m going to try to be responsible.
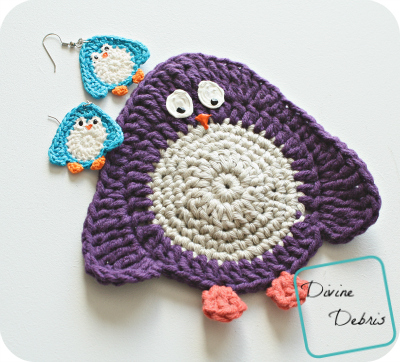
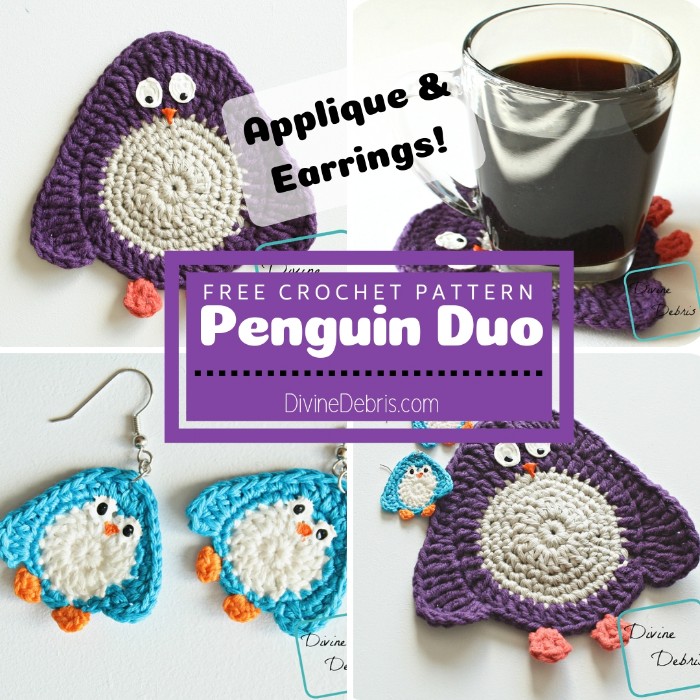
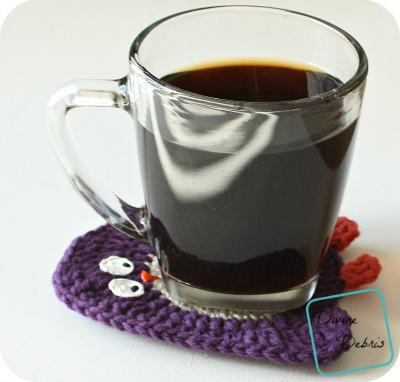
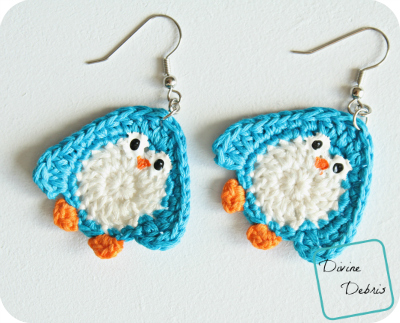
First order of business is this post. My hand is kinda killing me, I think I overdid it last week and so I wanted to make a simple pattern for this week (possibly next week too depending upon how my hand is feeling). So, I went looking through old designs, earrings and such, to find a pattern that would fit. You might have already guessed I love turning old earring designs into applique/ coaster designs, as I’ve done it with Tea Cups, Cocoa Mugs, Cupcakes, and Penny Penguins! I hope you love them as much as I do.
You can purchase an ad-free pdf of this pattern in my Ravelry shop. This purchase helps me continue to make patterns week after week.
Materials:
- US G (4.00 mm) crochet hook
- Worsted weight/ size #4 yarn
- I used cotton yarn (just scraps I had, don’t know the brand) because I plan on using this as a coaster.
- Yarn needle
- Puffy paint
- 2.25 mm steel crochet hook (if making earrings)
- 2.00 mm steel crochet hook (if making earrings)
- Size 10 crochet thread (if making earrings)
- I used DMC floss/ embroidery thread
- Jump rings (if making earrings)
- French hook (if making earrings)
- Jewelry pliers (if making earrings)
- Fabric stiffener (if making earrings)
- I use Stiffy brand and dilute it with water


- I use Stiffy brand and dilute it with water
Gauge:
- G: 4.5” x 4.5” = 19 dcs x 9 rows
(although it’t not entirely critical)
Terms/ stitches used:
- Magic circle
- Ch: chain
- St: stitch
- Slip st: slip stitch
- Sc: single crochet
- Hdc: half double crochet
- Dc: double crochet
- Tr: treble crochet
- Dtr: double treble crochet
Notes:
- Both patterns is worked in the round with a slip st into the first st of the row, until the last row, which is work just part of the way around.
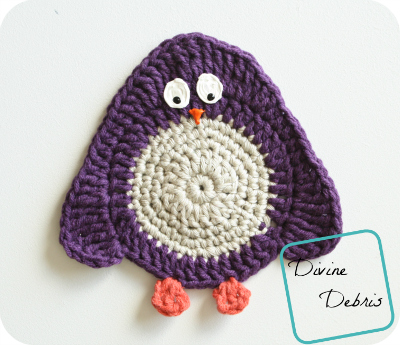
- Color A is the cream, color B is purple, and color C is orange (in the photos for coaster). Earrings are color A is white, color B is blue, and color C is orange.
- The body of the penguin is created first and then the feet are attached. The last step is the eyes and beak.
- For the earrings you can use fabric stiffener to make them hard to the touch, this keeps them from getting all floppy when worn.
- The ch 1 on some rows does not count as a stitch. The ch 2 on some rows does not count as a stitch. The ch 3 on some rows does count as a stitch.
Finished measurements:
- Coaster:
- Height: 5.25″ (foot to top of head)
- Width: 5.25″ (widest point of wing to wing)
- Earrings:
- Height: 1.5″ (foot to top of head)
- Width: 1.5″ (widest point of wing to wing)

Pattern Instructions:
– Applique/ coaster –
With US G (4.00 mm) hook:
Rnd 1: A: Create a magic circle, ch 1, sc 12 times into it, slip st into the first st – 12 scs
Rnd 2: Ch 3 (counts as a dc here and throughout), dc twice into the next st, *dc into the next st, dc twice into the next st,* repeat form * to * 4 more times, slip st into the first st – 18 dcs
Rnd 3: Ch 1, sc once into the same st as join and into the next st, sc twice into the next st, *sc once into the next 2 sts, sc twice into the next st,* repeat from * to * 4 more times, slip st into the first st – 24 scs
Rnd 4: Ch 1, sc once into the same st as join and into the next 2 sts, sc twice into the next st, *sc once into the next 3 sts, sc twice into the next st,* repeat from * to * 4 more times, slip st into the first st – 30 scs
Rnd 5: Ch 1, sc once into the same st as join and into the next 3 sts, sc twice into the next st, *sc once into the next 4 sts, sc twice into the next st,* repeat from * to * 4 more times, slip st into the first st – 36 scs
Fasten off color A.
Rnd 6: B: Ch 3, dc into the same st as join, dc into the next 5 sts, *dc twice into the next st, dc into the next 5 sts,* repeat from * to * 4 more times, slip st into the first st – 42 dcs
Rnd 7: Ch 2 (does not count as a stitch), dc and tr into the same st as join, dtr twice into the next st, tr twice into the next st, tr and dc into the next st, dc and hdc into the next st, hdc into the next 5 sts, dc twice into the next st, dc and tr into the next st, tr twice into the next st, tr and dtr into the next st, dtr into the next st, dtr and tr into the next st, tr twice into the next st, tr and dc into the next st, dc twice into the next st, hdc into the next 5 sts, hdc and dc into the next st, dc and tr into the next st, tr twice into the next st, dtr twice into the next st, dc and tr into the next st, ch 2, slip st into the same st as last dc and tr – 12 dcs, 16 trs, 7 dtrs, 12 hdcs
Fasten off, weave in all your ends.
Feet:
With a new color:
Foot 1:
Create a slip knot on your hook, sc into the 5th st from the last st you made on row 7, ch 2, dc into the same st, ch 2, sc into the same st – 2 scs, 1 dc
Fasten off, weave in your ends.
Skip the next 3 sts.
Foot 2:
Create a slip knot on your hook, sc into the 5th st from the last st you made on row 7, ch 2, dc into the same st, ch 2, sc into the same st – 2 scs, 1 dc
Fasten off, weave in your ends.
Details:
Using the puffy paint, add eyes and a beak. I like using puffy paint for details like that because it gives some fun personality to the design, especially because it’s not perfect, but if you’d rather make eyes (or use buttons) and a beak from thread and glue or sew the on go with that. Make them as big as you would like. When using puffy paint, make sure you tap the tip (cap still on) facing down on a solid surface, this helps to reduce the air bubbles that ruin pretty works. Let the puffy paint dry completely before you add the pupils or use the applique/ coaster. I’ve made that mistake before and it was a mess. A sad, ruined, mess of a project.
– The Earrings –
With 2.25 mm steel crochet hook:

Row 1: A: Create a magic circle, ch 1, sc 12 times into the circle, slip st into the first sc – 12 scs
Row 2: Ch 3 (counts as a dc here and throughout), dc twice into the next st, *dc into the next st, dc twice into the next st,* repeat form * to * 4 more times, slip st into the first st – 18 dcs
Fasten off with this color, weave in your ends.
Row 3: B: Ch 1, sc once into the same st as join and into the next st, sc twice into the next st, *sc once into the next 2 sts, sc twice into the next st,* repeat from * to * 4 more times, slip st into the first st – 24 scs
Row 4: Ch 2 (does not count as a stitch), tr into same space, dc twice into the next st, hdc once into the next st, sc once into the next 3 sts, hdc once into the next st, dc twice into the next st, tr into the next st, dc twice into the next st, hdc once into the next st, sc once into the next 3 sts, hdc once into the next st, dc twice into the next st, tr once into the next st, ch 2 and sl St into same St as the last tr.
Fasten off with this color, weave in all your ends.
Feet:
With 2.00 mm steel crochet hook:
Foot 1:
Create a slip knot on your hook, slip st into the second st from the last st you created on row 4, [ch 2, sc, ch 1, sc, ch 2, slip st into the same st] – this all goes into the same st – 2 scs
Skip the next 2 sts.
Fasten off, weave in your ends.
Foot 2:
Create a slip knot on your hook, slip st into the second st from the last st you created on row 4, [ch 2, sc, ch 1, sc, ch 2, slip st into the same st] – this all goes into the same st – 2 scs
Fasten off, weave in your ends.
Details:
Use diluted fabric stiffener to make the earrings flat as possible. I put them on a plastic wrap or bag and then get them completely saturated, then leave them to dry over night. When they are completely dry, apply the puffy paint eyes and beak. Be sure to tap your puffy paint, with the cap still on, on a flat surface tip down (this helps to reduce the air bubbles that pop and ruin pretty works). Next use your metal jump rings, this is where the pliers come into use, and attach one to the top of the head, then attach another to that. When you’ve got both of your rings attached, attach your french hook and then you’re all set! See, piece of cake!
So, there you go! 2 designs this week, earrings and a applique/ coaster (I’m using it as a coaster for now). I hope you are tagging your photos on IG with #DivineDebris so I can see them, or sharing them on Ravelry.
In other news, I have another design out with The Pattern Pack, my Southwest Necklace. It’s a fun necklace that you can totally do up and make it look complicated and detailed with different colors or you can keep it simple and use fewer. Either way, it’s a fun accessory you can totally use again and again. Right now it’s only available to purchase in the TPP, for more info go here.
Also! The new Viola Convertible Cowl is out right now. I put the whole Viola Line on sale for 50% off (all $2.12) through Jan 15th.
And my testers are hard at work on another convertible cowl pattern, so I should have that released later this week. I hope your new year is going well. Take care!
This post is linked to: The Linky Ladies Community Link Party #33, Hookin’ on Hump Day #110, Rebeckah’s Treasures Saturday Link Party #29.
Tish Melvin
Monday 9th of January 2017
Adorable coasters! Think I'll start my Christmas crocheting really early this year!!
Holiday Decor Crochet Pattern Roundup - Ambassador Crochet | Ambassador Crochet
Thursday 15th of December 2016
[…] Penguin coaster/applique […]
10 Free Crochet Penguin Patterns - Amanda Saladin
Tuesday 13th of December 2016
[…] Pretty Penny Penguin Earrings from Divine Debris […]
Dianne
Monday 14th of November 2016
Making these tomorrow. Too cre. Do you have an elephant earring pattern?
Ellisen
Tuesday 14th of June 2016
Fantastic Perfect Penguins! Thanks so much for sharing. My granddaughter will love them.