
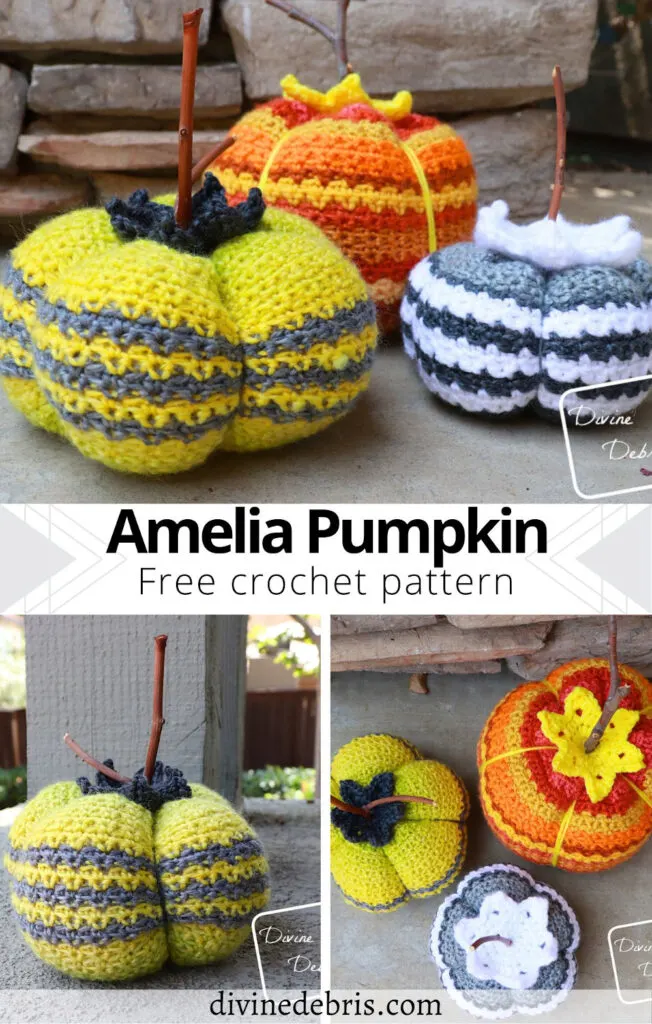
![[Image description] 3 different Amelia Pumpkins (black and white in the center, green and grey on the right, and many oranges on the left) sitting in front of a grey wood pillar and trees.](https://d3gel9wqxksnxm.cloudfront.net/wp-content/uploads/2021/08/Amelia-Pumpkin-1000x756-1.jpg)
The title says it all, I’m going to start celebrating Halloween in August and you can’t stop me. If you follow me on Instagram you know that this is true, as I’ve been talking about Halloween for weeks now (maybe, I haven’t been counting). And to kick off the Falloween season, I’m releasing this year’s pumpkin – the Amelia Pumpkin crochet pattern.
Each year I like to make a pumpkin (click here to see some past pumpkin designs). I’ve been doing this for years and I have quite the collection of pumpkins in my house and I hope you do too. I started to do this because I have always loved Halloween and I love to decorate with my own makes. And for this year I wanted to bring back the texture of the Amelia Pullover from the beginning of the year. It came down to the Amelia and the Alix textures and because the Amelia is more dense it won. Maybe in a bulky yarn the Alix could win… perhaps next year.
Anyway, on to this design – you can make it however you want. I love when you can customize a pattern endlessly and with the Amelia Pumpkin crochet pattern it’s no different. With the body, you can add as many stitches as you’d like to make it wider but just always make sure they’re an odd stitch count. And with the height, the sky is literally the limit, you can keep adding rows until you’re happy. All 3 of the pumpkins in the photos here have small adjustments, different stitch or row counts, to make them unique. You just need to be able to pull the yarn around the outside for them to work and one of my testers said a ch works well for that and I love it. Do a chain for it! It’ll be great.
So, yeah, I hope you are as excited about Halloween designs as I am and I hope you give the Amelia Pumpkin a try.
Have a great week. Wash your hands, wear a mask, be kind to each other, and stay safe.
Please note: I was provided the yarn for this pattern by We Crochet for the purposes of designing the Amelia Pumpkin crochet pattern, with compensation. I wasn’t provided the yarn with the expectations of positive or negative reviews but I always enjoy using this yarn, I’ve used it before. If you purchase yarn through any of the links in this post, I will be compensated.
Copyright @ Divine Debris 2023. No part of this document may be reproduced or transmitted in any form by any means, electronic, mechanical, photocopying, or otherwise, without prior written permission from the author. Sales of finished products are permitted, but the designer requests that you link back to the pattern and credit Divine Debris with the original design under the Creative Commons Attribution-Share Alike license. If you have any questions, comments or concerns please contact info@divinedebris.com.
(this post contains affiliate links)
If you appreciate my weekly patterns I hope you’d consider purchasing an ad-free pdf of this pattern in my Ravelry shop and Lovecrafts shop!
Thank you June for becoming my newest patron on Patreon!
Where to purchase the Amelia Pumpkin crochet pattern


![[Image description] Top down view of 3 different Amelia Pumpkins (black and white in the bottom front, green and grey on the left, and many oranges on the right) on top of cement](https://d3gel9wqxksnxm.cloudfront.net/wp-content/uploads/2021/08/Amelia-Pumpkin-1000x936-1.jpg)
Level
Easy
Materials
- US G (4.00 mm) crochet hook (or hook you need to obtain gauge)
- Size #4/ worsted/ medium weight yarn
- 2 colors
- A: 2 oz/ 122 yds
- B: .5 oz/ 28 yds
- I used Chroma Twist by We Crochet for the green and gray and gray and white pumpkins
- 2 colors
- Notions: scissors, measuring tape, yarn needle
- Poly-Fil/ Stuffing (amount differs)
- Hot Glue and Glue Gun (optional)
- Stick (for stem)
Gauge
- 20 sc x 23 rows = 4”
Terms/ Stitches used
- RS: Right side
- Rnd: Round
- Join
- St: Stitch
- Ch: Chain
- Sc: Single crochet
- BLO/FLO: Back loop/Front loop only
- Hdc: Half double crochet
- Dc: Double crochet
- Picot: picot (explained below)
Notes
- Picot: Ch 3, slip st in the 3rd ch from hook.
- This pattern is worked in one piece, in the round, from the bottom up. When the Pumpkin is complete you will have a tube shape, you will then seam one end closed, stuff the middle, and seam the other end closed. To finish, you will use yarn to create sections around the outside and add the Topper and a stick for the stem.
- The ch-1 at the beginning of the rnds does not count as a stitch.
- This pattern would work well with any weight yarn, just make sure your stitches are good and tight to keep the stuffing from peeking out.
- The multiple of this pattern is 2 + 1 (as your final st count needs to be an odd number).
- In the photos: color A is the larger sections of color (We Crochet’s Chroma Twist in GoGo Boots) and color B is the 3 contrasting stripes (Chroma Twist in Wednesday).
Approx Finished Product Details (may vary by yarn used)
| Height | Width |
| Approx 7” | Approx 4” |
![[Image description] a green and grey Amelia Pumpkins sitting in front of a grey wood pillar and bushes in the background.](https://d3gel9wqxksnxm.cloudfront.net/wp-content/uploads/2021/08/Amelia-Pumpkin-1000x965-1.jpg)
Amelia Pumpkin Crochet Pattern Instructions
Pumpkin
Rnd 1: Ch 71, slip st to form a ring *do not twist this ring*
(RS) Rnd 2: Ch 1, sc into each ch around, join — 71 sc
Rnd 3: Ch 1, turn, sc into the first st, *sc FLO into the next st, sc into the next st,* repeat from * to * the rest of the way around, join — 71 sc
Rnd 4: Ch 1, turn, sc into the first st, *sc BLO into the next st, sc into the next st,* repeat from * to * the rest of the way around, join — 71 sc
Rnds 5 – 16: repeat rnds 3 – 4, 6 times.
Drop color A, attach color B.
Rnds 17 – 18: B: repeat ends 3 – 4, once.
Drop color B, switch to color A.
Rnds 19 – 20: A: repeat ends 3 – 4, once.
Drop color A, switch to color B.
Rnds 21 – 22: B: repeat ends 3 – 4, once.
Drop color B, switch to color A.
Rnds 23 – 24: A: repeat ends 3 – 4, once.
Drop color A, switch to color B.
Rnds 25 – 26: B: repeat ends 3 – 4, once.
Fasten off color B, switch to color A.
Rnds 27 – 42: repeat rnds 3 – 4, 8 times.
Fasten off leaving a tail long enough to weave through every other stitch to close the top.
![[Image description] close up of the "weave back and forth" to start closing one end of the pumpkin](https://d3gel9wqxksnxm.cloudfront.net/wp-content/uploads/2021/08/20210726_155601.jpg)
Closing/Stuffing
Picking up where you left off on the Pumpkin, weave your needle/yarn back and forth through every other stitch until you get all the way around row 42. Pull the piece of yarn until the center closes. You may need to weave your end through more than once, or even sew the hole closed. Flip your piece around, stuff the pumpkin as full as you’d like. To seam the other end closed, use a long piece of yarn (long enough to weave around the pumpkin) and your needle to weave back and forth through every other stitch all the way around row 2. Pull the ends tight until the hole closes, you may need to sew it closed on this side too.
![[Image description] close up of a white woman's hand closing the bottom of the Amelia Pumpkin](https://d3gel9wqxksnxm.cloudfront.net/wp-content/uploads/2021/08/20210726_155734.jpg)
Creating the sections
Using another long piece of yarn or chains if you need something sturdier (the length will depend on your pumpkin’s size), secure it to the top of your pumpkin (however you’d like) and run the yarn along the outside of your pumpkin, securing it to the bottom (row 2) while pulling the yarn tight. Do this as many times as you’d like (5 times is shown in the photos) to create the sections on the outside of your pumpkin. You can also feed the needle through the center of the pumpkin and then run the yarn along the outside of the pumpkin, then back through the center. It may be difficult to get the yarn tight enough to create the sections but you can use glue on the bottom of the pumpkin to pull the yarn tighter or run yarn over the sections multiple times to reinforce the yarn.
Fasten off your yarn and weave in your ends.
Topper
Rnd 1: B: Create a magic circle (or ch 1 if you don’t like the MC), ch 1, sc 12 times into the circle, join — 12 sc
Rnd 2: Ch 1, hdc into the first st, hdc twice into the next st, *hdc into the next st, hdc twice into the next st,* repeat from * to * the rest of the way around, join — 18 hdc
Rnd 3: Ch 1, hdc into the first st, hdc into the next st, [hdc, ch 2, hdc] into the next st, *hdc into the next 2 sts, [hdc, ch 2, hdc] into the next st,* repeat from * to * the rest of the way around, join — 24 hdc, 6 ch-2 spaces
Rnd 4: Ch 1, slip st into the first st, slip st into the next st, sc into the next st, [hdc, dc, picot, dc, hdc] into the ch2 space, *sc into the next st, slip st into the next 2 sts, sc into the next st, [hdc, dc, picot, dc, hdc] into the ch2 space, sc into the next st,* repeat from * to * the rest of the way around, join — 12 sc, 12 hdc, 12 dc, 6 picots
Finishing
Sew or glue your Topper to the top (Row 42) of the closed and segmented Pumpkin and then attach a stick to the center of the Topper to act as the pumpkin’s stem.
![[Image description] 3 different Amelia Pumpkins (black and white in the center, green and grey on the left, and many oranges on the right_ sitting in front of a stone background and cement floor](https://d3gel9wqxksnxm.cloudfront.net/wp-content/uploads/2021/08/Amelia-Pumpkin-1000x757-1.jpg)

Rue
Saturday 25th of September 2021
Why does the pumpkin I’m making not look like the picture at all? The instructions say you will use a 1/2 double, double & pico stitch but these aren’t use.
Divine Debris
Saturday 25th of September 2021
I don't know why your pumpkin looks weird. I'd make sure you're doing the texture correctly and have the right side facing you? And hdc, dc, and picot are used but not until the Topper section. I hope that helps!