

Hello there, how is your week going? I feel like I’m perpetually under-caffeinated BUT I have watched The Addams Family, Hocus Pocus, and Practical Magic this last week – so I’m doing pretty good. 😀 It’s that mind frame that’s got me making these adorable earrings that I really hope you love. I wanted to show how ready I am for Fall to everyone that sees me on the street and instead of wearing a sign “I’m ready for Fall, ask me about it!” I opted for earrings. Ok, I’m kidding, I don’t wear a sign but my pumpkin spice latte and Wednesday Addams t-shirt probably gives off the particular vibe I’m going for.
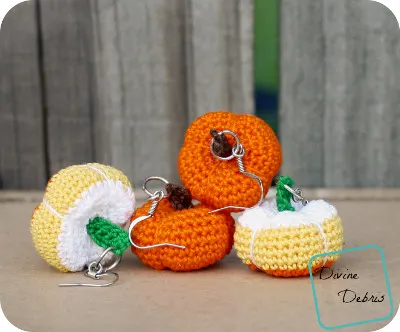
Anyway, enough about my style. These earrings are super easy to make but I do caution you, working with tiny hooks and thread can be hard on the hands – mine needed a break after the first pair I made. I switched up the second pair to be candy corn colored for a friend of mine. But if you’re determined, you could make these earrings in one night and be ready to rock your Fall decor by Wednesday. 😀 I really hope you like this design and give it a try. Also try it out with WW yarn and a size G hook, you could make a tiny pumpkin that’s simple and sweet.
You can purchase an ad-free downloadable pdf for this pattern in my Ravelry shop.
Materials
- US 1.80 mm steel crochet hook
- Size 10 crochet thread
- Less than 1 oz/ 50 yds
- 2 colors
- I used Aunt Lydia’s Crochet Thread
- A needle that will weave in your ends
- Ami stuffing
- Jump rings
- Metal french hooks
- Jewelry pliers
Gauge
- 9 rows x 10 scs = 1″
- The gauge isn’t wildly necessary, just make sure your tension is so that your stitches are tight enough that you can’t see the stuffing.


Terms/stitches used
- Magic circle
- Ch: chain
- St: stitch
- Slip st: slip stitch
- Sc: single crochet
- Sc2tog: single crochet 2 stitches together
Notes
- This pattern is worked in the round, with a slip st into the first st from the last st.
- This pattern is worked from the bottom up in 2 sections: the pumpkin and the stem. When you finish the main body of the pumpkin you will use a length of thread and run it through the center and around the outside to create the sections of pumpkin, like in my Fun Fall Pumpkins pattern. The stem is sewn to the top of the pumpkin in the photos but feel free to glue it or use a twig if you have one handy.
- The ch 1 at the beginning of the row does not count as a stitch.
- I suggest the use of the invisible sc2tog for this pattern.
- Color A is orange and color B is brown.
Finished directions
|
|
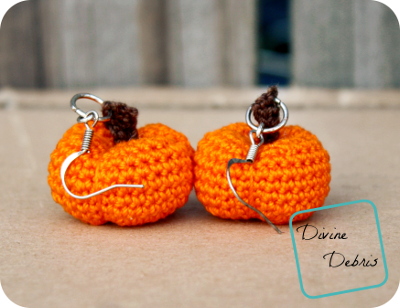
Stuffed Pumpkins Earrings free crochet pattern by DivineDebris.com
Stuffed Pumpkins Earrings Pattern instructions
-Pumpkin-
Row 1: A: Create a magic circle, ch 1, sc 6 times into the circle, slip st into the first st – 6 scs
Row 2: A: Ch 1, sc twice into the same st as join, sc twice into the next 5 sts, slip st into the first st – 12 scs
Row 3: A: Ch 1, sc twice into the first st, sc into the next st, *sc twice into the next st, sc into the next st,* repeat from * to * 4 more times, slip st into the first st – 18 scs
Row 4: A: Ch 1, sc twice into the first st, sc into the next 2 sts, *sc twice into the next st, sc into the next 2 sts,* repeat from * to * 4 more times, slip st into the first st – 24 scs
Row 5: A: Ch 1, sc twice into the first st, sc into the next 3 sts, *sc twice into the next st, sc into the next 3 sts,* repeat from * to * 4 more times, slip st into the first st – 30 scs
Rows 6 – 10: A: Ch 1, sc into the same st as join and into the next 29 sts, slip st into the first st – 30 scs
Row 11: A: Ch 1, sc into the same st as join and into the next 2 sts, sc2tog the next 2 sts, *sc into the next 3 sts, sc2tog the next 2 sts,* repeat from * to * 4 more times, slip st into the first st – 24 scs
Note: stuff your pumpkin now, because it might be harder to do so in a couple rows. You don’t need it to be super full, because you’ll be squishing it down a bit with the sectioning.
Row 12: A: Ch 1, sc into the same st as join and into the next st, sc2tog the next 2 sts, *sc into the next 2 sts, sc2tog the next 2 sts,* repeat from * to * 4 more times, slip st into the first st – 18 scs
Row 13: A: Ch 1, sc into the same st as join sc2tog the next 2 sts, *sc into the next st, sc2tog the next 2 sts,* repeat from * to * 4 more times, slip st into the first st – 12 scs
Row 14: A: Ch 1, sc2tog the next 2 sts, *sc2tog the next 2 sts,* repeat from * to * 4 more times, slip st into the first st – 6 scs
Leave a long tail, at least 10″, before fastening off on the pumpkin. Use this tail to weave from the top of the pumpkin down through the center and around the side of the pumpkin. I did this 4 times, because these are just tiny pumpkins, but you can do it more or less if you want. Weave in your ends.
– Stem –
Row 1: B: Ch 5, sc into the second ch from the hook and across – 4 scs
Row 2: B: Ch 1, sc into the next 4 sts – 4 scs
Fasten off and use your tail to attach the stem to the top of your pumpkin. Weave in your ends. You could use glue if you’d prefer and/ or a twig. It’s totally up to your creativity!
– Finishing –
When you’ve got your pumpkin all put together, attach some jump rings to the top of your stem and your french hook to those rings so you can wear them proudly.
Tada! There’s the super simple and fun pattern I hope you love. See ya next week.
This post is linked to Hookin’ on Hump Day #151.
Carrie
Sunday 3rd of September 2023
My sister and my mother will soon be sporting pairs of these cutie wee pumpkins. Thank you so much for sharing the pattern with us. You have some other cuties that I'm about to go check out too. Have an awesome day.
Conchi
Sunday 10th of October 2021
Muy divertidos, los voy a hacer, me encantan!!! Gracias por el patrón.
Divine Debris
Thursday 21st of October 2021
I'm so glad you like them!
Angela taylor
Wednesday 27th of September 2017
I love your cute little veggies hope you don't mind but I'm going to use a thicker yarn and different colours to make key rings for my buddies 😘