
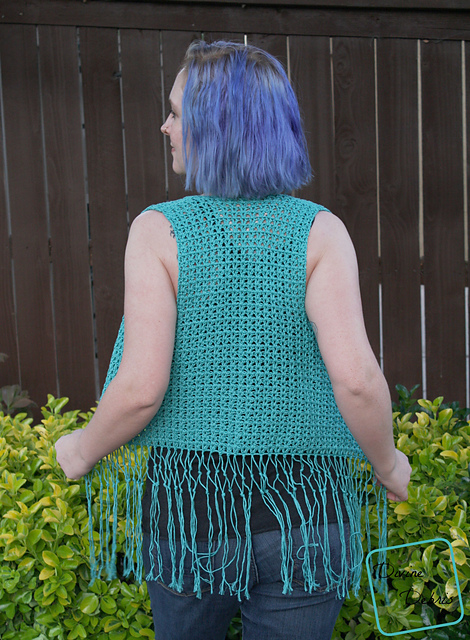
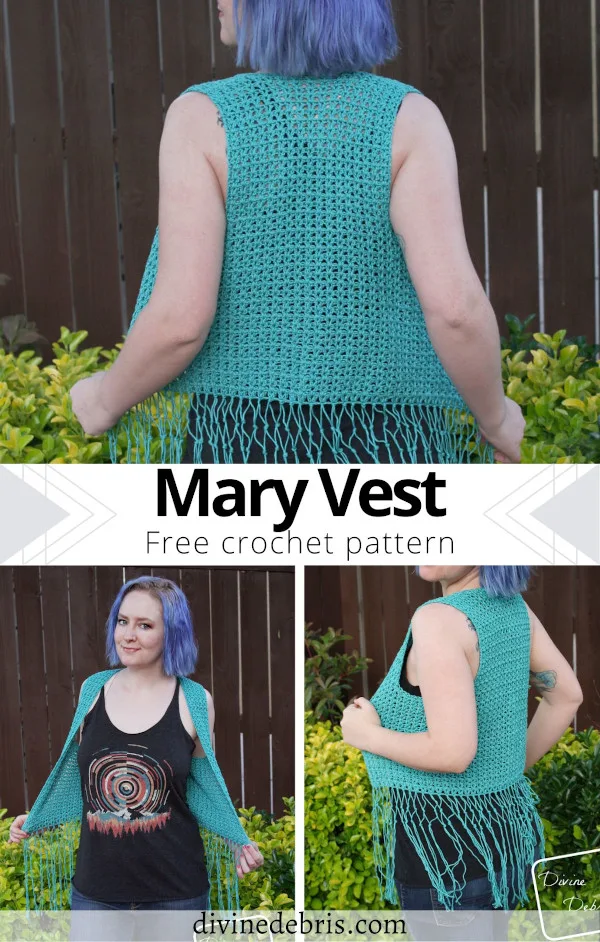
Happy May everyone! I hope you’re ready for some warmer weather… I know I am. I mean, I really am – this is my second vest pattern (the first was the Miriam Vest) in the last couple months because I’m ready to go suns-out guns-out but also I like to take a little crochet with me. Ha!
I’m actually so excited to finally publish this pattern. I’ve had it on my hook for a while and I have been in love with it since I started working with this yarn (which isn’t available right now… sorry, I was told it would be out before this post went live but that is not the case. I will update this post when the yarn becomes available). I wanted something with a little personality and a lot of fun to it (hello fringe, does both things quite well). I’m even going to wear it to a beer festival I’m going to at the end of the month. Where would you wear it?
Anyway… I tried to include as many photos below for the fringe as possible so that it makes sense for you when you work it up. But the fringe is not necessary for you to make an awesome vest. You can also make it longer by making the Body section taller before moving onto the Straps/Upper Back sections (as noted in the pattern) – so there’s a lot of room to customize in this design.
I hope you love this pattern I can’t wait to see your photos! Remember to tag DivineDebris on IG so I can see them~
This post is linked to Hookin’ on Hump Day #190
(This post may contain affiliate links)
If you appreciate my weekly patterns I hope you’d consider purchasing an ad-free pdf of this pattern in my Ravelry shop.
Thank you to all my awesome patrons on Patreon!


Language
America English
Level
Intermediate (need to know how to read a pattern for a garment, make a gauge swatch, and block)
Materials
- US I (5.50 mm) crochet hook
- Size #3 light weight/DK yarn
- I used Mary Maxim Simply Natural
- Specifics listed in the Finished product dimensions section
- Yarn needle
Gauge
- 8 rows x 13 dc =4″
- 7 v-stitches x 9 rows = 4” (steamed and blocked)
Terms/ Stitches used
- RS: right side
- Ch: chain
- St: stitch
- Dc: double crochet
- VS: V stitch
Notes
- VS: *dc twice* worked into the same stitch. When you work back into this stitch you will work into the space between the 2 dcs from the previous row.
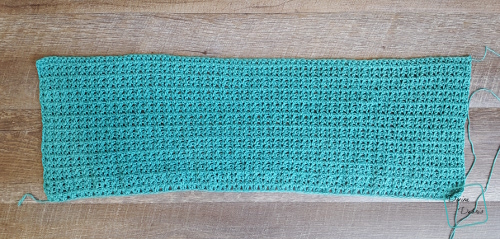
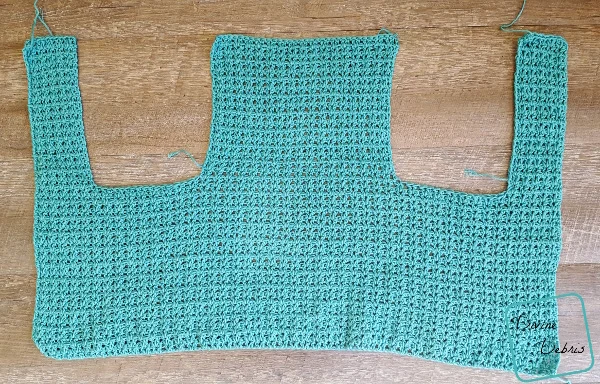
- This pattern is worked in 3 sections: the Body, the Upper-Back, and the Straps.
- The ch 3 at the beginning of the rows does count as a stitch.
- The sample is medium and was made using Mary Maxim Simply Natural in Jamaica Bay.

Finished product dimensions (measurements may vary by gauge and yarn used)
| Small | Medium | Large | XL | 2X |
| Across: 25″ Height: 17″ Fits Chest: 32″ – 34″ Yarn: 5 oz/350 yds | Across: 27″ Height: 17″ Fits Chest: 36″ – 38″ Yarn: 5.5oz/385 yds | Across: 29″ Height: 17″ Fits Chest: 40″ – 42″ Yarn: 5.8 oz/406 yds | Across: 31″ Height: 21″ Fits Chest: 44″ – 46″ Yarn: 6.5 oz/455 yds | Across: 33″ Height: 21″ Fits Chest: 48″ – 50″ Yarn: 7 oz/490 yds |
Mary Vest Pattern Instructions
Body
Sizing as follows: SM (MD, LG, 2X, 3X)
Row 1: Ch 89 (95, 103, 109, 117), skip 4 chs (counts as a dc + skipping 1 st), *VS, skip the next st,* repeat from * to * 41 (44, 48, 51, 55) more times, dc into the last st – 42 (45, 49, 52, 56) VS, 2 dc (all sizes)
Rows 2 – 22: Ch 3 (counts as a dc here and throughout), turn, *skip the next dc, VS into the space between the 2 dcs from the previous row’s VS, skip the next dc,* repeat from * to * 41 (44, 48, 51, 55) more times, dc into the last st – 42 (45, 49, 52, 56) VS, 2 dc (all sizes)
Do not fasten off, move into your First Strap.
Note: if you’d like your piece to be longer on your body, add more rows here before moving onto the Straps and Upper Back.
For XL and 2X
Rows 23 – 27: Ch 3, turn, *skip the next dc, VS into the space between the 2 dcs, skip the next dc,* repeat from * to * 51 (55) more times, dc into the last st – 52 (56) VS, 2 dc (both sizes)
Do not fasten off, move onto your First Strap.
Note: if you’d like your piece to be longer on your body, add more rows here before moving onto the Straps and Upper Back.

First Strap
Row 1: Ch 3, turn, *skip the next dc, VS into the space between the 2 dcs from the previous row’s VS, skip the next dc,* repeat from * to * 4 (all sizes) more times, dc into the next st – 5 VS (all sizes), 2 dc (all sizes)
Rows 2 – 18: Ch 3, turn, *skip the next dc, VS into the space between the 2 dcs from the previous row’s VS, skip the next dc,* repeat from * to * 4 (all sizes) more times, dc into the next st – 5 VS (all sizes), 2 dc (all sizes)
For sizes Small – Large fasten off leaving a very long tail (you will use this to secure your strap to your Upper Back section).
For XL and 2X
Rows 19 – 23: Ch 3, turn, *skip the next dc, VS into the space between the 2 dcs from the previous row’s VS, skip the next dc,* repeat from * to * 4 (both sizes) more times, dc into the next st – 5 VS (both sizes), 2 dc (both sizes)
Fasten off leaving a very long tail (you will use this to secure your strap to your Upper Back section).

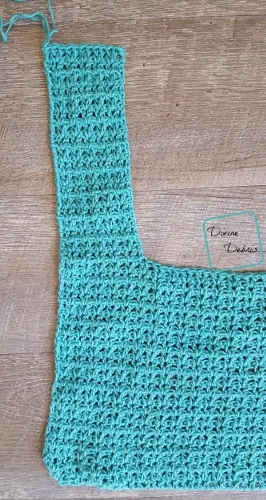
Upper Back
Row 1: From where you stopped on row 1 for your First Strap, skip the next unworked dc, skip the next 7 (7, 7, 10, 10) VS, and skip the next dc st, dc into the next st, *skip the next dc, VS into the space between the 2 dcs from the previous row’s VS, skip the next dc,* repeat from * to * 13 (16, 20, 17, 21) more times, dc into the next st – 14 (17, 21, 18, 22) VS, 2 dc (all sizes)
Rows 2 – 18: Ch 3, turn, *skip the next dc, VS into the space between the 2 dcs from the previous row’s VS, skip the next dc,* repeat from * to * 13 (16, 20, 17, 21) more times, dc into the next st – 14 (17, 21, 18, 22) VS, 2 dc (all sizes)
Fasten off for sizes Small – Large.
For XL and 2X
Rows 19 – 23: Ch 3, turn, *skip the next dc, VS into the space between the 2 dcs from the previous row’s VS, skip the next dc,* repeat from * to * 17 (21) more times, dc into the next st – 18 (22) VS, 2 dc (both sizes)
Fasten off.
Second Strap
Row 1: From where you stopped on row 1 for your Upper Back, skip the next unworked dc, skip the next 7 (7, 7, 10, 10) VS, and skip the next dc st, dc into the next st, *skip the next dc, VS into the space between the 2 dcs from the previous row’s VS, skip the next dc,* repeat from * to * 4 (all sizes) more times, dc into the next st – 5 VS (all sizes), 2 dc (all sizes)
Rows 2 – 18: Ch 3, turn, *skip the next dc, VS into the space between the 2 dcs from the previous row’s VS, skip the next dc,* repeat from * to * 4 (all sizes) more times, dc into the next st – 5 VS (all sizes), 2 dc (all sizes)
For sizes Small – Large fasten off leaving a very long tail (you will use this to secure your strap to your Upper Back section).
For XL and 2X
Rows 19 – 23: Ch 3, turn, *skip the next dc, VS into the space between the 2 dcs from the previous row’s VS, skip the next dc,* repeat from * to * 4 (both sizes) more times, dc into the next st – 5 VS (both sizes), 2 dc (both sizes)
Fasten off leaving a very long tail (you will use this to secure your strap to your Upper Back section).

Seaming
Secure the tops of your straps with the first 12 and last 12 sts of the Upper Back piece using your preferred method of seaming.

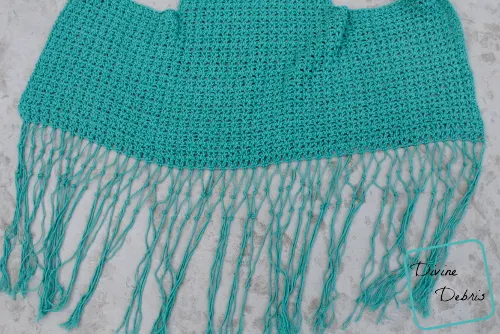
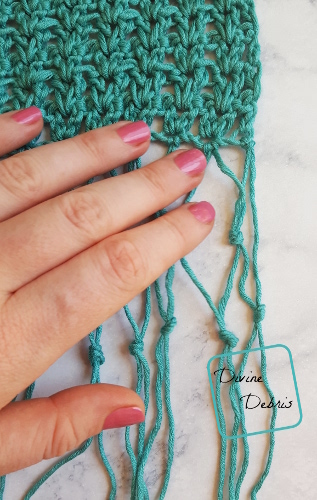
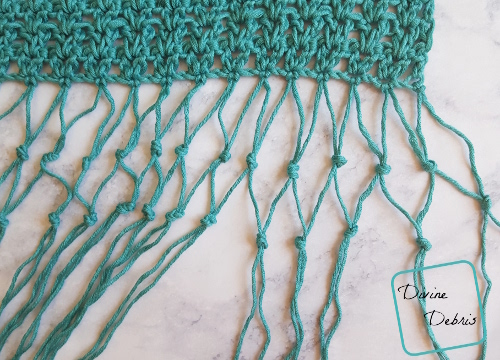
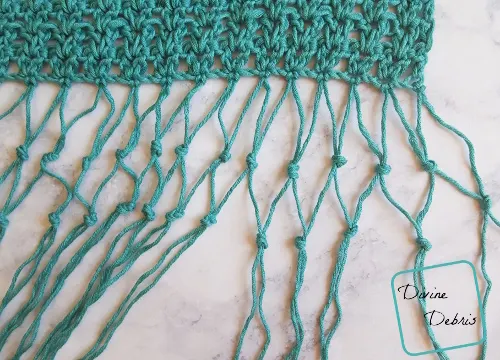
Fringe
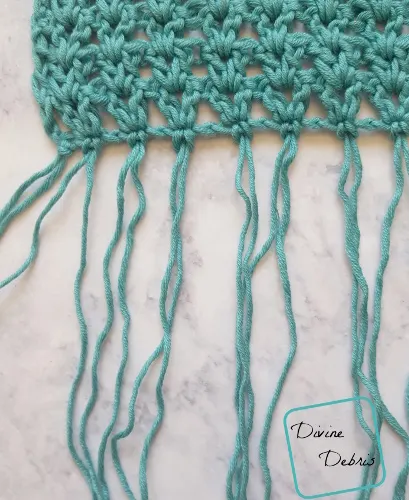
Cut 44 (47, 51, 53, 58) 20″ pieces of yarn (you need 1 for each VS and the end dcs for the opposite side of your first row). Fold the yarn in half, use your hook to pull the loop end of your yarn through the other side of your st (each VS and the end dcs), pull the loose ends of your fringe through your loop and then pull the loose ends until the loop tightens around the st.

To create the knot detail:
Row 1: skip the first loose strand, * knot together the next 2 loose strands about 1.5″ from the Body piece,* repeat * to * across until you get to the last strand (which you will leave alone for this row).

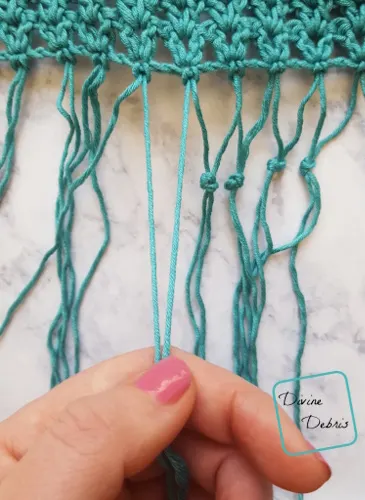
Row 2: Use the first 2 strands to create a knot about 1″ – 1.5″ from the last row’s knots, *using the next 2 strands, create a knot about 1″ – 1.5″ from the last row’s knots,* repeat * to * across.


Val
Tuesday 5th of March 2024
Love it..simple and nice ..not too much pieces to crochet...I think I'll be my summer project...thanks
Mary DeWolf
Thursday 25th of July 2019
Hi, Love this vest! Question though, is the V stitch just 2 double crochets in the same stitch or is it 1 double crochet, chain 1, 1 double crochet in the same stitch? Can't wait to make this beautiful vest, thank you!
Divine Debris
Monday 5th of August 2019
The V stitch is 2 dc stitches worked into the same st. When you work back into this stitch, you're working into the space between the dcs. Hope that makes sense and helps