
Look at that, it’s 2019! I mean, I know that my last post was on 2019 but it hadn’t fully started to sink in. Now I’m feeling the new year. It’s hard to explain, ya know? That the new year is here and real. Back in December I spent a lot of time thinking about 2018 and all the things I did, the things I didn’t do, and the things I wish went better. All that was nice but now that 2019 is here, I’m feeling like I need to be better and it’s already stressing me out. Ha! Not that it takes a lot to stress me out. I stay stressed out.
But now I’m thinking about how to be better, how to hit some goals that make me feel like I’m good at this and that I’m progressing. I don’t want to stay comfortable, I want to keep moving forward and become someone I can be proud of. I watched Julie and Julia yesterday while working… maybe a movie about my blogging experience? Nah, that would be boring. With more breakdowns than Julie had in the movie (sometimes I just cry to get all the extra emotions out of my body).
Dunno.
I am going to stop yapping on, as I keep seeing people complain about food bloggers who talk about their lives before recipes so I’ve been feeling self-conscious about my little “about me” portions of my posts before you get to the good stuff (the pattern). Although, a person does make a blog and they share personal experiences – it’s a part of the existence, ya know?
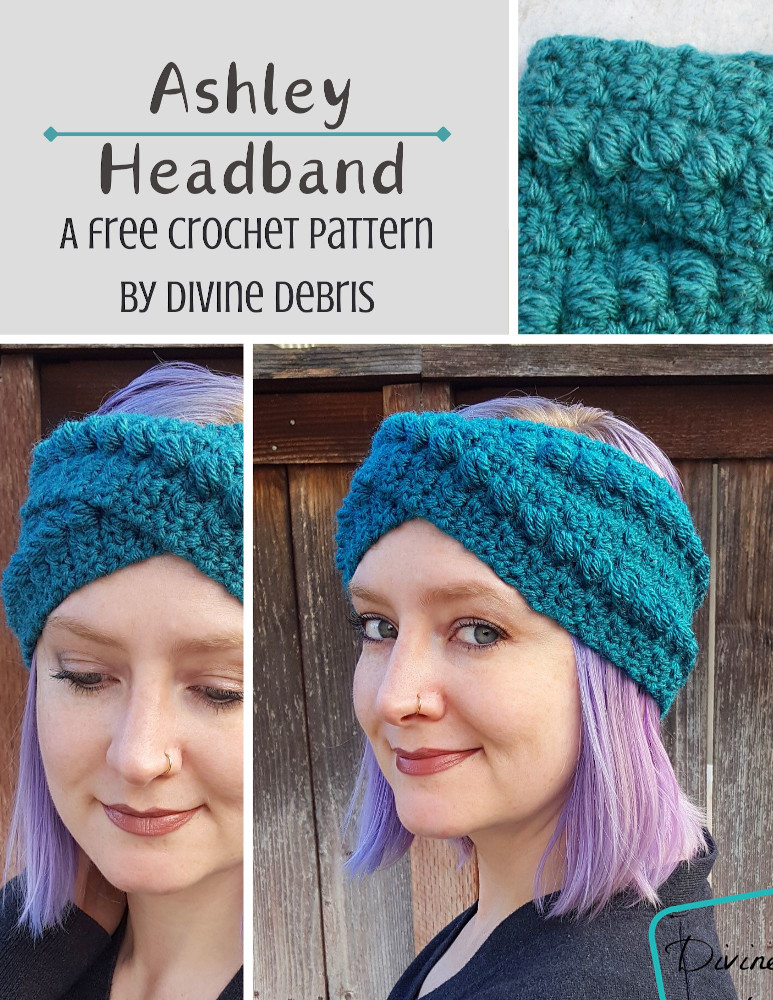
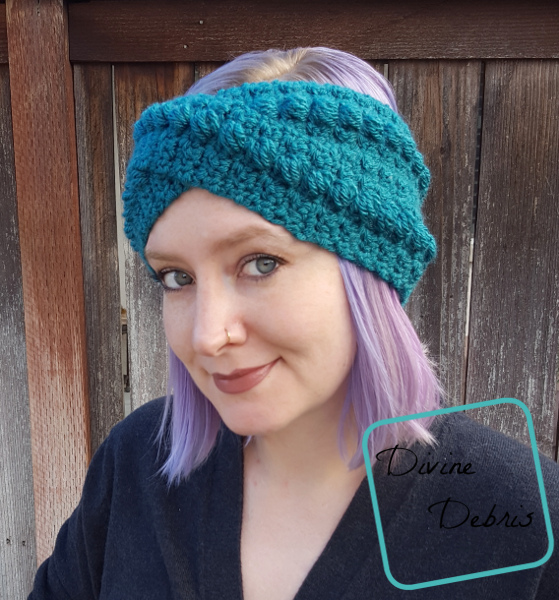
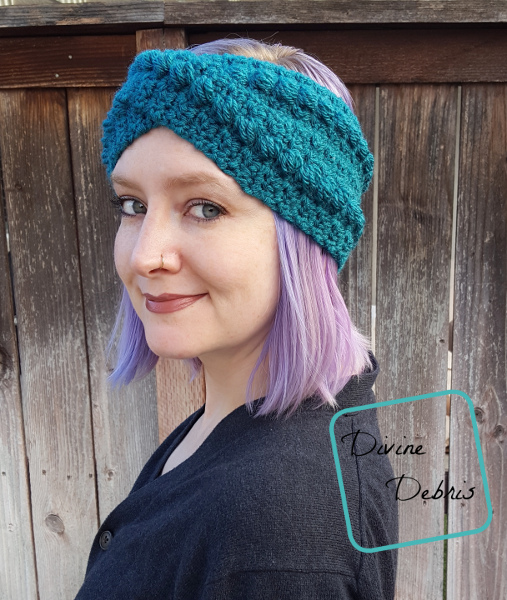
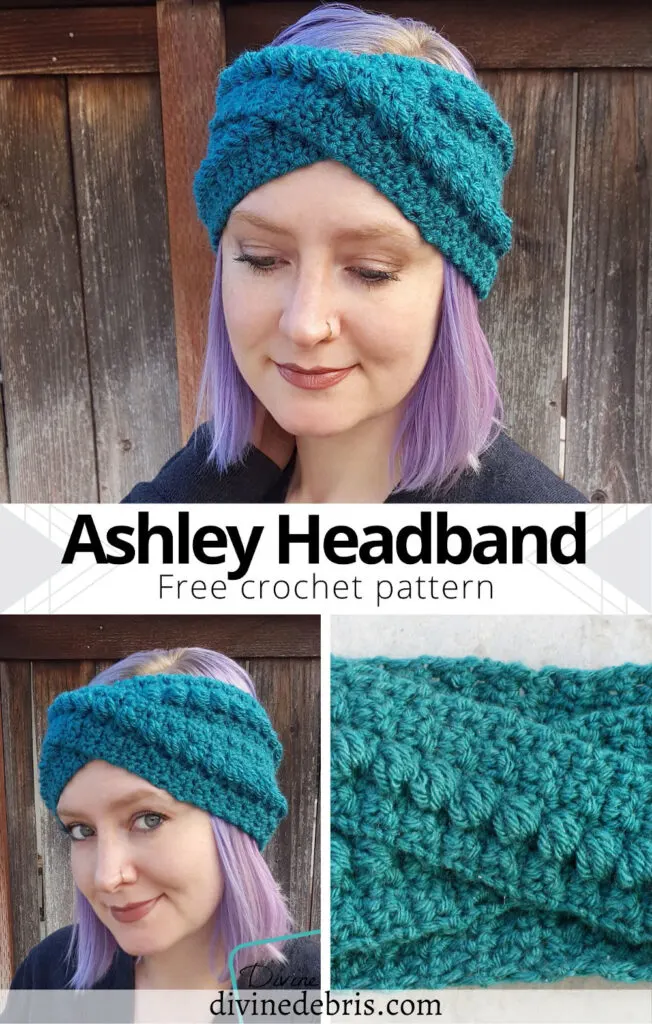
So. Yeah. Today’s post is a fun and quick pattern I really hope you like. I was seeing so many fantastic twisty headbands on the internet that I wanted to make one of my own! I don’t often like to take trend advice from people (I’m tragically trendy and all) but I wanted to see if I could make this pattern in a very “me” way. I don’t know if I accomplished it but I do like the way the twist works out, with the different pieces, and how easy it is to slip on my head. It’s a pretty decent walking/hiking headband if I do say so myself. And it’s a real quick project. I made this in one night. It took longer to write the pattern than it did to make it. 😀
Copyright @ Divine Debris 2023. No part of this document may be reproduced or transmitted in any form by any means, electronic, mechanical, photocopying, or otherwise, without prior written permission from the author. Sales of finished products are permitted, but the designer requests that you link back to the pattern and credit Divine Debris with the original design under the Creative Commons Attribution-Share Alike license. If you have any questions, comments or concerns please contact info@divinedebris.com.
This post contains affiliate links. If you purchase yarn through any of the links in this post, I may be compensated.
If you appreciate my weekly patterns I hope you’d consider purchasing the Ashley Headband crochet pattern in an ad-free pdf of this pattern in my Ravelry shop.


Where to purchase the Ashley Headband Crochet Pattern

A HUGE thank you to all my patrons on Patreon!
Thank you to all my Patreon supporters.

Language
- American English
Level
- Easy
Materials
- US J (6.00 mm) crochet hook
- Worsted/ medium/ size #4 weight yarn
- I used Vanna’s Choice
- Yarn needle
Gauge
- 12 hdc x 9 rows =4″
Terms/stitches used
- RS: right side
- Ch: chain
- St: stitch
- Sc: single crochet
- HDCPuff (explained below)
- Dc: double crochet
Notes
- HDCPuff: *yarn over, insert your hook into the specified st, pull up a loop,* repeat from * to * 3 more times, yarn over, pull through all 9 loops on your hook.
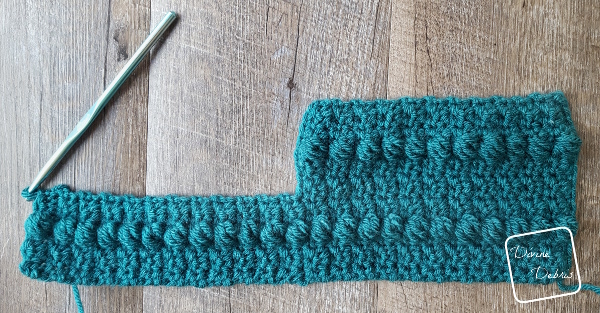
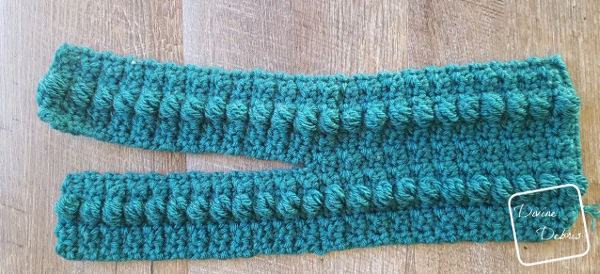
- This pattern is worked in 3 sections (Section 1, Twist Section, Section 2), in rows with a turn at the beginning of the row. You will make Section 1 first, move on to the two pieces in the Twist Section, and then work on Section 2 (which will be worked onto both pieces of the Twist Section). You will seam the last row to your first row to complete your headband.
- The ch-3 at the beginning of some of the rows does count as a stitch.
- The ch-1 at the beginning of some of the rows does not count as a stitch.
- You’re going to need to know how to create a slipknot on your hook for this pattern.
- This pattern is purposely asymmetrical.
- This pattern was made using Vanna’s Choice yarn in Peacock.
Finished product dimensions (approx)
Height 4.5″
Diameter (when laid flat): 10.5″ – 11″
Ashley Headband Pattern instructions
Section 1
(RS) Row 1: Ch 17, sc into the second ch from the hook and into the next 15 sts – 16 sc
Row 2: Ch 3 (counts as a dc here and throughout), turn, sc into the next st, dc into the next st, sc into the next st, HDCPuff into the next st, *sc into the next st, dc into the next st,* repeat from * to * twice more, HDCPuff into the next st, *dc into the next st, sc into the next st,* repeat from * to * once more – 7 dc, 7 sc, 2 HDCPuff sts
Row 3: Ch 1, turn, sc into the next 16 sts – 16 sc
Row 4 – 23: repeat rows 2 – 3, 10 times
Twist Section
Note: this section will be worked 2 pieces. The first piece you will only work half of the row until you have 46 rows, then you’ll fasten off. The second piece you will work the other 8 sts you didn’t work into on row 23, for 46 rows, then you’ll fasten off. Then you will lay Piece 2 on top of Piece 1 and continue to Section 2.
Piece 1
Row 24: Ch 3, turn, sc into the next st, dc into the next st, sc into the next st, HDCPuff into the next st, sc into the next st, dc into the next st, sc into the next st – 3 dc, 4 sc, 1 HDCPuff st
Row 25: Ch 1, turn, sc into the next 8 sts – 8 sc
Rows 26 – 45: repeat rows 24 – 25, 10 times
Row 46: Ch 3, turn, sc into the next st, dc into the next st, sc into the next st, HDCPuff into the next st, sc into the next st, dc into the next st, sc into the next st – 3 dc, 4 sc, 1 HDCPuff st
Fasten off, weave in your ends.
Piece 2
Begin on the unworked sts from row 23 of Section 1.
Row 24: Create a slipknot on your hook, dc into the next st, sc into the next st, dc into the next st, HDCPuff into the next st, dc into the next st, sc into the next st, dc into the next st, sc into the next st – 4 dc, 3 sc, 1 HDCPuff st
Row 25: Ch 1, turn, sc into the next 8 sts – 8 sc
Rows 26 – 45: repeat rows 24 – 25, 10 times
Row 46: Ch 3, turn, sc into the next st, dc into the next st, HDCPuff into the next st, dc into the next st, sc into the next st, dc into the next st, sc into the next st – 3 dc, 4 sc, 1 HDCPuff st
Fasten off, weave in your ends.

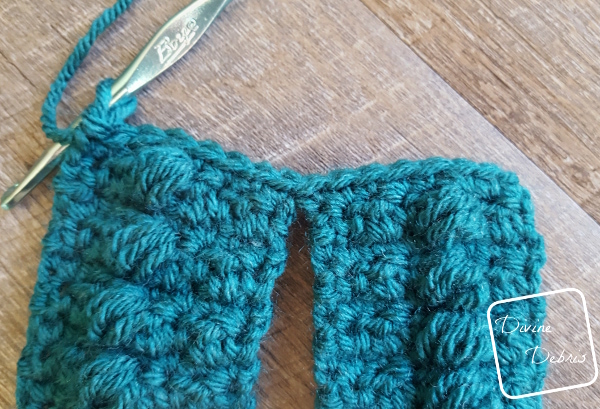
Section 2
Flip the 2 pieces from the Twist Section so that Piece 2 lays on top of Piece 1 with the Right Side facing you (as seen in the photo above).
(RS) Row 47: Create a slipknot on your hook, sc into the 8 sts from Piece 2, sc into the 8 sts from Piece 1 – 16 sc
Row 48: Ch 3, turn, sc into the next st, dc into the next st, HDCPuff into the next st, *dc into the next st, sc into the next st,* repeat from * to * 3 more times, HDCPuff into the next st, sc into the next st, dc into the next st, sc into the next st – 7 dc, 7 sc, 2 HDCPuff sts
Row 49: Ch 1, turn, sc into the next 16 sts – 16 sc
Rows 50 – 67: repeat rows 48 – 49, 9 times
Row 68: Ch 3, turn, sc into the next st, dc into the next st, HDCPuff into the next st, *dc into the next st, sc into the next st,* repeat from * to * 3 more times, HDCPuff into the next st, sc into the next st, dc into the next st, sc into the next st – 7 dc, 7 sc, 2 HDCPuff sts
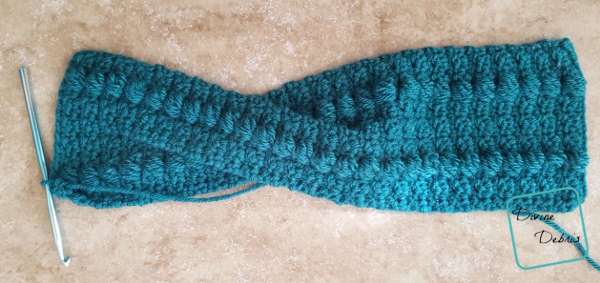
Fasten off leaving a very long tail. Use your tail to secure row 68 to row 1. If you want this headband to be smaller, feel free to omit rows. For a 10″ headband, stop at row 66 (for example).
Weave in all your ends.
Tada! There it is, the Ashley Headband crochet pattern I really hope you like this design and make a bunch of them and tag me on your photos!
See ya next week <3

Fifi
Friday 12th of June 2020
Hello from Australia! I'm about to make this cute little number and wanted to ask you first - would it work if it was narrower? Say 3.5 inches instead of 4.5? And if I do try for a narrower version, is there any stitch counting/ math or formula I should follow to avoid running into trouble? Or can I just chain fewer stitches at the beginning (say, 13?) and it'll work out fine?
Thanks so much for your advice in advance :)
Divine Debris
Wednesday 17th of June 2020
No specific formula, I did an odd amount of sts but you could probably make the pattern with any stitch number. :)
Jo Coombs
Saturday 29th of February 2020
Thank you for sharing this pattern.
L
Thursday 12th of December 2019
If I want the headband to be larger, would I add more rows to section 2 as needed? Or do I need to add from the beginning?
Divine Debris
Friday 13th of December 2019
If you want to make the headband wider around I would add rows evenly on sections 1 and 2 so that they're still symmetrical
Wendy Lindberg
Monday 18th of November 2019
Row 25: Ch 1, turn, sc into the next 8 sts – 8 sc Stuck on here
Rayna
Tuesday 29th of September 2020
I’m stuck the row before that. Why is there a cluster at the end
Divine Debris
Tuesday 19th of November 2019
Can you tell me what exactly you are having a problem with? The Twist section is worked in 2 parts, as the photos row, so when you work only 8 sts, it's to make the first piece. Then you go back to rows 24 - 46 and make the second piece on the unworked sts from row 23.
Hope that helps!
Amber
Marsha Elaine Dean
Sunday 10th of November 2019
I am not sure what I am missing but I am missing something. I do not understand how I get the longer pice on the twist once I have completed row 23. When I follow the directing my twist does not extend like the picture shows. Please advise me what I am doing wrong. Thank you.
Rayna
Tuesday 29th of September 2020
Me too. There is a misprint somewhere. I have had to work it out for myself.
Divine Debris
Sunday 10th of November 2019
Hi! For the Twist section you make two pieces, both rows 24 - 46, and then you lay one part over the other and then continue to the final section. Once piece is not longer than the other, they're both the same size. I hope that helps.
Take care, Amber