
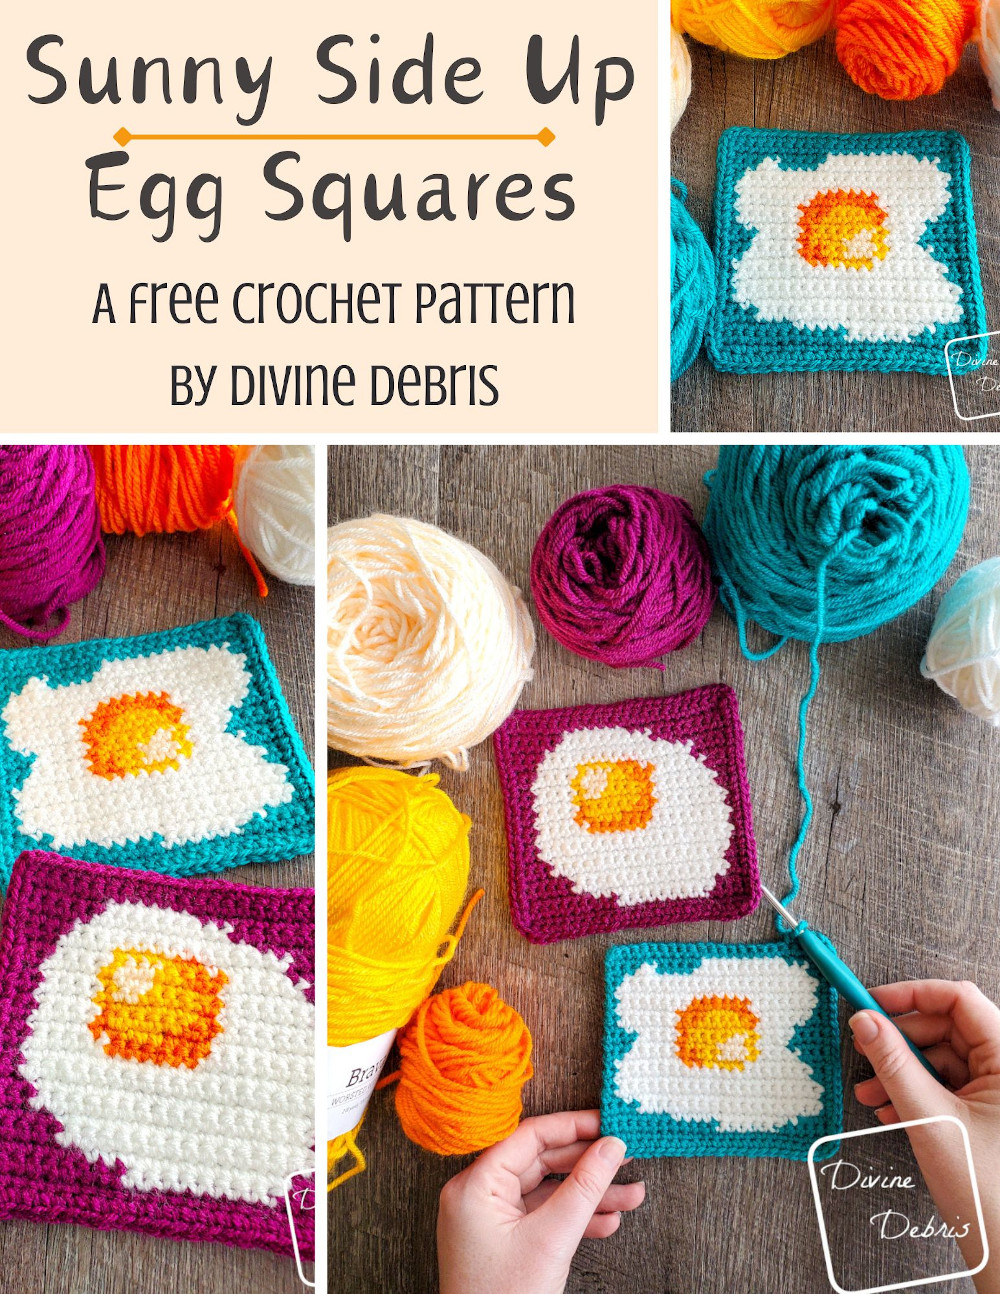
What’s your favorite breakfast food? For me, I love some good ol’ fashioned french toast. But I couldn’t figure out how to make a super cute square out of that (not yet any way, because I am working on it) so I decided to try out a different breakfast food – the classic egg. And this week I’ve got a couple of fun designs for you in the form of the Sunny Side Up Egg Squares.
If you’ve been following my crochet journey for a while you know that I love to make a crochet square/ coaster pattern. I love how fast they work up, what great stash busters they are, and they’re just fun projects to make in-between larger wips. And I’ve been moving this last month (hopefully this is the last one for a while) so I thought I’d keep the designs to an easy size and thought I needed an extra dose of fun (IMO I always need more fun). And so these silly egg themed coasters were born.
Using Stitch Fiddle I designed these squares but it took some time to get them right. I was worried that the eggs were either too “perfect” or too “imperfect” with the whites and the yolks being circles (or the best you can get in a graph). But once I got a good idea for the 3 colored yolk, it made the white look more realistic. And I’m so glad I did that, it adds a nice dimension to the design and really makes the “oh, that’s an egg” jump out. I played around with adding some surface crochet brown or caramel color to the edge of the eggs (to mimic pan fried browning) but I had a good moment of reining myself and thought better of it.
Below you’re going to find some photos of the Cute Strawberry Bag squares, because I didn’t take photos of this square as I was working on it. I just got too busy and forgot, but luckily the techniques for keeping the square’s RS clean and readable are the same as the strawberry square’s. I always use a combination of tapestry and intarsia when I’m working color work (any color work tbh) because it makes the design better.
I will carry yarn on a project but something like this it’s better not to, too many colors can peek through that white. But for this design I used 2 separate pieces of color A and dropped them as I got to color B. However, this might be the instruction part that could be a bit confusing – I carried color B (the white) behind the 3 different colors I used for the yolk (colors C – E) because that section was small enough and the colors were bright enough that the white wouldn’t be too noticeable. As I’ve said many times in the past, I go with my gut on when to carry yarn and when to drop it down the RS and that’s just something that comes with practice (for me at least). And hopefully this design willy give you and opportunity to practice and get yourself a “gut feeling.”
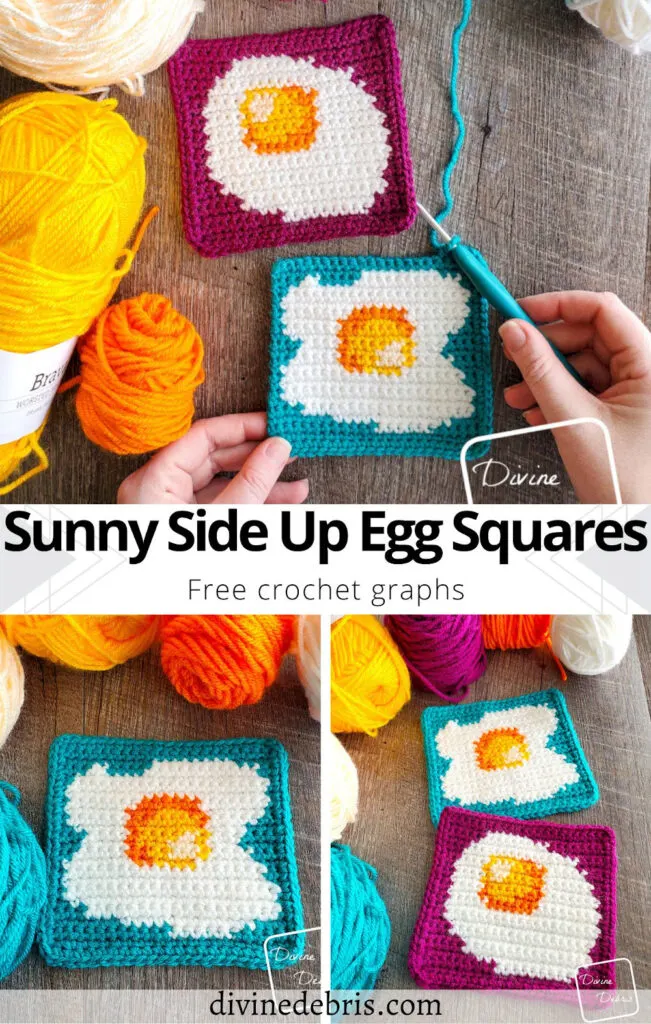
Below are 2 separate graphs for the Sunny Side Up Egg Squares – one for each egg design you see in the photos. If you’d like written/ color coded instructions you can pick them up in my Ravelry shop (I’m working on other places to post them). I do this because it is still a lot of work to make these pattern and buying the pdf helps me to afford yarn, web hosting, time making, and all the other expenses that come with this blog and I do hope you understand.
I do hope you like this week’s pattern duo. If you do, please comment below on what breakfast square I should make next. Personally I’m thinking about avocado toast or a waffle but I could be persuaded to a different design. But don’t fret, I do have coffee designs you can make now (I always love some coffee for breakfast). And don’t forget, be kind to each other and never side with the oppressors.
Please note: I was provided the yarn for this pattern by We Crochet for the purposes of designing the Sunny Side Up Egg Squares crochet pattern, without compensation. I wasn’t provided the yarn with the expectations of positive or negative reviews but I’ve used Brava Worsted many times for home decor, garments, and whatnot and it’s one of my favorite worsted yarns to use – especially for nearly all my wall hangings. This post contains affiliate links. If you purchase yarn through any of the links in this post, I may be compensated.
Copyright @ Divine Debris 2024. No part of this document may be reproduced or transmitted in any form by any means, electronic, mechanical, photocopying, or otherwise, without prior written permission from the author. Sales of finished products are permitted, but the designer requests that you link back to the pattern and credit Divine Debris with the original design under the Creative Commons Attribution-Share Alike license. If you have any questions, comments or concerns please contact info@divinedebris.com.
(this post contains affiliate links)


If you appreciate my patterns I hope you’d consider purchasing an ad-free pdf of this pattern in my Ravelry shop and Lovecrafts shop (coming soon)!
Where to purchase the Sunny Side Up Egg Squares crochet pattern


![[Image description] Top down view of the Sunny Side Up Egg Squares, laying on a fake wood background with skeins of yarn along the top and left side of the photo and a white woman's hands crocheting a border on the blue square.](https://d3gel9wqxksnxm.cloudfront.net/wp-content/uploads/2024/04/Sunny-Side-Up-Eggs-809x1000-1.jpg)
Level
Intermediate (need to know how to read a graph and do color work)
Materials
- US G (4.00 mm) crochet hook
- Worsted weight/ size #4 yarn
- 5 colors
- A: .3 oz/ 19 yds
- B – E: <.1 oz/ 5 yds
- I used Brava Worsted by We Crochet for this
- See Notes section for exact colors
- Notions: scissors, measuring tape, yarn needle
Gauge
- 19 sc x 20 rows = 4” (blocked)
Terms/ Stitches used
- St: Stitch
- Ch: Chain
- RS: Right side
- Sc: Single crochet
Notes
- As is industry standard, this pattern is just a free graph and not written instructions but you can purchase the pattern for a fee in my Ravelry shop.
- These squares are worked from the bottom up in rows, with a chain and turn at the beginning of the row.
- Begin with a ch 23 in color A, turn, and start in the 2nd ch from the hook. Each row begins with a “ch 1, turn” and all st counts are 22 sc.
- The ch 1 at the beginning of the rows does not count as a stitch.
- Blocking is suggested for this pattern.
- The odd rows are the right side.
- This whole pattern is worked in sc.
- Brava Worsted by We Crochet was used for all the yarn in the photos.
- Colors in the photos:
- Egg 1: Color A is purple (BW in Fairy Tale), color B is white (BW in White), color C is orange (BW in Orange), color D is yellow (BW in Caution), and color E is light yellow (BW in Custard).
- Egg 2: Color A is blue (BW in Marina), color B is white (BW in White), color C is yellow (BW in Caution), color D is orange (BW in Orange), and color E is light yellow (BW in Custard).
- Colors in the photos:
Blocked Sunny Side Up Egg Squares crochet pattern Finished Product Details
| Height | Width |
| 4.8” | 5” |
Notes on carrying yarn on the Sunny Side Up Egg Squares
To yarn conservation and clarity purposes, color A is not carried through the entire square. Instead, color A is used on the edges of the square (2 separate pieces) and color B is used in the center, along with colors C – E that are only used in that small spot where they are used. I didn’t carry A across or behind B and I didn’t carry colors C – E all the way through color B, instead I carried B behind colors C – E when needed. This way I could keep the RS of the square as tidy as possible and make it read clearly as an egg.
Below are 2 close up photos of the Cute Strawberry Square from my Cute Strawberry Bag showing all the colors being used separately with separate strands of yarn, it’s the same technique I used for this pattern. If you’d like to carry the yarn (tbh I don’t suggest it for the best results), I do highly suggest while carrying the inactive yarn with the RS facing, make sure it’s behind the previous row’s stitches. And when carrying the inactive yarn with the WS facing, make sure it’s in front of the previous row’s stitches. Don’t pull the carried yarn too tight or let it hang loose (try to keep it even
with the stitches), as it can distort your square’s final look. Blocking may help even
out some distortion or bulkiness of the center that may occur.
![[image description] close up look of the right side of a Cute Strawberry Bag square on a fake wood background](https://d3gel9wqxksnxm.cloudfront.net/wp-content/uploads/2024/03/Strawberrt-Bag-1000x711-1.jpg)
![[image description] close up look of the wrong side of a Cute Strawberry Bag square on a fake wood background](https://d3gel9wqxksnxm.cloudfront.net/wp-content/uploads/2024/03/Strawberrt-Bag-1000x712-1.jpg)
![[Image description] Top down view of the Sunny Side Up Egg Squares, laying on a fake wood background with skeins of yarn along the top and left side of the photo.](https://d3gel9wqxksnxm.cloudfront.net/wp-content/uploads/2024/04/Sunny-Side-Up-Eggs-814x1000-1.jpg)
![[Image description] Top down view of the Sunny Side Up Egg Squares, laying on a fake wood background with skeins of yarn along the top and left side of the photo.](https://d3gel9wqxksnxm.cloudfront.net/wp-content/uploads/2024/04/Sunny-Side-Up-Eggs-814x1000-1.jpg.webp)
Sunny Side Up Egg Squares Crochet Graphs
Egg Square 1
![[Image description] Top down view of the Sunny Side Up Egg Square 1, laying on a fake wood background with skeins of yarn along the left side of the photo.](https://d3gel9wqxksnxm.cloudfront.net/wp-content/uploads/2024/04/Sunny-Side-Up-Eggs-903x1000-1.jpg)
Graph Key: Color A is pink, color B is white, color C is orange, color D is yellow, and color E is light yellow. I used Brava Worsted by We Crochet for this square.
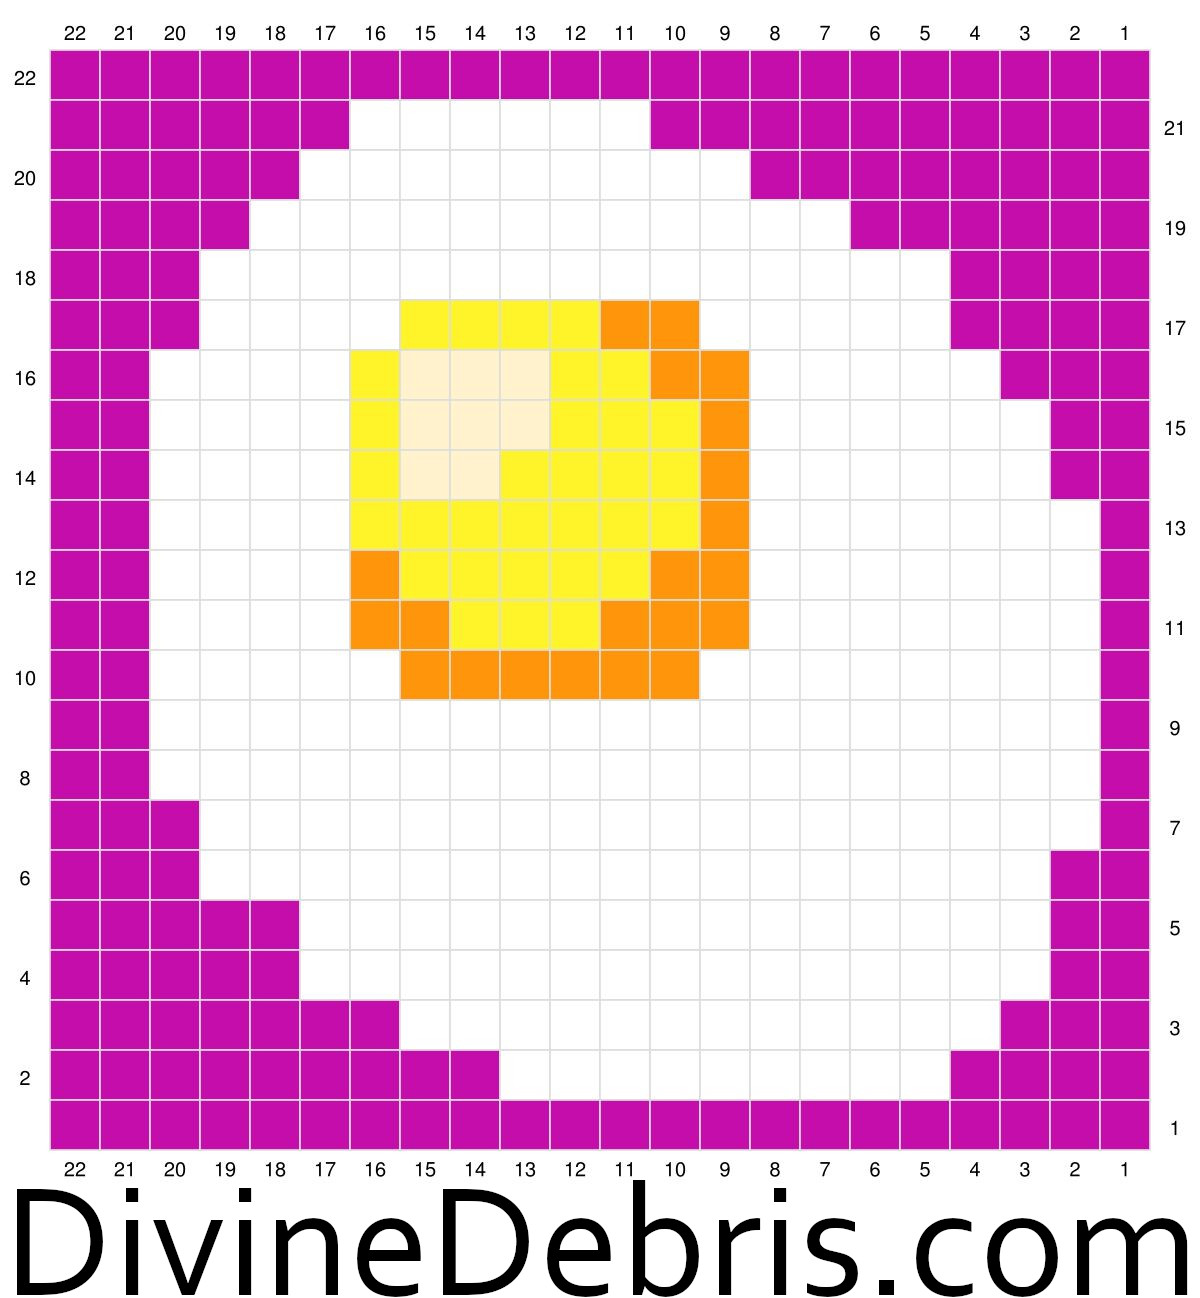
For the squares: begin with a ch 23 in color A, turn, and start in the 2nd ch from the hook. Each row begins with a “ch 1, turn” and all st counts are 22 sc.
Border
With the RS facing you, join color A in the first st on the other side of Row 1 of the square.
Row 1: A: Ch 1, sc into the next 22 sts, ch 1 at the corner, sc into the next 22 row ends, ch 1 at the corner, sc into the next 22 sts of Row 22, ch 1 at the corner, sc down the next 22 row ends, ch 1 at the corner, join with a slip st – 88 sc, 4 ch-1 spaces
Fasten off, weave in your ends. Block the square so it measures 4.8” x 5”.
Egg Square 2
![[Image description] Top down view of the Sunny Side Up Egg Square 2, laying on a fake wood background with skeins of yarn along the top of the photo.](https://d3gel9wqxksnxm.cloudfront.net/wp-content/uploads/2024/04/Sunny-Side-Up-Eggs-977x1000-1.jpg)
Graph Key: Color A is blue, color B is white, color C is yellow, color D is orange, and color E is light yellow. I used Brava Worsted by We Crochet for this square.
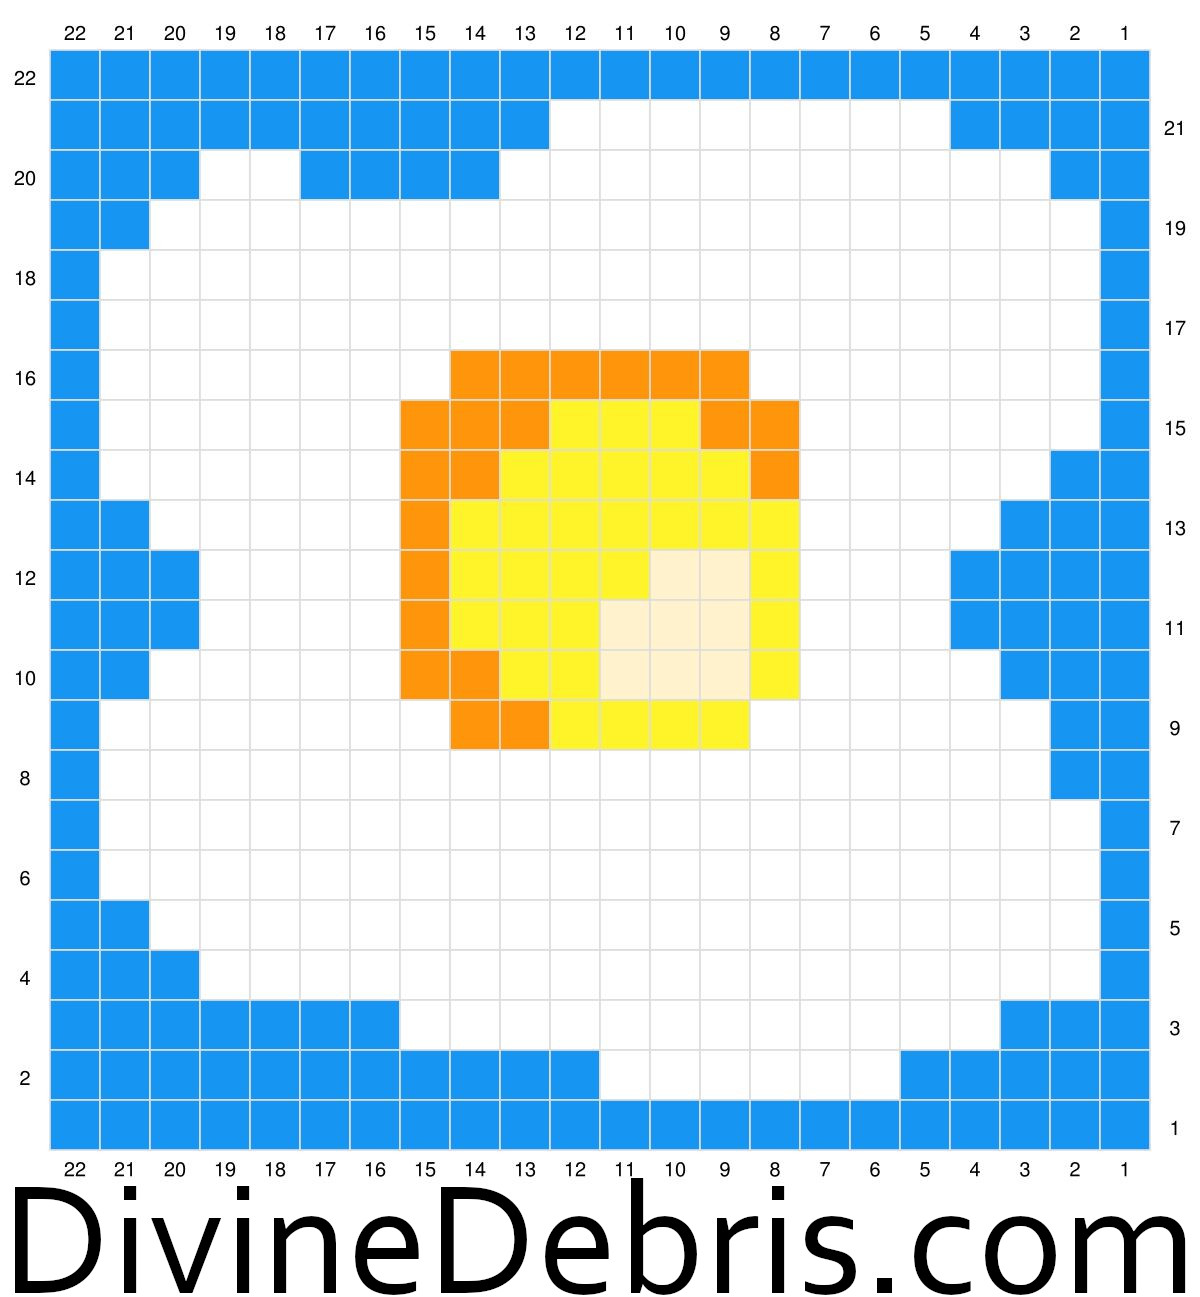
For the squares: begin with a ch 23 in color A, turn, and start in the 2nd ch from the hook. Each row begins with a “ch 1, turn” and all st counts are 22 sc.
Border
With the RS facing you, join color A in the first st on the other side of Row 1 of the square.
Row 1: A: Ch 1, sc into the next 22 sts, ch 1 at the corner, sc into the next 22 row ends, ch 1 at the corner, sc into the next 22 sts of Row 22, ch 1 at the corner, sc down the next 22 row ends, ch 1 at the corner, join with a slip st – 88 sc, 4 ch-1 spaces
Fasten off, weave in your ends. Block the square so it measures 4.8” x 5”.
You can pick up written instructions for the Sunny Side Up Egg Squares crochet pattern in my Ravelry shop.


Teryle
Thursday 1st of May 2025
This is super cute! Please tell me that you have Bacon and Toast in the makes? <3
Divine Debris
Friday 2nd of May 2025
Oh I'm so glad you like it :) I don't bacon squares but I do have toast and avocado toast and avocado egg and jam toast squares I hope you like those too