


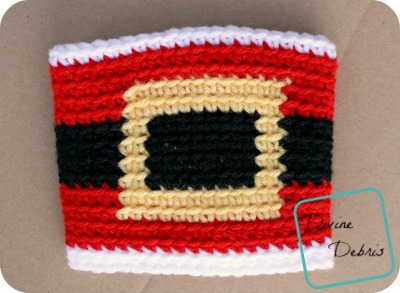
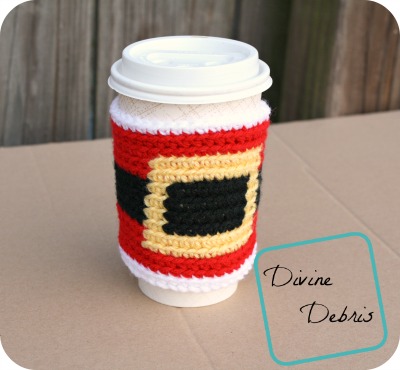
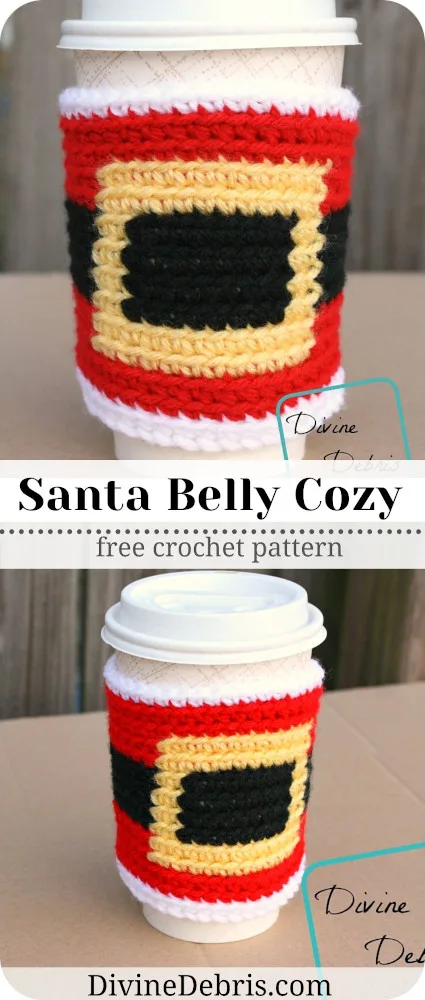
I was out at a store at the mall near me and I cam across this mug cozy that looked this but it was cloth and I wanted to make it crochet. Seriously, I was standing there looking at this thing wrapped around a bottle of lotion and thought, “this would look SO CUTE in tapestry!” and here we are. I went home, graphed it out and started on it as soon as I could. This is also a great and quick pattern, I finished it in under and hour. Fun enough, make this in green instead of red and BAM you’ve got a St. Paddy’s cozy.
You can purchase an ad-free downloadable pdf for this pattern in my Ravelry shop.
Thank you to all my Patreon supporters.
(this post may contain affiliate links)
Materials
- US G (4.00 mm) crochet hook
- Worsted/ medium/ size #4 weight yarn
- .8 oz. / 42 yards
- I used Red Heart Super Saver
- Yarn needle
Gauge
- 4″ = 16 scs x 16 rows
Terms/ stitches
- Rnd: round
- RS: right side (side that faces out)
- Ch: chain
- St: stitch
- Slip st: slip stitch
- Sc: single crochet
Notes
- This pattern is worked in the round, with a slip st into the first st of the row.
- The ch 1 at the beginning of the row does not count as a stitch.
- You can replace the first row with a foundation single crochet row if you’d like to.
- This pattern is worked from the bottom up
- All of the stitches in this pattern are single crochets. The directions will only tell you what color (ie: Color A, Color B, etc…) and the number in the parentheses tells you how many single crochets to make.
- In the example, the inactive yarn is carried behind the active. If this is confusing, you might want to check out this helpful Moogly video on tapestry.
- You need to know how to work into the back loop only (BLO) for this pattern.
- If you don’t work this pattern in the back loop only, it might end up leaning. You can block the finished item to make it lean less. At the end of the row, slip st into both loops of your 1st st, this will help to keep your seam straight.
- Color A is white, color B is red, color C is yellow/gold and color D is black in the photos.
Finished measurements
- Height: 4.25″
- Diameter: 4.5″
Santa Belly Cozy Pattern Instructions
Rnd 1: A: Ch 38, slip st to form a circle (do not twist this ch), ch 1, sc into each st around – 38 scs
Fasten off color A.
Rnds 2 – 3: B: Ch 1, sc into to each st around – 38 scs
Note:
- Rows 2 – 14 are worked into the back loop only.
- The following directions will only tell you what color (ie: Color A, Color B, etc…) and the number in the parentheses tells you how many stitches to make.
- Following the ch 1, the first st is worked into the same st as join.
Rnds 4 – 5: B: Ch 1, (13), C: (12), B: (13), slip st into the first st to secure – 38 scs
Fasten off color B.
Rnds 6 – 9: D: Ch 1, (13), C: (2), D: (8), C: (2), D: (13), slip st into the first st to secure – 38 scs
Fasten off color D.
Rnds 10 – 11: B: Ch 1, (13), C: (12), B: (13), slip st into the first st to secure – 38 scs
Fasten off color C.
Rnds 12 – 13: B: Ch 1, sc into to each st around – 38 scs
Fasten off color B.
Rnd 14: A: Ch 1, sc into to each st around – 38 scs
Fasten off color A, weave in all your ends.
I hope you like this pattern and make tons of them!
Take care, see you next week!
This post is linked to the Linky Ladies Community Link Party #80.

The Linky Ladies – Community Link Party #81 – The Purple Poncho
Saturday 30th of December 2017
[…] Santa Belly Mug Cozy by Divine […]
10 Free Santa Crochet Patterns - Crochet For You
Monday 12th of December 2016
[…] Belly Cozy – Divine Debris Crochet Santa Claus – Repeat Crafter […]
Linky Ladies ~ Community Link Party #81 | Crystalized Designs Blog
Tuesday 6th of December 2016
[…] Winter Hat by Darcy Johnson 3. Elf Boot Cuffs by Allie Cat’s Hats and Crafts 4. Santa Belly Mug Cozy by Divine Debris 5. Elf Hat by Posh Pooch […]
Maria Slay
Wednesday 30th of November 2016
Absolutely love this pattern! You are so very talented.