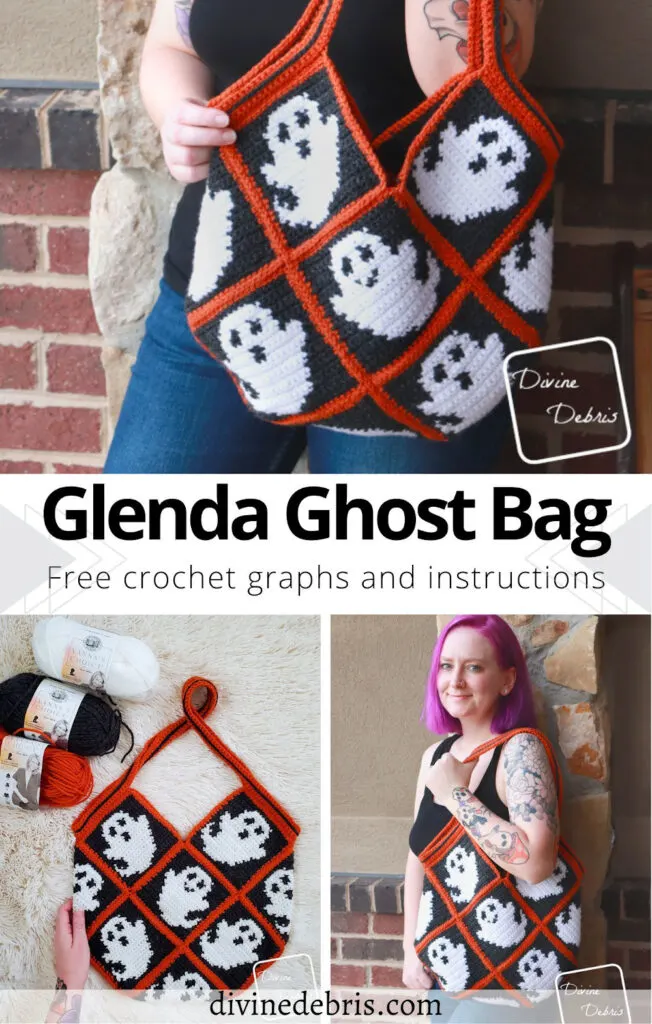
It’s September! And you know what that means, right? That all the people who aren’t super into Halloween shrug and say “ok, sure, it’s time to decorate.” Because, if I’m being honest, I’ve always got a little Halloween decor around my house, just to make me smile. But, with it being officially spooky season, I decided what better time to share a bag you’re going to want to carry all season long – Glenda Ghost Bag crochet pattern.
Oh my goodness have I been excited to make this bag. I got the idea for it a few months ago and parked it away in my head as a little “oh, maybe later” design but as soon as I started posting about it, feedback on social media was good. I guess I’m not the only one who loves a cute little ghostie.
Now, I know this bag might look complicated but it’s pretty straight forward – it’s 13 squares you seam and then add straps to. That’s basically it. The hardest part is sitting down to make 11 of one square and 2 of the other, then blocking them, and them seaming them in a specific way. But don’t worry, there are lots of photos below of the bag in the process of seaming. I swear it’s not hard, just take it one stitch/ one square at a time. And you can definitely add more rows to the strap, change up the arrangement of the squares or how many of each you do. It’s got a lot off room for customization.
I really, really hope you like this new bag pattern. I cannot wait to take it everywhere I go for the next 2 months. It’s just the perfect accessory for me, ya know?
This post is linked to Loop Scoop 69.
Please note: I was provided the yarn for this pattern by Lion Brand Yarn for the purposes of designing and used it for the Glenda Ghost Bag crochet pattern, without compensation. I wasn’t provided the yarn with the expectations of positive or negative reviews but been using Vanna’s Choice for so long, it’s one of my favorite worsted with yarns. This post contains affiliate links. If you purchase yarn through any of the links in this post, I may be compensated.
Copyright @ Divine Debris 2023. No part of this document may be reproduced or transmitted in any form by any means, electronic, mechanical, photocopying, or otherwise, without prior written permission from the author. Sales of finished products are permitted, but the designer requests that you link back to the pattern and credit Divine Debris with the original design under the Creative Commons Attribution-Share Alike license. If you have any questions, comments or concerns please contact info@divinedebris.com.
(this post contains affiliate links)
If you appreciate my patterns I hope you’d consider purchasing an ad-free pdf of this pattern in my Ravelry shop and Lovecrafts shop!
Where to purchase the Glenda Ghost Bag crochet pattern
Level
Intermediate (need to know how to read a graph and do color work)
Materials
- US G (4.00 mm) crochet hook
- 3 colors worsted weight/ size #4 yarn
- Color A: 4.1 oz/ 199 yds
- Color B: 3.2 oz/ 155 yds
- Color C: 2.5 oz/ 121 yds
- I used Vanna’s Choice by Lion Brand Yarn for this pattern
- Notions: scissors, measuring tape, yarn needle
Gauge
- 16 sc x 16 rows = 4” (blocked)
Terms/ Stitches used
- St: Stitch
- Ch: Chain
- Rnd: Round
- Slip st: Slip Stitch
- Sc: Single crochet
- BLO: Back loop only
- RS: Right Side/ WS: Wrong Side
Notes
- You can purchase the easy to print version of this pattern for a fee in my Ravelry shop.
- This pattern is worked in 3 sections: the Squares, the Assembly (where the seaming is), and the Straps.
- There are 2 different squares used in the pattern and 13 squares are used in total.
- For the squares: begin with a ch 21 in color A, turn, and start in the 2nd ch from the hook.
- Each row begins with a “ch 1, turn” and all st counts are 20 sc.
- The squares are worked from the bottom up in rows, with turns at the beginning of the rows.
- Each square has a Border, which you add once the square is done, and you use the Border to seam.
- The ch 1 at the beginning of the rows does not count as a stitch.
- Color A is carried behind color B in the photos.
- Blocking is suggested for this pattern.
- In the photos: color A is black, color B is white, and color C is orange. Vanna’s Choice by Lion Brand Yarn was used for all colors.
Blocked Glenda Ghost Bag Crochet Pattern Finished Product Details
| Squares (including border) | Bag |
| 5.5” across 5.5” high | 15” across (at widest) 14.5” high (not including straps) |
Border
With the RS facing you, join color C in the first st on the other side of Row 1 of the square.
Row 1: C: Ch 1, sc into the next 20 sts, ch 1 at the corner, sc into the next 20 row ends, ch 1 at the corner, sc into the next 20 sts of Row 20, ch 1 at the corner, sc down the next 20 row ends, ch 1 at the corner, join with a slip st – 80 sc, 4 ch-1 spaces
Fasten off, weave in your ends. Block the square so it measures 5.5” x 5.5”.
Glenda Ghost Bag Square 2
Make 2
Key: color A is dark gray and color B is white.
For the squares: begin with a ch 21 in color A, turn, and start in the 2nd ch from the hook. Each row begins with a “ch 1, turn” and all st counts are 20 sc.
Border
With the RS facing you, join color C in the first st on the other side of Row 1 of the square.
Row 1: C: Ch 1, sc into the next 20 sts, ch 1 at the corner, sc into the next 20 row ends, ch 1 at the corner, sc into the next 20 sts of Row 20, ch 1 at the corner, sc down the next 20 row ends, ch 1 at the corner, join with a slip st – 80 sc, 4 ch-1 spaces
Fasten off, weave in your ends. Block the square so it measures 5.5” x 5.5”.
Assembly
- You should have a total of 13 squares (11 Square 1 and 2 square 2).
- You can use any method of seaming for this section. I used a back loop only slip st.
- Fasten off between each seam and weave in your ends securely.
- Be sure to also seam the ch1 at the corners of each square.
To better visualize how you need to assemble your bag, lay your squares in rows of: 2, 1, 2, 1, 2, 3, 2, with the first 4 rows of ghost squares upside down. You want them to be upside down because when you seam the bag along the middle single square, they’ll all be facing up the same way. See the photo below for reference.
When your Bag is seamed to match the photo on the previous page, flip it over so that the wrong side is facing you like the photo below.
Follow Steps 1 – 3 on how to finish seaming the sides of your bag.
Step 1: Fold your bag along the dark blue line in the center so it looks like the photo below.
Step 2: Seam the green edges to the teal edges on the right-hand side of the bag. The photo below shows how it will line up.
Step 3: Seam the pink edges to the yellow edges on the left-hand side of the bag. The photo below shows how it will line up.
Glenda Ghost Bag Straps
In the left photo above, the blue arrow shows which side you need to start your straps on and in the right photo, the green arrow shows you where you start your first st (not the ch 1 at the corner).
The photo above shows you (in purple) how you go up the square from where you joined your yarn, skip across a space (this is where the strap is) and work down another square. You will repeat this on the other side of the bag to create 2 straps.
Rnd 1: With color C, pull up a loop in the indicated photo above (the first st, not the ch 1, to the left of the seam you made when you did Step 2 of the Assembly), sc BLO into the next 20 sts of the square you’re on, ch 75, skip the ch 1 and next 20 sts on this square, skip where the 3 squares are joined and move to the next square to the left, skip the next 20 sts and ch 1 on the corner and sc BLO into the next 20 sts of this square, moving the other side of the bag, skip the ch 1 at the corner and where the 3 squares are joined and move to the next square to the left, skip ch 1 at the corner and sc BLO into the next 20 sts of this square, ch 75, skip the ch 1 and next 20 sts on this square, skip where the 3 squares are joined and move to the next square to the left, skip the next 20 sts and ch 1 on the corner and sc BLO into the next 20 sts of this square, skip the ch 1 at the corner and where the 3 squares are joined, join with a slip st – 80 sc, 2 ch 75 spaces
Rnds 2 – 4: C: Ch 1, turn, sc around, join – 230 sc
Fasten off, weave in your ends. Block this section if you’d like.
Optional: To reinforce your strap, add a row of slip sts along the surface of Rnd 3 of the Straps in color A.
You can pick up written instructions for the Glenda Ghost Bag crochet pattern in my Ravelry shop.

![[Image description] A white woman with purple hair stands against a brick wall looking to at the camera, holding the Glenda Ghost Bag.](https://d3gel9wqxksnxm.cloudfront.net/wp-content/uploads/2023/09/Ghost-Bag-701x1000-1.jpg.webp)


![[Image description] Top down view some of the unseamed squares for the Glenda Ghost Bag crochet pattern, with a white woman's hands holding one in the bottom left corner](https://d3gel9wqxksnxm.cloudfront.net/wp-content/uploads/2023/09/Ghost-Bag-882x1000-3.jpg.webp)
![[Image description] A white woman with purple hair stands against a brick wall looking to her right, holding the Glenda Ghost Bag.](https://d3gel9wqxksnxm.cloudfront.net/wp-content/uploads/2023/09/Ghost-Bag-667x1000-1.jpg.webp)
![[Image description] Glenda Ghost Bag Square 1 graph](https://d3gel9wqxksnxm.cloudfront.net/wp-content/uploads/2023/09/Ghost-Bag-ghost-graph-1-by-Divine-Debris-946x1024.jpg.webp)
![[Image description] Glenda Ghost Bag Square 2 graph](https://d3gel9wqxksnxm.cloudfront.net/wp-content/uploads/2023/09/Ghost-Bag-ghost-graph-2-by-Divine-Debris-945x1024.jpg.webp)
![[Image description] Glenda Ghost Bag assembly photo 1 - all 13 squares are laying on an off-white carpet](https://d3gel9wqxksnxm.cloudfront.net/wp-content/uploads/2023/09/Ghost-Bag-778x1000-1.jpg.webp)
![[Image description] Glenda Ghost Bag assembly photo 2 - all 13 squares are laying upside down and color-coded on an off-white carpet](https://d3gel9wqxksnxm.cloudfront.net/wp-content/uploads/2023/09/Ghost-Bag-seaming-741x1000-1.jpg.webp)
![[Image description] Glenda Ghost Bag assembly photo 3 -the 13 squares have been folded in half for further seaming.](https://d3gel9wqxksnxm.cloudfront.net/wp-content/uploads/2023/09/Ghost-Bag-seaming-1000x749-1.jpg.webp)
![[Image description] Glenda Ghost Bag assembly photo 4 - close up on how to fold the right-hand side.](https://d3gel9wqxksnxm.cloudfront.net/wp-content/uploads/2023/09/Ghost-Bag-seaming-881x1000-1.jpg.webp)
![[Image description] Glenda Ghost Bag assembly photo 5 - close up on how to fold the left-hand side.](https://d3gel9wqxksnxm.cloudfront.net/wp-content/uploads/2023/09/Ghost-Bag-seaming-860x1000-1.jpg.webp)
![[Image description] Glenda Ghost Bag assembly photo 6 - the body of the bag should now be complete](https://d3gel9wqxksnxm.cloudfront.net/wp-content/uploads/2023/09/Ghost-Bag-1000x882-1.jpg.webp)
![[Image description] Glenda Ghost Bag straps photo 1 - the body of the bag is complete and this shows where to start the straps](https://d3gel9wqxksnxm.cloudfront.net/wp-content/uploads/2023/09/Ghost-Bag-Straps-1000x882-1.jpg.webp)
![[Image description] Glenda Ghost Bag straps photo 2 - close up on where to to start the straps](https://d3gel9wqxksnxm.cloudfront.net/wp-content/uploads/2023/09/Ghost-Bag-610X600.jpg.webp)
![[Image description] Glenda Ghost Bag straps photo 3 - photo showing where to skip a space for the straps](https://d3gel9wqxksnxm.cloudfront.net/wp-content/uploads/2023/09/Ghost-Bag-Straps-1000x883-1.jpg.webp)
![[Image description] The Glenda Ghost Bag hangs off a bench in front of a brick wall](https://d3gel9wqxksnxm.cloudfront.net/wp-content/uploads/2023/09/Ghost-Bag-757x1000-1.jpg.webp)

Liz Cyranek
Thursday 21st of September 2023
Omg is adorable !! I will love to do it ! But I can’t follow a written patterns ! When I learn to crochet is following a video! But Thank you for amazing Job! Some Day I will be able to follow instructions!! 🥰🥰🥰🥰
JeanneGreenEyes
Wednesday 20th of September 2023
Saw your Ghost Bag on the (last) #70 Loop Scop and just had to check it out! Thank you for sharing it and for having such great instruction with pictures 💕
Joanie
Thursday 7th of September 2023
Thank you for the ghost bag I Love it 🥰