
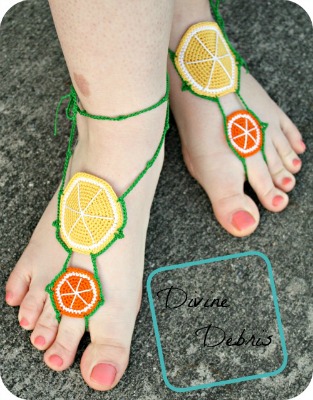
As I said when I made the Kayla Barefoot Sandals a year ago, barefoot sandals just so freakin’ cute. Sure, I don’t wear them all that often, but I also am not big on leavin’ the house. Outside is cold or hot, humid and there are bugs. So, when I feel like it, I wear them around the house for fun, because lookin’ down at them I smile and think how cute they are. Do you tend to wear a lot of barefoot sandals?
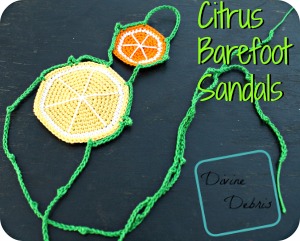
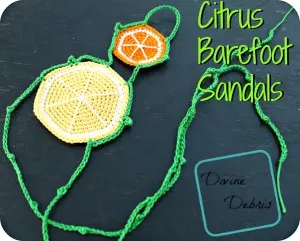
This design, the Citrus Barefoot Sandals, I’ve had written, mostly, for a while. I designed these based on the Citrus Ring I debuted back in February but other things came up, you know how that goes, and I didn’t get the pattern written out and published until now. I hope you like the pattern. Add this to your Ravelry queue or faves here.


Materials:
- 4 colors of size 10 crochet thread (I used Aunt Lydia‘s)
- 2.25mm crochet hook
- needle to weave your ends in
Terms/ stitches used:
- St: stitch
- Ch: chain
- Sc: single crochet
- Magic circle
- Picot
Finished product dimensions:
- Length: just under 4.5″ from tip of loop around toe and top of larger citrus circle
- Straps: 12″ in length
- Width: 2.25″
Pattern instructions:
Smaller citrus:
Row 1: Create a magic circle: ch 1, sc six times into the circle, slip st into the first sc to secure- 6 scs
Row 2: Ch 1, sc twice into the same st as join and into each st around, slip st into the first sc to secure – 12 scs
Row 3: Ch 1, sc twice into the same st as join, sc into the next st, *sc twice into the next st, sc twice into the next st,* repeat from * to * until the end of the row, slip st into the first sc to secure – 18 scs
Row 4: Ch 1, sc twice into the same st as join, sc once into the next 2 sts, *sc twice into the next st, sc once into the next 2 sts,* repeat from * to * the rest of the way around, slip st into the first sc to secure – 24 scs
Row 5: Ch 1, sc once into the same st as join and into the next 2 sts, sc twice into the next st, * sc into the next 3 sts, sc twice into the next st,* repeat from * to * the rest of the way around, slip st into the first sc to secure – 30 scs
Change to white thread: Row 6: Ch 1, sc twice into the same st as join, sc once into the next 4 sts, *sc twice into the first st, sc once into the next 4 sts,* repeat from * to * the rest of the way around, slip st into the first sc to secure – 36 scs (fasten off with this color)
Change to orange thread: Row 7: Ch 1, sc once into the same st as join and into the next 4 sts, sc twice into the next st, *sc into the next 5 sts, sc twice into the next st,* repeat from * to * the rest of the way around, slip st into the first sc to secure – 42
Fasten off.
To do the white details, the original Citrus Ring post has photos that will help you add these details. Cut a piece of white thread 9″ in length for the orange citrus (smaller) and 13″ in length for the yellow citrus (larger).
Larger Citrus:
Row 1: Create a magic circle: ch 1, sc six times into the circle, slip st into the first sc to secure- 6 scs
Row 2: Ch 1, sc twice into the same st as join and into each st around, slip st into the first sc to secure – 12 scs
Row 3: Ch 1, sc twice into the same st as join, sc into the next st, *sc twice into the next st, sc twice into the next st,* repeat from * to * until the end of the row, slip st into the first sc to secure – 18 scs
Row 4: Ch 1, sc twice into the same st as join, sc once into the next 2 sts, *sc twice into the next st, sc once into the next 2 sts,* repeat from * to * the rest of the way around, slip st into the first sc to secure – 24 scs
Row 5: Ch 1, sc once into the same st as join and into the next 2 sts, sc twice into the next st, * sc into the next 3 sts, sc twice into the next st,* repeat from * to * the rest of the way around, slip st into the first sc to secure – 30 scs
Row 6: Ch 1, sc twice into the same st as join, sc once into the next 4 sts, *sc twice into the first st, sc once into the next 4 sts,* repeat from * to * the rest of the way around, slip st into the first sc to secure – 36 scs
Row 7: Ch 1, sc once into the same st as join and into the next 4 sts, sc twice into the next st, *sc into the next 5 sts, sc twice into the next st,* repeat from * to * the rest of the way around, slip st into the first sc to secure – 42
Row 8: Ch 1, sc twice into same st as join, sc once into the next 5 sts, *sc twice into next st, sc once into the next 6 sts,* repeat from * to * the rest of the way around, slip st into the first sc to secure – 48 scs
Row 9: Ch 1, sc twice into same st as join, sc once into the next 6 sts, *sc twice into next st, sc once into the next 7 sts,* repeat from * to * the rest of the way around, slip st into the first sc to secure – 54 scs
Change to white thread: Row 10: Ch 1, sc twice into same st as join, sc once into the next 7 sts, *sc twice into next st, sc once into the next 8 sts,* repeat from * to * the rest of the way around, slip st into the first sc to secure – 60 scs (fasten off with this color)
Change to yellow thread: Row 11: Ch 1, sc twice into same st as join, sc once into the next 8 sts, *sc twice into next st, sc once into the next 9 sts,* repeat from * to * the rest of the way around, slip st into the first sc to secure – 66 scs
Fasten off.
Assembly:
After you finish the white details on the citruses: with green thread, ch 100 chs. I usually do a picot following every 10th ch but you don’t have to, it just adds a little something nice. After your 100th ch, sc into a st right before an increase (2 scs) on one of the larger citruses, ch 9, skip 7 scs on the citrus, sc into the next st, ch 1, picot, ch 1, sc into the next st on the larger citrus, ch 9, skip 7 sts, sc into the next st on the larger citrus, ch 5, sc into a st right after an increase on the smaller citrus, ch 5, skip 5 sts, sc into the next st on the smaller citrus, ch 1, picot, ch 1, sc into the next st on the smaller citrus, ch 5, skip 5 sts, sc into the next st on the smaller citrus, ch 20, skip 6 sts, sc into the next st on the smaller citrus, ch 5, skip 5 sts, sc into the next st on the smaller citrus, ch 1, picot, ch 1, sc into the next st on the smaller citrus, ch 5, skip 5 sts, sc into the next st on the smaller citrus, ch 5, skip 6 sts from the last sc you made on the larger citrus, sc into the next st on the larger citrus, ch 9, skip 7 sts, sc into the next st on the larger citrus, ch 1, picot, ch 1, sc into the next st on the larger citrus, ch 9, skip 7 sts, sc into the next st on the larger citrus, ch 100 (include the picots if you did so earlier in the assembly). Fasten off. Repeat this assembly on the second set of citruses.
20 Free Patterns for Your Feet! Barefoot Sandals • Oombawka Design Crochet
Friday 24th of February 2017
[…] 2 Citrus Barefoot Sandals by Divine Debris […]
Barefoot Sandals For Your Lemonade Stand – Crochet
Friday 15th of July 2016
[…] Citrus Barefoot Sandal Crochet Pattern. […]