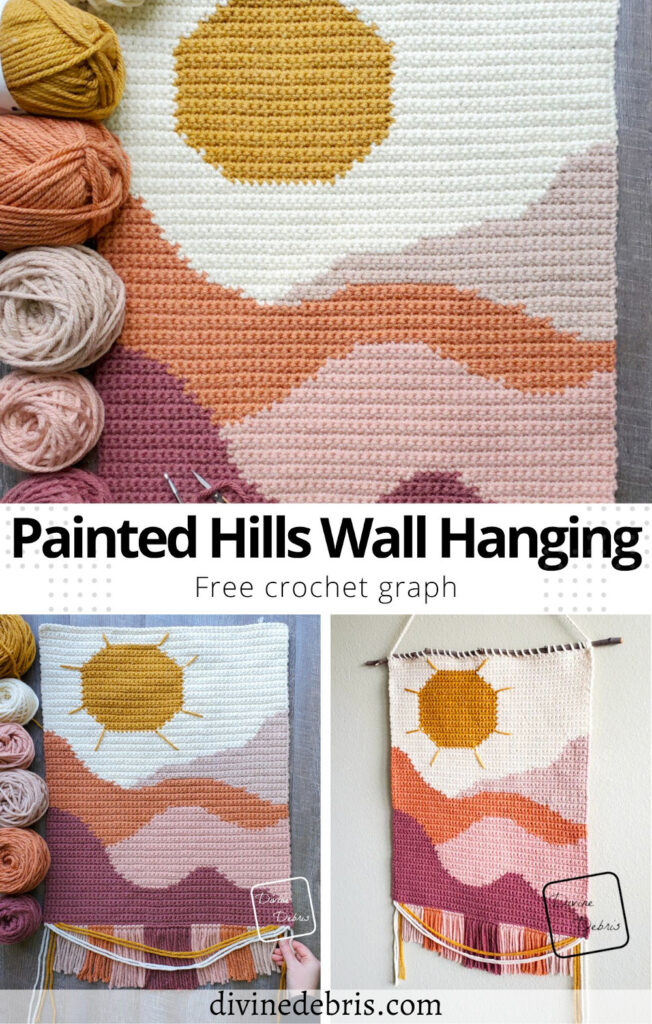
I have to say, I am excited that we’re at the end of March. It has been so freaking rainy here in southern California where I live that I haven’t felt like doing much of anything. I want to get out and have fun and do Spring things, like hike and walk in nature. And enjoy some slightly (hopefully) warmer temps. But, alas, those days aren’t here yet so I guess I’ll just have to make them myself… in yarn. Like I did with this week’s new design, the Painted Hills Wall Hanging.
If you’ve been around here for a while, you know that I’ve been really into wall hangings the last couple of years. Actually, more than that, but designs like the Painted Hills Wall Hanging are really where I’m happiest right now. They really allow me to express my creativity in a way that some other crochet projects don’t. It’s why I call this “painting with yarn” because it reminds me of the rush I often get when I paint.
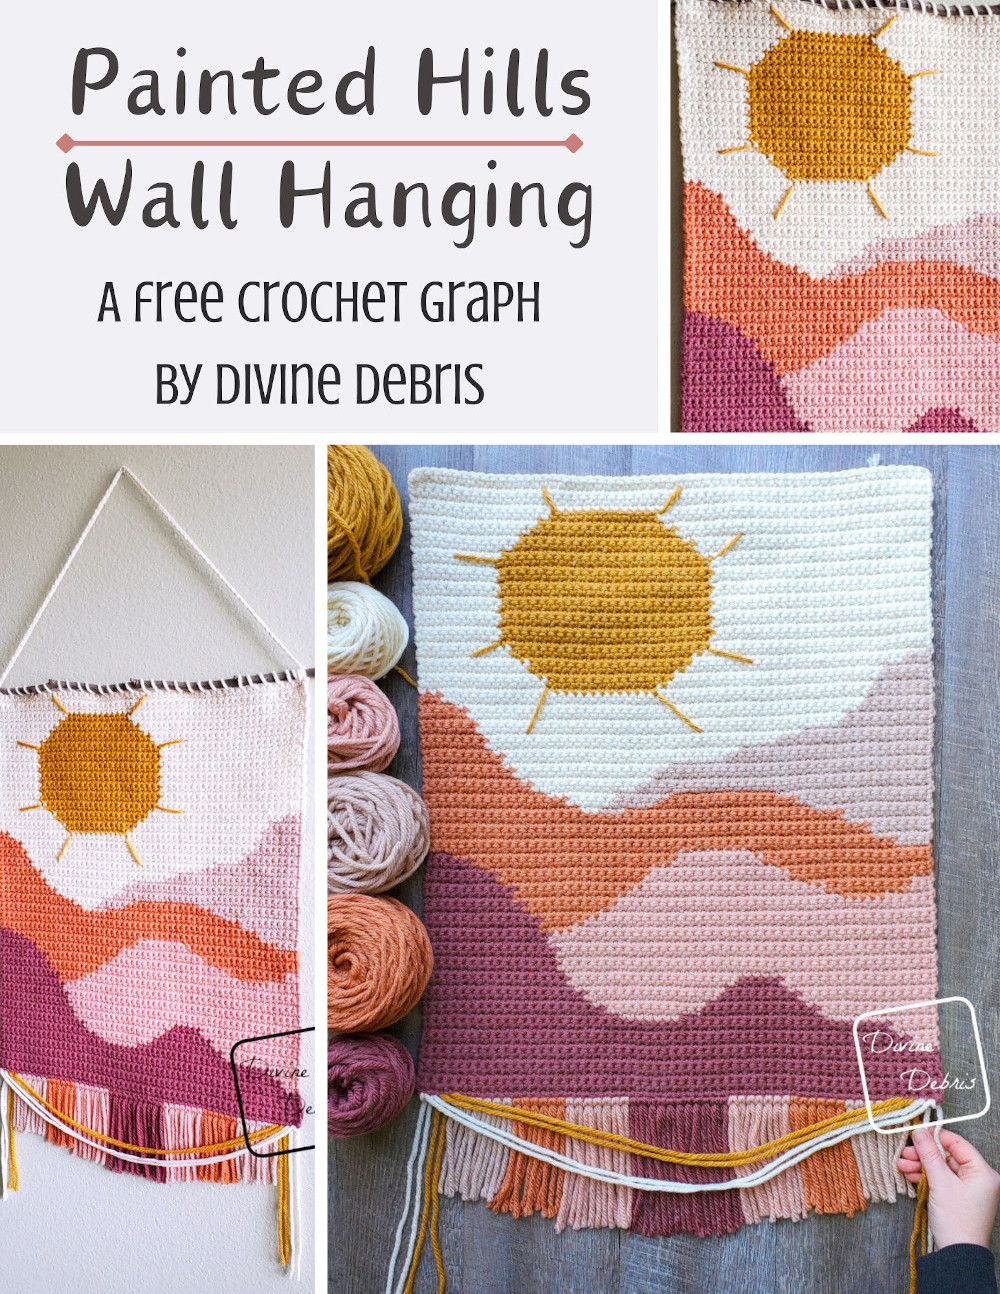
For this pattern, specifically, I wanted to make a landscape with Hue + Me Yarn. I wanted to “go big” with a wall hanging pattern and use a lot of my stash in the process. I have a had so much fun working with this yarn, bulky yarn works up so well for a wall hanging. I should definitely use it more often in the future. And I just love how these colors work together. Other than playing around with a blue in there, this design is as I pictured it in my head.
And shout out to Kirsten T for helping me name this new design on Facebook!
When it comes to color work you should do what works the best for you. For this wall hanging I mostly used a bobbin technique (keeping the yarn attached to the skein) and made sure to turn the piece back and forth rather than in a circle as I worked the rows. I have a couple Reels on my Instagram that show how I change colors from the front and also the back, so if you’re struggling with changing colors those might help you. But I firmly believe that anyone can make a color work project like this, you just need to know how to make a single crochet 🙂 Oh, and don’t forget to block – it helps color work so much.
And if you like the fringe as much as I do, there is a small photo tutorial and a video (if you can’t see it, turn your ad-block off) at the bottom of this blog post to help you. I was really inspired by macrame designs and I had to make something like that.
And keeping with industry standards, if you’d like written instructions to this pattern you can pick those up in my Ravelry shop. I know talking about money is often icky but I split up these patterns this way so that people do have an incentive to pick up the pdf, it helps me to keep making patterns here on my blog. I hope you understand.
Anyway, I hope this new design brings you a beautiful landscape if you’re like me and the weather has kept you in the house for the last month. Please wear and wash your masks and be kind to each other.
Please note: I was provided the yarn for this pattern by Lion Brand Yarn for the purposes of designing the Painted Hills Wall Hanging crochet pattern, without compensation. I wasn’t provided the yarn with the expectations of positive or negative reviews but I’ve used Hue + Me Yarn many times, it’s one of my favorite bulky weight yarns. Do not make videos from my patterns.
![[Image description] The Painted Hills Wall Hanging light from the right side, against a off white background.](https://d3gel9wqxksnxm.cloudfront.net/wp-content/uploads/2023/03/Painted-Hills-Wall-Hanging-642x1000-1.jpg)
![[Image description] The Painted Hills Wall Hanging light from the right side, against a off white background.](https://d3gel9wqxksnxm.cloudfront.net/wp-content/uploads/2023/03/Painted-Hills-Wall-Hanging-642x1000-1.jpg.webp)
Copyright @ Divine Debris 2023. No part of this document may be reproduced or transmitted in any form by any means, electronic, mechanical, photocopying, or otherwise, without prior written permission from the author. Sales of finished products are permitted, but the designer requests that you link back to the pattern and credit Divine Debris with the original design under the Creative Commons Attribution-Share Alike license. If you have any questions, comments or concerns please contact info@divinedebris.com.
(this post contains affiliate links)

If you appreciate my patterns I hope you’d consider purchasing an ad-free pdf of this pattern in my Ravelry shop and Lovecrafts shop!
Where to purchase the Painted Hills Wall Hanging crochet pattern


![[Image description] top down view of the unfinished Painted Hills Wall Hanging. There are 6 skeins of yarn along the left side of the photo and a white woman's hands adding fringe to the bottom.](https://d3gel9wqxksnxm.cloudfront.net/wp-content/uploads/2023/03/Painted-Hills-Wall-Hanging-760x1000-1.jpg)
Level
Intermediate (need to know how to read a graph and do color work)
Materials
- US J (6.00 mm) crochet hook
- Size #5 bulky weight yarn
- 6 colors
- I used Hue + Me by Lion Brand Yarn for this project
- Colors and amounts used are listed in the Notes
- Notions: scissors, measuring tape, yarn needle
- Wooden dowel/ stick (more than 20” across)
Gauge
- 12 sc x 14 rows = 4” (blocked)
Terms/ Stitches used
- Ch: Chain
- St: Stitch
- Sc: Single crochet
- RS: Right side
Notes
- As is industry standard, this pattern is just a free graph and not written instructions but you can purchase the pattern for a fee in my Ravelry shop.
- Start your design with a ch 58, sc into the 2nd ch from the hook and across with color A. Each row begins with a “ch 1, turn” and all st counts are 57 sc.
- This pattern is worked from the bottom up, row by row with a turn at the beginning of the row.
- The ch 1 at the beginning of the rows does not count as a stitch.
- The odd rows are the RS.
- This pattern doesn’t require you to carry the yarn, just use bobbins where necessary and change colors on the last pull through of the sc.
- In the photos: Hue + Me by Lion Brand Yarn – color A is dark pink (HM in Love Song 2.7 oz/ 84 yds), color B is light pink (HM in Rosewater 2.1 oz/ 65 yds), color C is orange (HM in Grapefruit 2.1 oz/ 65 yds), color D is tan (HM in Desert 1.2 oz/ 37 yds), color E is white (HM in Salt 4.6 oz/ 143 yds), and color F is yellow (HM in Mustard 1.5 oz/ 47 yds).
Blocked Painted Hills Wall Hanging Finished Product Details (approx, not including stick/ dowel/ fringe)
| Height | Width |
| 24” | 19” |
![[image description] The Painted Hills Wall Hanging hanging from a metal hook on a wooden fence.](https://d3gel9wqxksnxm.cloudfront.net/wp-content/uploads/2023/03/Painted-Hills-Wall-Hanging-597x1000-1.jpg)
Painted Hills Wall Hanging Crochet Pattern Graph
Key: color A is dark pink, color B is light pink, color C is orange, color D is gray, color E is white, and color D is yellow.
![[Image description] Graph for the Painted Hills Wall Hanging](https://d3gel9wqxksnxm.cloudfront.net/wp-content/uploads/2023/03/Painted-Hills-Wall-Hanging-graph-by-Divine-Debris.jpg.jpg)
Start your design with a ch 58, sc into the 2nd ch from the hook and across with color A. Each row begins with a “ch 1, turn” and all st counts are 57 sc.
Top/ Hanging
Sew your wooden dowel or stick to your wall hanging (or sc into the last row across if you’d like).
For the hanger, ch 80 with color E and tie the ends to the first and last sts on the final row of the wall hanging.
And feel free to add rays to the sun with color F at this time.
Fringe (optional)
To recreate the fringe I have on my wall hanging cut 11 12″ pieces of color A, 14 11″ pieces of color B, 12 10″ pieces of color C, 12 9″ pieces of color D, 2 40″ pieces of color E, and 2 36″ pieces of color F. Add them to the other side of Row 1, arranging them from the center out: color A in the center 11 sts, 7 sts of color B on both sides of color A, 6 sts of color C on both sides of color B, and 6 sts of color D on both sides of of color C. For color F: start in the first st to the right of your last piece of color D fringe, pull your yarn through the st, leave a 8″ tail hanging down, pull your yarn across (be sure to leave slack so the yarn hangs down in front of your other fringe) to the first st to the left of that side’s color D, and pull your yarn through that st, with a 8″ tail hanging down on that side. Repeat the instructions for color F again with the first st to the left and the right of the sts you just made. For color E: do as you did with color F, except leave a 9″ tail along the sides. Feel free to loop your hanging tails through the st again to secure the yarn.
Below are photos that will help you add color E and color F fringe.
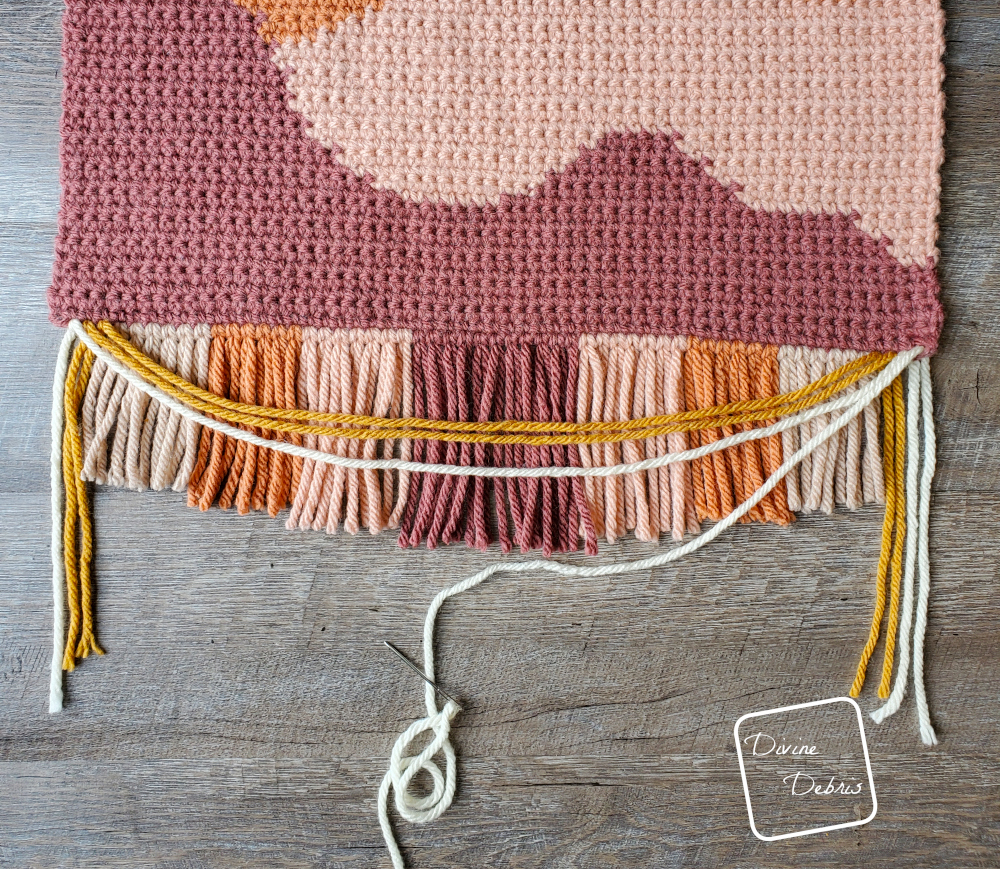
Fringe Step 1
Pull your yarn through the designated st on the right side, leaving a long tail (8″ for color F, 9″ for color E).
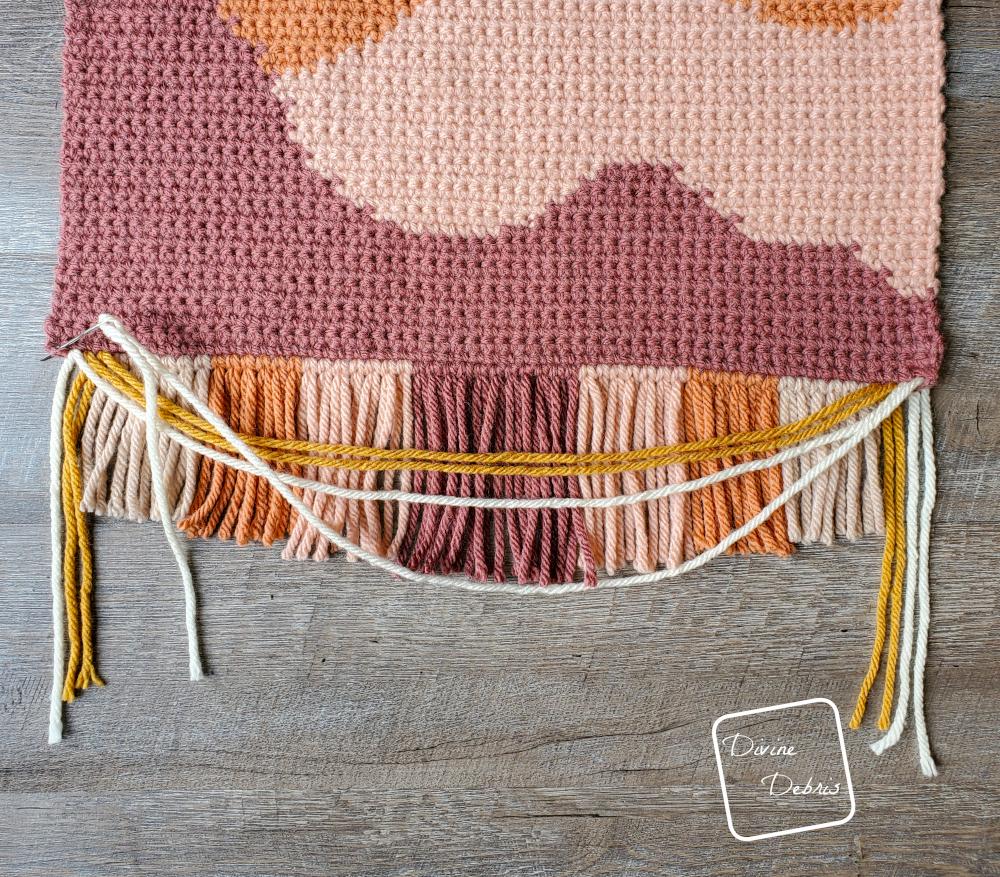
Fringe Step 2
Pull your yarn across leaving slack in the center.
Fringe Step 3
Pull your yarn through the designated st on the left and create a matching tail on the left side (8″ for color F, 9″ for color E).
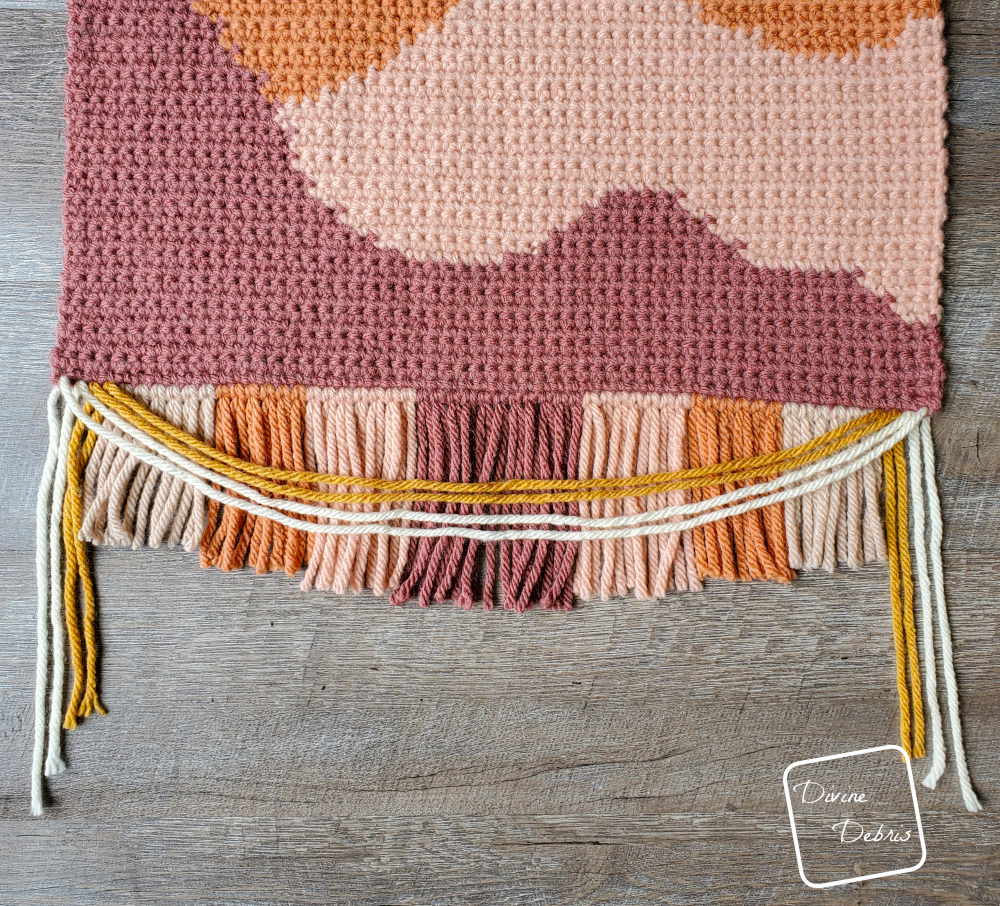
Feel free to loop your hanging tails through the st again to secure the yarn.
Here’s a quick video of how I added fringe to the Painted Hills Wall Hanging
You can pick up written instructions for the Painted Hills Wall Hanging crochet pattern in my Ravelry shop.