
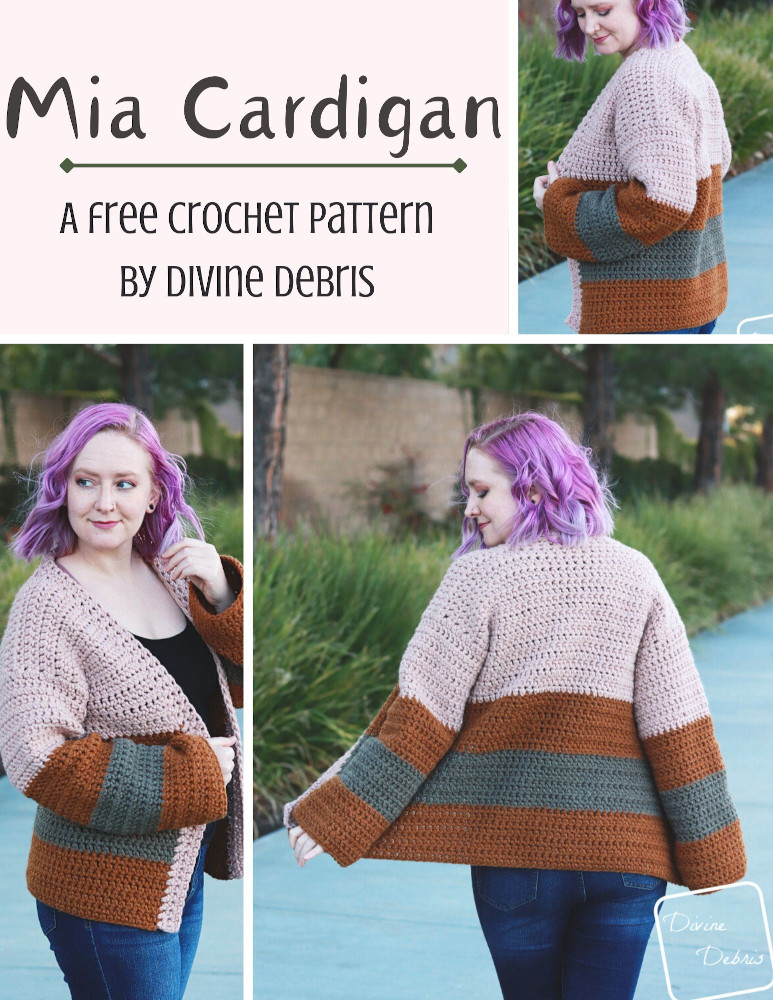
Happy Mia Cardigan crochet pattern day!
Ok, that’s not an official holiday or anything but I started this design back at the beginning of January (as seen on Instagram) but I had no room in my schedule until this month. Sometimes it’s so hard to be organized but it’s also nice, because I like knowing I have patterns ready to go. It’s weird, honestly, to try to make things week by week like this. Weird in a good way.
Oh, yeah… So… I’m celebrating the release (finally) with a fake holiday.
Honestly, I hope people like this pattern. I probably should have found a way to fit this design into my release schedule a month or more ago because it’s a bulky weight yarn (using the Hue+Me from Lion Brand Yarn that I used to make the Calista Basket) design and those are the best during the cold months of the year. But, also, it’s still cold here and in other places across the US… so maybe people want something cozy?
Oh, I don’t know. Like most of my designs, I’m just trying to make what makes me happy but also hope other people will like. It’s a weird balance, a dance that I’m not quite good at, but like everything it takes practice. I just hope that as how the Mia Cardigan is super simple, it’ll be a good design no matter the time of year.
And it uses the extended single crochet, need I say more? Oh, yeah? Ok, this stitch is super fun and worth the little extra loop. It gives designs a nice little bit of extra texture, which in the year 2021 I’m here for. I like not a ton of work with a lot of fun pay off (my 2021 motto), so I love this stitch and I hope you do too.
Please enjoy the Mia Cardigan crochet pattern! & consider purchasing one of the pdfs to help me keep making patterns. 🙂
I hope where ever you are you’re having a great time and being safe and healthy. Hugs friends. Wash your hands and masks.
Please note: I was provided the yarn for this pattern by Lion Brand Yarn for the purposes of making this design, without compensation. I wasn’t provided the yarn with the expectations of positive or negative reviews but I did enjoy using this yarn, I’ve used it many times and it’s always a great worsted acrylic yarn. If you purchase yarn through any of the links in this post, I will be compensated. Please do not make videos of my patterns.
(this post contains affiliate links)

If you appreciate my weekly patterns I hope you’d consider purchasing an ad-free pdf of this pattern in my Ravelry shop and Lovecrafts shop!
Thank you Ashlynn and Alice for becoming my newest patrons on Patreon!
Where to purchase the Mia Cardigan crochet pattern


![[image description] the Mia Cardigan lays flat on a white background with skeins of yarn to the left and a hand holding the right sleeve.](https://d3gel9wqxksnxm.cloudfront.net/wp-content/uploads/2021/03/MiaCardigan-1000x956-1.jpg)
Level
Easy
Materials
- US L (8.00 mm) crochet hook
- Size #5/ Bulky weight yarn
- 3 colors
- Amounts in Finished Product Details
- Notions: scissors, measuring tape, yarn needle
- Stitch markers to help you made your sleeves (optional)
Gauge
- 8 esc x 7 rows= 4” (blocked)
Terms/ Stitches used
- RS: right side
- St: stitch
- Ch: chain
- Join: join with a slip st into the first st
- Rnd: round
- Slip st: slip stitch
- Esc: extended single crochet (explained below)
- Sc: Single crochet
Notes
- Esc (extended single crochet): insert hook into stitch, yarn over, pull up a loop, yarn over, draw through one loop, yarn over, pull through the 2 loops on the hook.
- This pattern is worked in 3 sections: Body, Upper Back, Sleeves, and Lapel.
- The Body is worked from the bottom up, then seamed along the shoulders, the Sleeves are worked along the holes created from seaming, and the Lapel is worked last into the row ends.
- The ch-1 at the beginning of the rows/ rnds does not count as a stitch.
- When changing colors, just pull up a new color with the ch 1 of the new row/rnd.
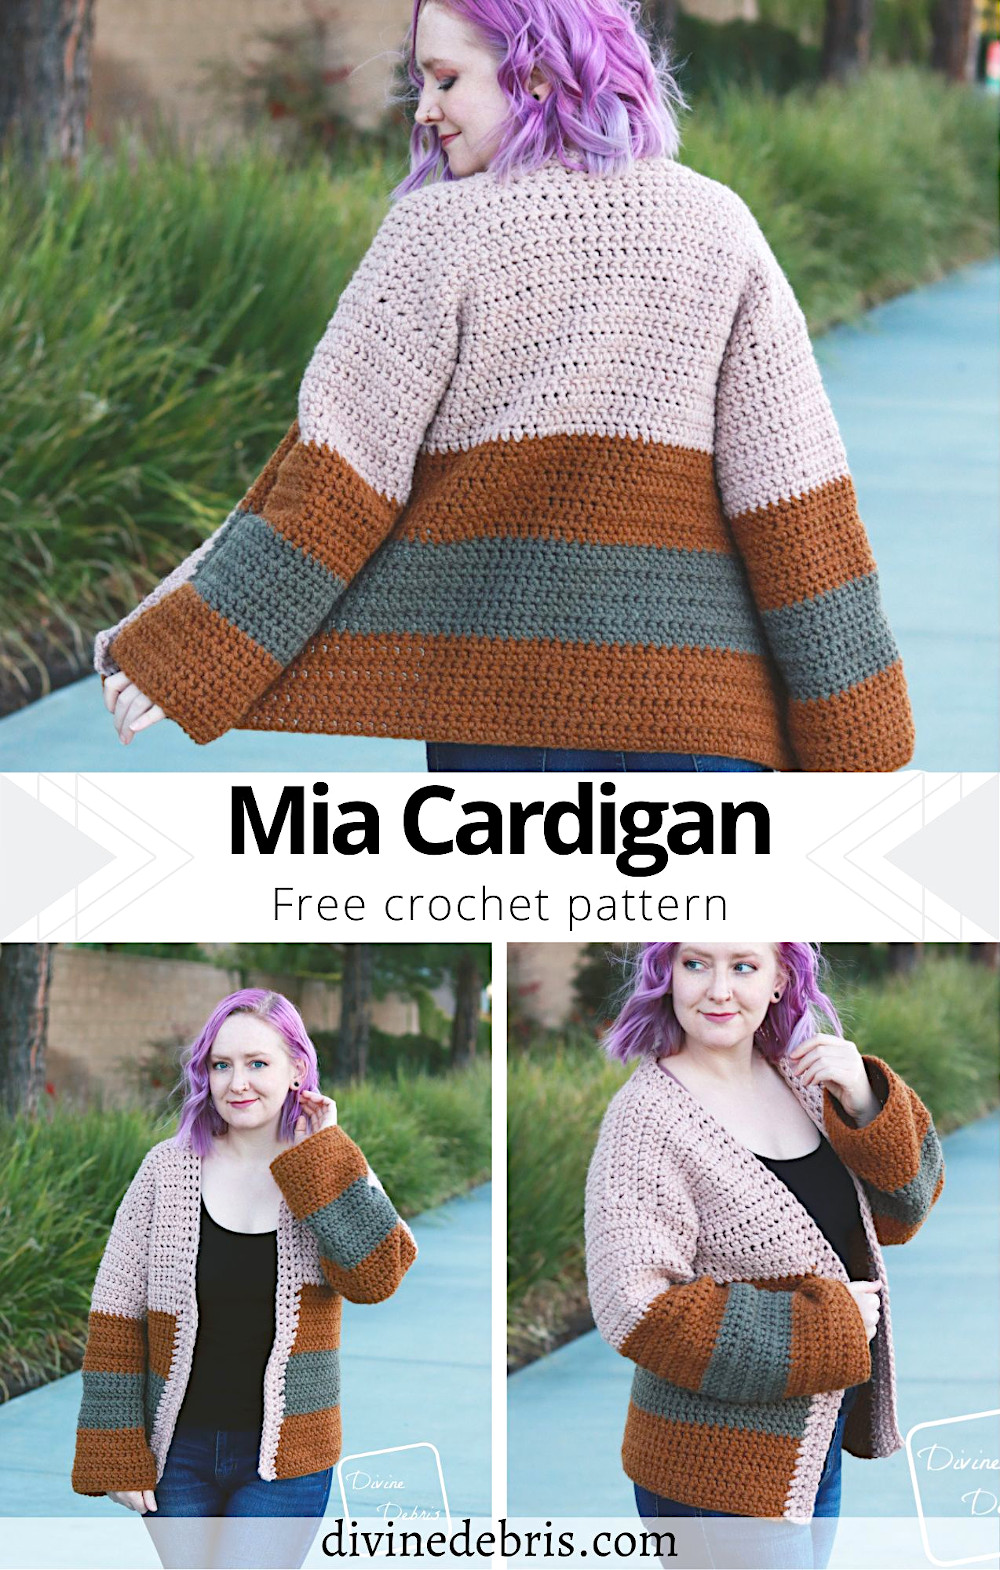
- In the photos: color A is dark mustard (Lion Brand Yarn Hue + Me in Arrowwood), color B is green (Lion Brand Yarn Hue + Me in Fatigues), and color C is tan (Lion Brand Yarn Hue + Me in Desert).
Approx finished product details (measurements may vary by gauge and yarn used)
| XSmall Height: 24” Cross Back: 16” Fits Chest: 28″ – 30″ Yarn: A: 8.1 oz | 251 yds B: 4 oz| 124 yds C: 10.3 oz | 319 yds | Small Height: 24”Cross Back: 18” Fits Chest: 32″ – 34″ Yarn: A: 8.4 oz | 260 yds B: 4.2 oz | 130 yds C: 10.9 oz | 338 yds | Medium Height: 25”Cross Back: 20” Fits Chest: 36″ – 38″ Yarn: A: 10.3 oz | 319 yds B: 5.2 oz | 161 yds C: 12 oz | 372 yds |
| Large Height: 25”Cross Back: 22” Fits Chest: 40”- 42” Yarn: A: 11.6 oz | 360 yds B: 5.5 oz | 171 yds C: 12.7 oz | 395 yds | 1X Height: 26”Cross Back: 24” Fits Chest: 44″ – 46″ Yarn: A: 12.4 oz | 483 yds B: 6.2 oz | 192 yds C: 15 oz | 465 yds | 2X Height: 26” Cross Back: 26” Fits Chest: 48″ – 50″ Yarn: A: 12.7 oz | 394 yds B: 6.3 oz | 195 yds C: 15.5 oz | 481 yds |
| 3X Height: 27” Cross Back: 28” Fits Chest: 52″ – 54″ Yarn: A: 15 oz | 465 yds B: 7.5 oz | 233 yds C: 16.4 oz | 508 yds | 4X Height: 27”Cross Back: 30” Fits Chest: 56″ – 58″ Yarn: A: 15.8 oz | 490 yds B: 8 oz | 248 yds C: 17.3 oz | 536 yds | 5X Height: 27”Cross Back: 32” Fits Chest: 60″ – 62″ Yarn: A: 16.5 oz | 512 yds B: 8.3 oz | 257 yds C: 18.2 oz | 564 yds |
![[image description] white woman with purple hair facing away looks down and over her shoulder while wearing the striped Mia Cardigan crochet pattern while standing in front of a row of bushes.](https://d3gel9wqxksnxm.cloudfront.net/wp-content/uploads/2021/03/MiaCardigan-847x1000-1.jpg)
![[image description] white woman with purple hair facing away looks down and over her shoulder while wearing the striped Mia Cardigan crochet pattern while standing in front of a row of bushes.](https://d3gel9wqxksnxm.cloudfront.net/wp-content/uploads/2021/03/MiaCardigan-847x1000-1.jpg.webp)
Mia Cardigan Crochet Pattern Instructions
Sizing as follows: XS (SM, MD, LG, 1X)(2X, 3X, 4X, 5X)
Body
Row 1: A: Ch 57 (61, 69, 77, 85)(89, 97, 105, 113), esc into the second ch from the hook and into the next 54 (58, 66, 74, 82)(86, 94, 102, 110) sts – 56 (60, 68, 76, 84)(88, 96, 104, 112) esc
Rows 2 – 7 (7, 8, 8, 8)(8, 9, 9, 9): A: Ch 1, turn, esc into the next 56 (60, 68, 76, 84)(88, 96, 104, 112) sts – 56 (60, 68, 76, 84)(88, 96, 104, 112) esc
Fasten off color A.
Rows 8 (8, 9, 9, 9)(9, 10, 10, 10) – 14 (14, 16, 16, 16)(16, 18, 18, 18): B: Ch 1, turn, esc into the next 56 (60, 68, 76, 84)(88, 96, 104, 112) sts – 56 (60, 68, 76, 84)(88, 96, 104, 112) esc
Fasten off color B.
Rows 15 (15, 17, 17, 17)(17, 19, 19, 19) – 21 (21, 24, 24, 24)(24, 27, 27, 27): A: Ch 1, turn, esc into the next 56 (60, 68, 76, 84)(88, 96, 104, 112) sts – 56 (60, 68, 76, 84)(88, 96, 104, 112) esc
Fasten off color A.
Rows 22 (22, 25, 25, 25)(25, 28, 28, 28) – 30 (30, 30, 30, 30)(30, 30, 30, 30): C: Ch 1, turn, esc into the next 56 (60, 68, 76, 84)(88, 96, 104, 112) sts – 56 (60, 68, 76, 84)(88, 96, 104, 112) esc
Do not fasten off. The next section creates the arm holes.
Upper Back
Right section
Rows 31 – 42 (42, 44, 44, 46)(46, 48, 48, 48): C: Ch 1, turn, esc into the next 12 (12, 14, 16, 18)(18, 20, 22, 24) sts – 12 (12, 14, 16, 18)(18, 20, 22, 24) esc
Fasten off leaving a long tail, which you will use to seam together the Upper Back sections.
Center section
Start where you left off on row 31 of the Right side and create a slipknot on your hook (this will make your first st a standing esc).
Row 31: C: Esc into the next 32 (36, 40, 44, 48)(52, 56, 60, 64) sts – 32 (36, 40, 44, 48)(52, 56, 60, 64) esc
Rows 32 – 42 (42, 44, 44, 46)(46, 48, 48, 48): C: Ch 1, turn, esc into the next 32 (36, 40, 44, 48)(52, 56, 60, 64) sts – 32 (36, 40, 44, 48)(52, 56, 60, 64)
Fasten off.
Left section
Start where you left off on row 31 of the Center side and create a slipknot on your hook (this will make your first st a standing esc).
Row 31: C: Esc into the next 12 (12, 14, 16, 18)(18, 20, 22, 24) sts – 12 (12, 14, 16, 18)(18, 20, 22, 24) esc
Rows 32 – 42 (42, 44, 44, 46)(46, 48, 48, 48): C: Ch 1, turn, esc into the next 12 (12, 14, 16, 18)(18, 20, 22, 24) sts – 12 (12, 14, 16, 18)(18, 20, 22, 24) esc
Fasten off leaving a long tail, which you will use to seam together the Upper Back sections. Weave in all your ends.
Block your piece so it measures 28” x 24” (20” x 24”, 34” x 25”, 38” x 25”, 42” x 26”)(44” x 26”, 48” x 27”, 52” x 27”, 56” x 27”).
![[image description] white woman with purple hair looks off to the left while wearing the striped Mia Cardigan crochet pattern while standing in front of a row of bushes.](https://d3gel9wqxksnxm.cloudfront.net/wp-content/uploads/2021/03/MiaCardigan-901x1000-1.jpg)
Seaming
Using the tails you left over from the Left and Right sections of the Upper Back, seam together, in your preferred method of seaming, the 12 (12, 14, 16, 18)(18, 20, 22, 24) sts from the Left and Right sections to the first and last 12 (12, 14, 16, 18)(18, 20, 22, 24) of the Center section. Weave in your ends. The open sections on the sides are your arm holes.
Sleeves
Sizing as follows: XS (SM, MD, LG, 1X)(2X, 3X, 4X, 5X)
Rnd 1: C: With the RS facing you, create a slipknot on your hook with color C (this will make your first st a standing esc) and start in the the one of the row 31 ends (your arm hole), esc into the next 24 (24, 28, 28, 32)(32, 36, 36, 36) row ends (all the way around the arm hole), join – 24 (24, 28, 28, 32)(32, 36, 36, 36) esc
Rnds 2 – 10: C: Ch 1, turn, esc into the next 24 (24, 28, 28, 32)(32, 36, 36, 36) sts, join – 24 (24, 28, 28, 32)(32, 36, 36, 36) esc
Fasten off color C.
Rnds 11 – 18: A: Ch 1, turn, esc into the next 24 (24, 28, 28, 32)(32, 36, 36, 36) sts, join – 24 (24, 28, 28, 32)(32, 36, 36, 36) esc
Fasten off color A.
Rnds 19 – 26: B: Ch 1, turn, esc into the next 24 (24, 28, 28, 32)(32, 36, 36, 36) sts, join – 24 (24, 28, 28, 32)(32, 36, 36, 36) esc
Fasten off color B.
Rnds 27 – 34: A: Ch 1, turn, esc into the next 24 (24, 28, 28, 32)(32, 36, 36, 36) sts, join – 24 (24, 28, 28, 32)(32, 36, 36, 36) esc
Rnd 35: A: Ch 1, turn, sc into the next 24 (24, 28, 28, 32)(32, 36, 36, 36) sts, join – 24 (24, 28, 28, 32)(32, 36, 36, 36) sc
Fasten off, weave in your ends. Block your sleeve so it measures 20”. These sleeves are meant to be long and cozy, if you’d like them shorter feel free to eliminate rows but just remember to do it on both sleeves.
Repeat Sleeve instructions on the other arm hole.
Lapel
(RS) Row 1: With color C create a slipknot on your hook (this will make your first st a standing esc), esc into the row end of row 1 and into the next 41 (41, 43, 43, 45)(45, 47, 47, 47) row ends, esc into the 8 (12, 12, 12, 12)(16, 16, 16, 16) that weren’t seamed on the Center section of the Upper Back, esc into the next 42 (42, 44, 44, 46)(46, 48, 48, 48) ends – 92 (96, 100, 100, 104)(108, 112, 112, 112) esc
Rows 2 – 3: Ch 1, turn, esc into the next 92 (96, 100, 100, 104)(108, 112, 112, 112) sts – 92 (96, 100, 100, 104)(108, 112, 112, 112) esc
Fasten off, weave in your ends.
Feel free to add more rows to the Lapel or an additional section along the bottom edge to match the Lapel.
![[image description] white woman with purple hair looks down while wearing the striped Mia Cardigan crochet pattern while standing in front of a row of bushes.](https://d3gel9wqxksnxm.cloudfront.net/wp-content/uploads/2021/03/MiaCardigan-923x1000-1.jpg)

Dawn Gaede
Sunday 7th of March 2021
I am confused. In the Center section it says start where you left off on row 31. I did rows 31 - 48 before fastening off. Does the "start where you left off on row 31" really mean row 48 since that's where I really left off. Or does it mean you go back to row 31 and start at the end of that row.
I just need a clarification. Thanks a lot. Your patterns are great. Dawn.
Divine Debris
Sunday 7th of March 2021
Like how you moved on from the Right Section to the Center Section by starting back on Row 31, you start back on Row 31 to create the Left Section after fastening off on Row 48 of the Center Section. The sections split up like this create the sleeve holes when you seam them along row 48. I hope that helps <3
-Amber