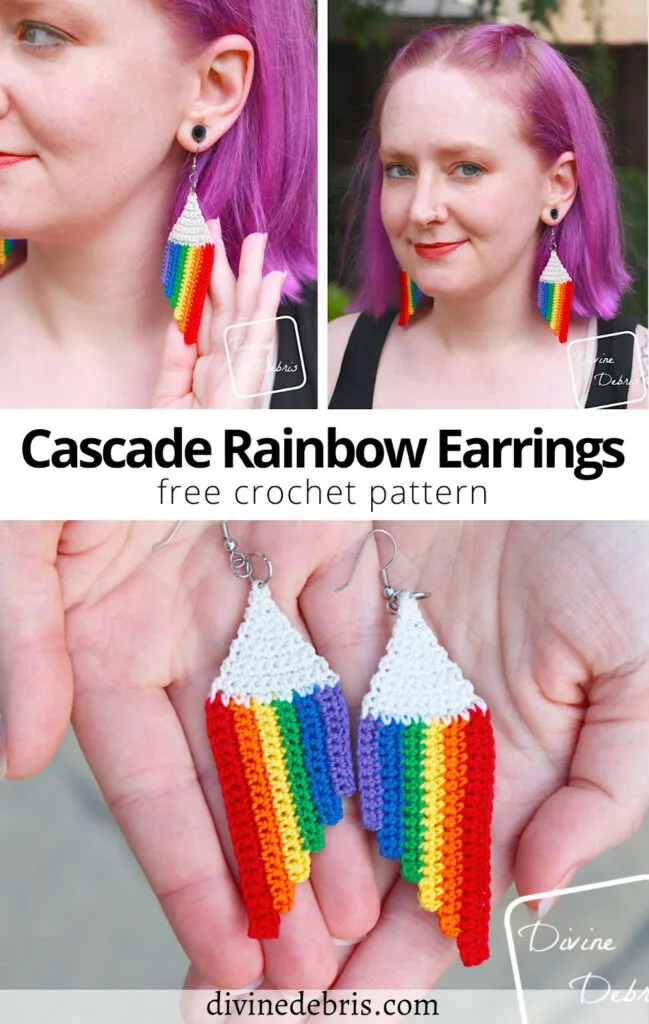
Will you look at that, I’m so organized this year 😀 Here I am, with my first Pride design of 2023 in May so you can have a pair of fancy new earrings like me ready to go when June hits. If you’re like me and ready for rainbows, I sure hope you like the new Cascade Rainbow Earrings crochet pattern.
Second only to Halloween, designing for Pride in June is one of my favorite times of the year. I love to find new ways to show off rainbows and incorporate them into my every day aesthetic. Especially because here in the US a record number of anti-queer bills have been introduced this year in various states. It is absolutely terrifying if I’m being completely honest with you. It’s also why I donate all the proceeds from rainbow designs to Trans LifeLine and The Trevor Project every June. To me, it’s more than just sharing rainbow designs, it’s about trying to save lives.
Now, I know soap box chats aren’t everyone’s favorite thing and I totally get that. I just wanted to make it very clear (to those who read these parts of blogs) where I stand on this issue. I’m a queer cis woman living in the US and I am doing what I can.
So… yeah, the earrings. I don’t now what to say about them other than I wore them out the other day and loved them. They’re so light weight and easy to make, I’m actually thinking about making a 2nd pair but this time making 2 of each so I can make them 3D. I bet that would look so cool! But if you want to just make them as they are, here’s a fun little video I posted on Instagram of how I finished the earrings.
As always, feel free to change up the colors on these earrings and customize them as you’d like. Because they’re so very easy, there’s so much room to customize. Add some fringe, or maybe some stars (I was really thinking about that myself) to the Triangle part. Or like I said above, double up on the design and stuff them with filling to make them 3D like my Stuffed Mushrooms Earrings. That would be SO cute in my opinion.
Anyway, I hope you like this week’s new pattern. I’m not going to apologize for hopping on that soap box of mine, I just hope you understand why it’s necessary.
And be kind to yourself, others, and the world. Wear and wash your masks.
Copyright @ Divine Debris 2023. No part of this document may be reproduced or transmitted in any form by any means, electronic, mechanical, photocopying, or otherwise, without prior written permission from the author. Sales of finished products are permitted, but the designer requests that you link back to the pattern and credit Divine Debris with the original design under the Creative Commons Attribution-Share Alike license. If you have any questions, comments or concerns please contact info@divinedebris.com.
(this post contains affiliate links)
If you appreciate my weekly patterns I hope you’d consider purchasing an ad-free pdf of this pattern in my Ravelry shop and Lovecrafts shop!
Where to purchase the Cascade Rainbow Earrings Crochet pattern
Level
Advanced Easy
Materials
- US 1.65 mm steel crochet hook
- Size 10 crochet thread
- Less than .1 oz total
- 7 colors
- I used Aunt Lydia’s Size 10 Thread
- Needle that will weave in your ends
- Jump rings
- Metal french hooks
- Jewelry pliers
- Fabric Stiffener
Gauge
- 12 sc x 10 rows = 1”
Terms/ Stitches used
- St: Stitch
- Ch: Chain
- RS: Right Side
- Sc: Single crochet
- Sc2tog: Sc 2 sts together
Notes
- This pattern is worked in 2 sections: the Rainbow and the Triangle.
- The ch 1 at the beginning of the rows does not count as a stitch.
- This design is worked in 7 colors but you can make it in as many or as few as you’d like.
- You could easily make this into a coaster or applique by using a 4.00 mm hook and worsted weight yarn to make it.
- In the photos: Color A is red, color B is orange, color C is yellow, color D is green, color E is blue, color F is purple, and color G is white. Aunt Lydia’s Size 10 crochet thread was used.
Approx Finished Product Details for the Cascade Rainbow Earrings Crochet (does not include findings/rings/hook)
| Height (approx) 3” | Width (approx) 1.2″ |
Cascade Rainbow Earrings Crochet Pattern Instructions
Rainbow
(make 2)
(RS) Row 1: A: Ch 21, sc into the 2nd ch from the hook and across — 20 sc
Row 2: Ch 1, turn, sc across — 20 sc
Fasten off color A, switch to color B.
Row 3: B: Ch 1, turn, sc into the next 18 sts — 18 sc
Row 4: Ch 1, turn, sc across — 18 sc
Fasten off color B, switch to color C.
Row 5: C: Ch 1, turn, sc into the next 16 sts — 16 sc
Row 6: Ch 1, turn, sc across — 16 sc
Fasten off color C, switch to color D.
Row 7: D: Ch 1, turn, sc into the next 14 sts — 14 sc
Row 8: Ch 1, turn, sc across — 14 sc
Fasten off color D, switch to color E.
Row 9: E: Ch 1, turn, sc into the next 12 sts — 12 sc
Row 10: Ch 1, turn, sc across — 12 sc
Fasten off color E, switch to color F.
Row 11: F: Ch 1, turn, sc into the next 10 sts — 10 sc
Row 12: Ch 1, turn, sc across — 10 sc
Fasten off color F. Weave in all your ends. Move onto the Triangle section.
Triangle
Row 1: G: With the RS facing you, pull up a loop on the first row end along the solid edge of the Rainbow, ch 1, sc into the next 12 row ends — 12 sc
Row 2: Ch 1, turn, sc into the first st, sc2tog the next 2 sts, sc across until 3 sts remain, sc2tog the next 2 sts, sc into the last st — 10 sc
Row 3: Ch 1, turn, sc across — 10 sc
Row 4: Ch 1, turn, sc into the first st, sc2tog the next 2 sts, sc across until 3 sts remain, sc2tog the next 2 sts, sc into the last st — 8 sc
Row 5: Ch 1, turn, sc across — 8 sc
Row 6: Ch 1, turn, sc into the first st, sc2tog the next 2 sts, sc across until 3 sts remain, sc2tog the next 2 sts, sc into the last st — 6 sc
Row 7: Ch 1, turn, sc across — 6 sc
Row 8: Ch 1, turn, sc into the first st, sc2tog the next 2 sts, sc2tog the next 2 sts, sc into the last st — 4 sc
Row 9: Ch 1, turn, sc across — 4 sc
Row 10: Ch 1, turn, sc2tog the next 2 sts, sc2tog the next 2 sts — 2 sc
Row 11: Ch 1, turn, sc across — 2 sc
Row 12: Ch 1, turn, sc2tog — 1 sc
Row 13: Ch 1, turn, sc — 1 sc
Fasten off, weave in all your ends.
Finishing
Like I do with all my earrings, I stiffened these with fabric stiffener. Just wet them down with the stiffener (I dilute it with water) and lay them flat to dry completely. When they’re dry, attach the findings, such as jump rings, and wear.
Don’t forget you can pick up a copy of this pattern in my Ravelry shop.


![[image description] A top down view of the Cascade Rainbow Earring being held up to the camera in a white woman's hands.](https://d3gel9wqxksnxm.cloudfront.net/wp-content/uploads/2023/05/RainbowCascadeEarrings-978x1000-2.jpg.webp)


![[Image description] Top down view of the Cascade Rainbow Earrings crochet pattern laying on fake wood background with skeins of crochet thread and strands around the earrings.](https://d3gel9wqxksnxm.cloudfront.net/wp-content/uploads/2023/05/RainbowCascadeEarrings-871x1000-1.jpg.webp)
![[Image description] A white woman with purple hair stands facing the camera wearing the Cascade Rainbow Earrings crochet pattern.](https://d3gel9wqxksnxm.cloudfront.net/wp-content/uploads/2023/05/RainbowCascadeEarrings-766x1000-1.jpg.webp)
![[Image description] Top down view of the Cascade Rainbow Earrings crochet pattern laying on fake wood background.](https://d3gel9wqxksnxm.cloudfront.net/wp-content/uploads/2023/05/RainbowCascadeEarrings-853x1000-1.jpg.webp)
