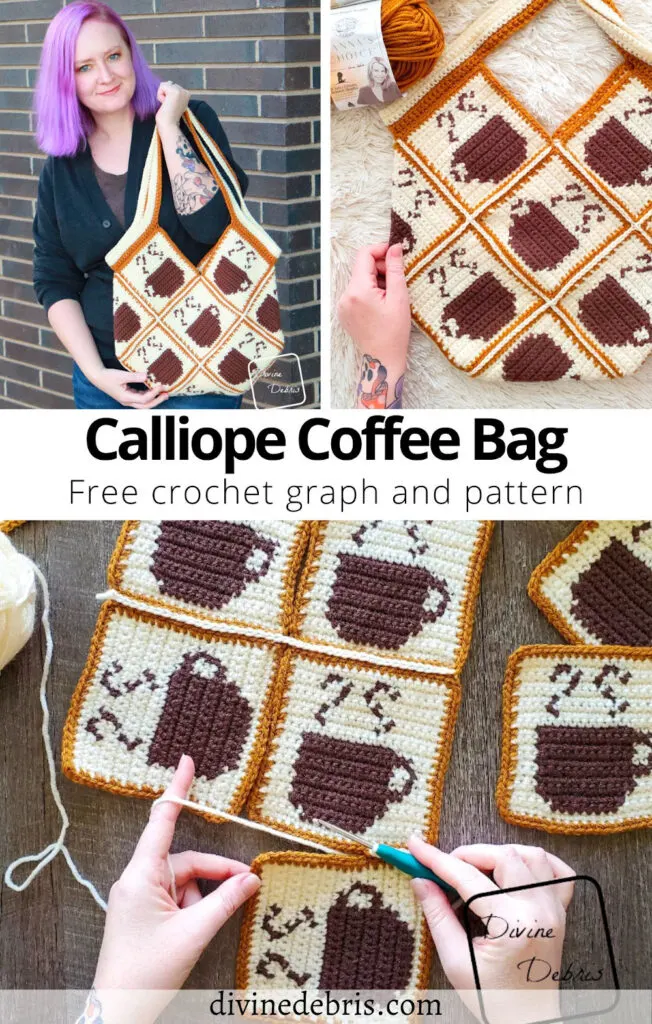
You know how much I love coffee right? Because I do, I really do. And when the response to my Glenda Ghost Bag was so good, I knew I needed to make a coffee themed one. That’s why this week’s I’ve the Calliope Coffee Bag crochet pattern for ya.
Yesterday on Instagram I was explaining why I picked Calliope for the name. In Greek Mythology Calliope was a muse, the eldest in fact, domain was epic poetry and eloquence and that just felt right for… because my constant companion and greatest muse is of course – coffee. I also, I just really like a little alliteration so the to “c” sounds also feels nice to me.
Like the Glenda Ghost Bag and the Susie Snowflakes Bag, the Calliope Coffee Bag is worked in 13 squares you seam and then add straps to. That’s kinda it. The hardest part is sitting down to make 6 of one square and 7 of the other, then blocking them, and them seaming them in a specific way. But don’t worry, there are lots of photos below of the bag in the process of seaming. I swear it’s not hard, just take it one stitch/ one square at a time. And you can definitely add more rows to the strap, change up the arrangement of the squares or how many of each you do. It’s got a lot off room for customization.
I had a blast thinking of a new bag pattern. I really do enjoy this style so much. I hope you do too. If you have any ideas you’d like to see, feel free to pop them into the comments 😀 And thank you so much for all your support. I hope you like this new bag pattern as much as I do.
Please note: I was provided the yarn for this pattern by Lion Brand Yarn for the purposes of designing and used it for the Calliope Coffee Bag crochet pattern, with compensation. I wasn’t provided the yarn with the expectations of positive or negative reviews but been using Vanna’s Choice for so long, it’s one of my favorite worsted with yarns. But I was commissioned to make this pattern and you can buy a kit for this pattern on Lion Brand’s Website. This post contains affiliate links. If you purchase yarn through any of the links in this post, I may be compensated.
Copyright @ Divine Debris 2023. No part of this document may be reproduced or transmitted in any form by any means, electronic, mechanical, photocopying, or otherwise, without prior written permission from the author. Sales of finished products are permitted, but the designer requests that you link back to the pattern and credit Divine Debris with the original design under the Creative Commons Attribution-Share Alike license. If you have any questions, comments or concerns please contact info@divinedebris.com.
(this post contains affiliate links)
If you appreciate my patterns I hope you’d consider purchasing an ad-free pdf of this pattern in my Ravelry shop and Lovecrafts shop!
Where to purchase the Calliope Coffee Bag crochet pattern
Level
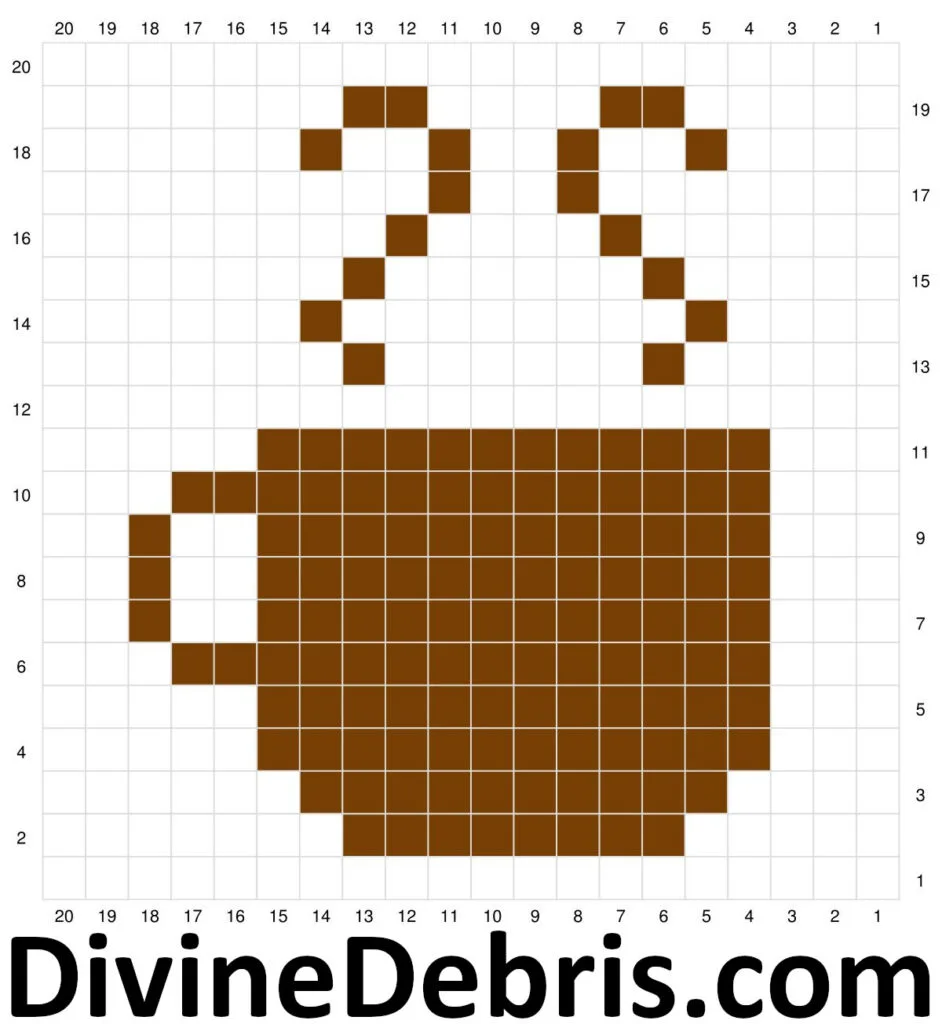
Intermediate (need to know how to read a graph and do color work)
Materials
- US G (4.00 mm) crochet hook
- 3 colors worsted weight/ size #4 yarn
- Color A: 5 oz/ 242 yds
- Color B: 3 oz/ 146 yds
- Color C: 2.5 oz/ 121 yds
- I used Vanna’s Choice by Lion Brand Yarn for this pattern
- Notions: scissors, measuring tape, yarn needle
Gauge
- 17 sc x 17 rows = 4” (blocked)
Terms/ Stitches used
- St: Stitch
- Ch: Chain
- Rnd: Round
- Slip st: Slip Stitch
- Sc: Single crochet
- BLO: Back loop only
- RS: Right Side/ WS: Wrong Side
Notes
- You can purchase the easy to print version of this pattern for a fee in my Ravelry shop.
- This pattern is worked in 3 sections: the Squares, the Assembly (where the seaming is), and the Straps.
- There are 2 different squares used in the pattern and 13 squares are used in total.
- For the squares: begin with a ch 21 in color A, turn, and start in the 2nd ch from the hook.
- Each row begins with a “ch 1, turn” and all st counts are 20 sc.
- The squares are worked from the bottom up in rows, with turns at the beginning of the rows.
- Each square has a Border, which you add once the square is done, and you use the Border to seam.
- The ch 1 at the beginning of the rows does not count as a stitch.
- Color A is carried behind color B in the photos.
- Blocking is suggested for this pattern.
- In the photos: color A is cream (Fisherman), color B is brown (Chocolate), and color C is gold (Honey). Vanna’s Choice by Lion Brand Yarn was used for all colors. Buy the kit for this pattern on Lion Brand’s website here.
Blocked Calliope Coffee Bag Crochet Pattern Finished Product Details
| Squares (including border) | Bag |
| 5.25” across 5.25” high | 14.5” across (at widest) 14” high (not including straps) |
Notes on carrying yarn on the Calliope Coffee Bag
For yarn conservation and clarity purposes, color B is not carried through the entire square.
Instead, color B is only used where it’s called for in the chart/ instructions and color A is carried behind it when not in use. Color B is only carried behind color A in the “steam” section above the cup, although you could use separate strands of B there to eliminate the need to carry the yarn.
Below are 2 close up photos of the top “steam” section of the square, showing color B carried and dropped when not in use.
Border
With the RS facing you, join color C in the first st on the other side of Row 1 of the square.
Row 1: C: Ch 1, sc into the next 20 sts, ch 1 at the corner, sc into the next 20 row ends, ch 1 at the corner, sc into the next 20 sts of Row 20, ch 1 at the corner, sc down the next 20 row ends, ch 1 at the corner, join with a slip st – 80 sc, 4 ch-1 spaces
Fasten off, weave in your ends. Block the square so it measures 5.25” x 5.25”.
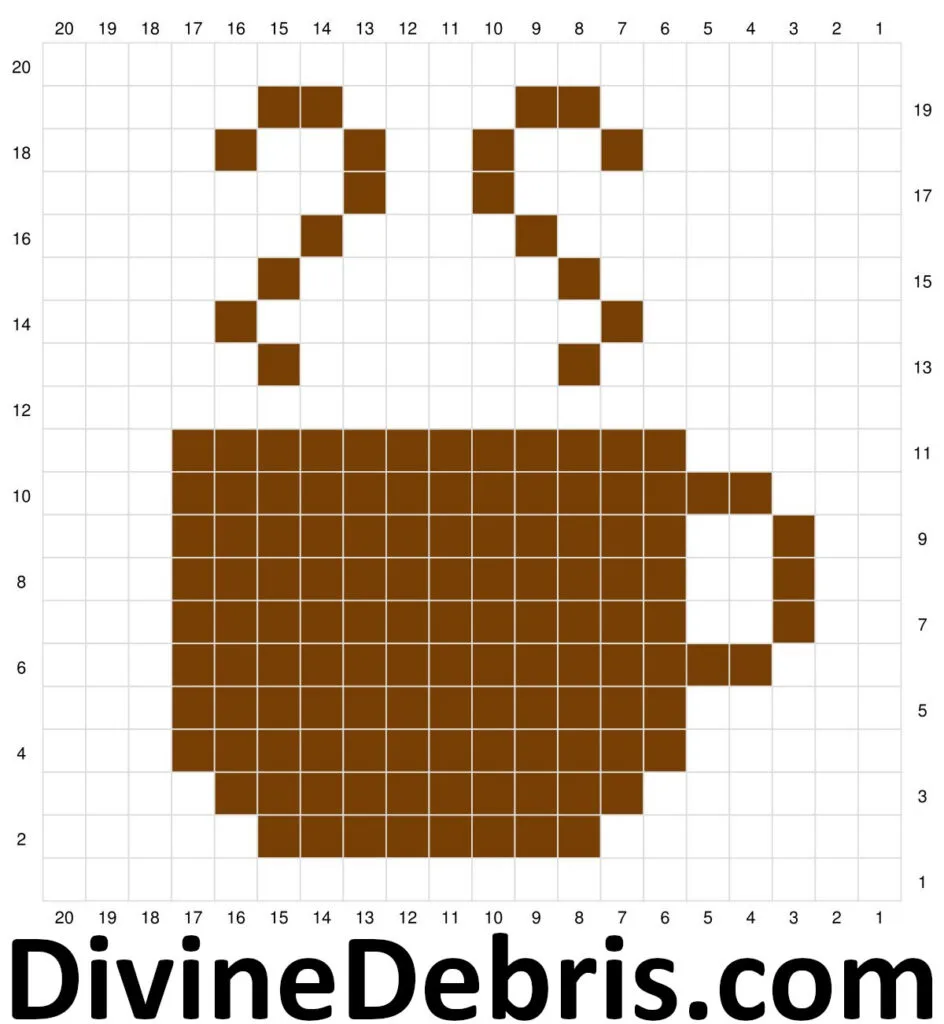
Calliope Coffee Bag Square 2
Make 7
Key: color A is white and color B is brown.
For the squares: begin with a ch 21 in color A, turn, and start in the 2nd ch from the hook. Each row begins with a “ch 1, turn” and all st counts are 20 sc.
Border
With the RS facing you, join color C in the first st on the other side of Row 1 of the square.
Row 1: C: Ch 1, sc into the next 20 sts, ch 1 at the corner, sc into the next 20 row ends, ch 1 at the corner, sc into the next 20 sts of Row 20, ch 1 at the corner, sc down the next 20 row ends, ch 1 at the corner, join with a slip st – 80 sc, 4 ch-1 spaces
Fasten off, weave in your ends. Block the square so it measures 5.25” x 5.25”.
Assembly
- You should have a total of 13 squares (6 Square 1 and 7 square 2).
- You can use any method of seaming for this section. I used a back loop only slip st.
- Fasten off between each seam and weave in your ends securely.
- Be sure to also seam the ch1 at the corners of each square.
To better visualize how you need to assemble your bag, lay your squares in rows of: 2, 1, 2, 1, 2, 3, 2, with the first 3 rows of cup squares upside down. You want them to be upside down because when you seam the bag along the middle single square, they’ll all be facing up the same way. See the photo below for reference.
When your Bag is seamed to match the photo on the previous page, flip it over so that the wrong side is facing you like the photo below.
Follow Steps 1 – 3 on how to finish seaming the sides of your bag.
Step 1: Fold your bag along the dark blue line in the center so it looks like the photo below.
Step 2: Seam the green edges to the teal edges on the right-hand side of the bag. The photo below shows how it will line up.
Step 3: Seam the pink edges to the yellow edges on the left-hand side of the bag. The photo below shows how it will line up.
Calliope Coffee Bag Straps
In the left photo above, the blue arrow shows which side you need to start your straps on and in the right photo, the green arrow shows you where you start your first st (not the ch 1 at the corner).
The photo above shows you (in purple) how you go up the square from where you joined your yarn, skip across a space (this is where the strap is) and work down another square. You will repeat this on the other side of the bag to create 2 straps.
Rnd 1: With color C, pull up a loop in the indicated by the green arrow in the photo above (the first st, not the ch 1, to the left of the seam you made when you did Step 2 of the Assembly), sc BLO into the next 20 sts of the square you’re on, ch 75, skip the ch 1 and next 20 sts on this square, skip where the 3 squares are joined and move to the next square to the left, skip the next 20 sts and ch 1 on the corner and sc BLO into the next 20 sts of this square, moving to the other side of the bag, skip the ch 1 at the corner and where the 3 squares are joined and move to the next square to the left, skip ch 1 at the corner and sc BLO into the next 20 sts of this square, ch 75, skip the ch 1 and next 20 sts on this square, skip where the 3 squares are joined and move to the next square to the left, skip the next 20 sts and ch 1 on the corner and sc BLO into the next 20 sts of this square, skip the ch 1 at the corner and where the 3 squares are joined, join with a slip st – 80 sc, 2 ch 75 spaces
Rnds 2 – 3: C: Ch 1, turn, sc around, join – 230 sc
Fasten off color C, switch to color A.
Rnds 4 – 6: A: Ch 1, turn, sc around, join – 230 sc
Fasten off, weave in your ends. Block this section if you’d like.
You can pick up written instructions for the Calliope Coffee Bag crochet pattern in my Ravelry shop.

![[image description] A white woman with purple hair stands against a brick background with the Calliope Coffee Bag hanging on her shoulder.](https://d3gel9wqxksnxm.cloudfront.net/wp-content/uploads/2023/11/CalliopeCoffeeBag-692x1000-1.jpg.webp)



![[Image description] Top down look at a pair of white woman's hands seaming of the Calliope Coffee Bag squares](https://d3gel9wqxksnxm.cloudfront.net/wp-content/uploads/2023/11/CalliopeCoffeeBag-800x1000-1.jpg.webp)
![[image description] close up look of the right side of a Calliope Coffee square on a fake wood background](https://d3gel9wqxksnxm.cloudfront.net/wp-content/uploads/2023/11/Coffee-Bag-Square-800x552-1.jpg.webp)
![[image description] close up look of the wrong side of a Calliope Coffee square on a fake wood background](https://d3gel9wqxksnxm.cloudfront.net/wp-content/uploads/2023/11/Coffee-Bag-Square-800x557-1.jpg.webp)
![[Image description] Top down look of the Calliope Coffee Bag laying on a white faux fir blanket, with pair of white woman's hands holding the bottom of the bag and skeins of yarn along the top left corner.](https://d3gel9wqxksnxm.cloudfront.net/wp-content/uploads/2023/11/CalliopeCoffeeBag-787x1000-1.jpg.webp)
![[Image description] Calliope Coffee Bag assembly photo 1 - all 13 squares are laying on an fake wood background](https://d3gel9wqxksnxm.cloudfront.net/wp-content/uploads/2023/11/CalliopeCoffeeBag-743x1000-1.jpg.webp)
![[Image description] Calliope Coffee Bag assembly photo 1 - all 13 squares are seamed and are laying on an fake wood background](https://d3gel9wqxksnxm.cloudfront.net/wp-content/uploads/2023/11/CalliopeCoffeeBag-755x1000-1.jpg.webp)
![[Image description] Calliope Coffee Bag assembly photo 3 - the 13 squares have been folded in half for further seaming.](https://d3gel9wqxksnxm.cloudfront.net/wp-content/uploads/2023/11/CalliopeCoffeeBag-1000x724-1.jpg.webp)
![[Image description] Calliope Coffee Bag assembly photo 4 - close up on how to fold the right-hand side.](https://d3gel9wqxksnxm.cloudfront.net/wp-content/uploads/2023/11/CalliopeCoffeeBag-885x1000-1.jpg.webp)
![[Image description] Calliope Coffee Bag assembly photo 5 - close up on how to fold the left-hand side.](https://d3gel9wqxksnxm.cloudfront.net/wp-content/uploads/2023/11/CalliopeCoffeeBag-869x1000-1.jpg.webp)
![[Image description] Calliope Coffee Bag assembly photo 6 - the body of the bag should now be complete](https://d3gel9wqxksnxm.cloudfront.net/wp-content/uploads/2023/11/CalliopeCoffeeBag-1000x939-1.jpg.webp)
![[Image description] Calliope Coffee Bag Straps photo 1 - the body of the bag is complete and this shows where to start the straps](https://d3gel9wqxksnxm.cloudfront.net/wp-content/uploads/2023/11/CalliopeCoffeeBag-1000x948-1.jpg.webp)
![[Image description] Calliope Coffee Bag Straps photo 2 - close up on where to to start the straps](https://d3gel9wqxksnxm.cloudfront.net/wp-content/uploads/2023/11/CalliopeCoffeeBag-1000x927-1.jpg.webp)
![[Image description] Calliope Coffee Bag Straps photo 3 - photo showing where to skip a space for the straps](https://d3gel9wqxksnxm.cloudfront.net/wp-content/uploads/2023/11/CalliopeCoffeeBag-1000x454-1.jpg.webp)
![[Image description] The Susie Snowflake Bag hangs off a piece of metal in front of a row of bushes](https://d3gel9wqxksnxm.cloudfront.net/wp-content/uploads/2023/11/CalliopeCoffeeBag-626x1000-1.jpg.webp)

Y
Thursday 18th of January 2024
Hi, if I only carry color A and not color B, I find that my middle section is slightly taller than the left and right (white part) parts of my square. Am I doing something wrong?
Divine Debris
Thursday 18th of January 2024
I don't quite know what you mean by "taller." I always carry the yarn behind (while working the RS) the previous row's sts and in front (while working the WS) of the previous row's sts and while I find that it does add a bit of bulk in those sections, it doesn't distort the design and is easily evened out with some steam blocking. I hope that helps.
Take care, Amber
Finn
Friday 29th of December 2023
I haven't made this yet, but I love the color coding photos in the instructions. Makes it very easy to follow. Super cute bag!
Diane S
Monday 27th of November 2023
This is so cute! I made just one for my husband to use for his coffee cup. He woke up this morning and it made him smile (I finished it while he was asleep). I will make more as gifts.
Betty Sinclair
Saturday 25th of November 2023
You should have a total of 13 squares (11 Square 1 and 2 square 2).In assembly think it should be 7 and 6 for total of 13 squares. Love the pattern and just about done making it.