
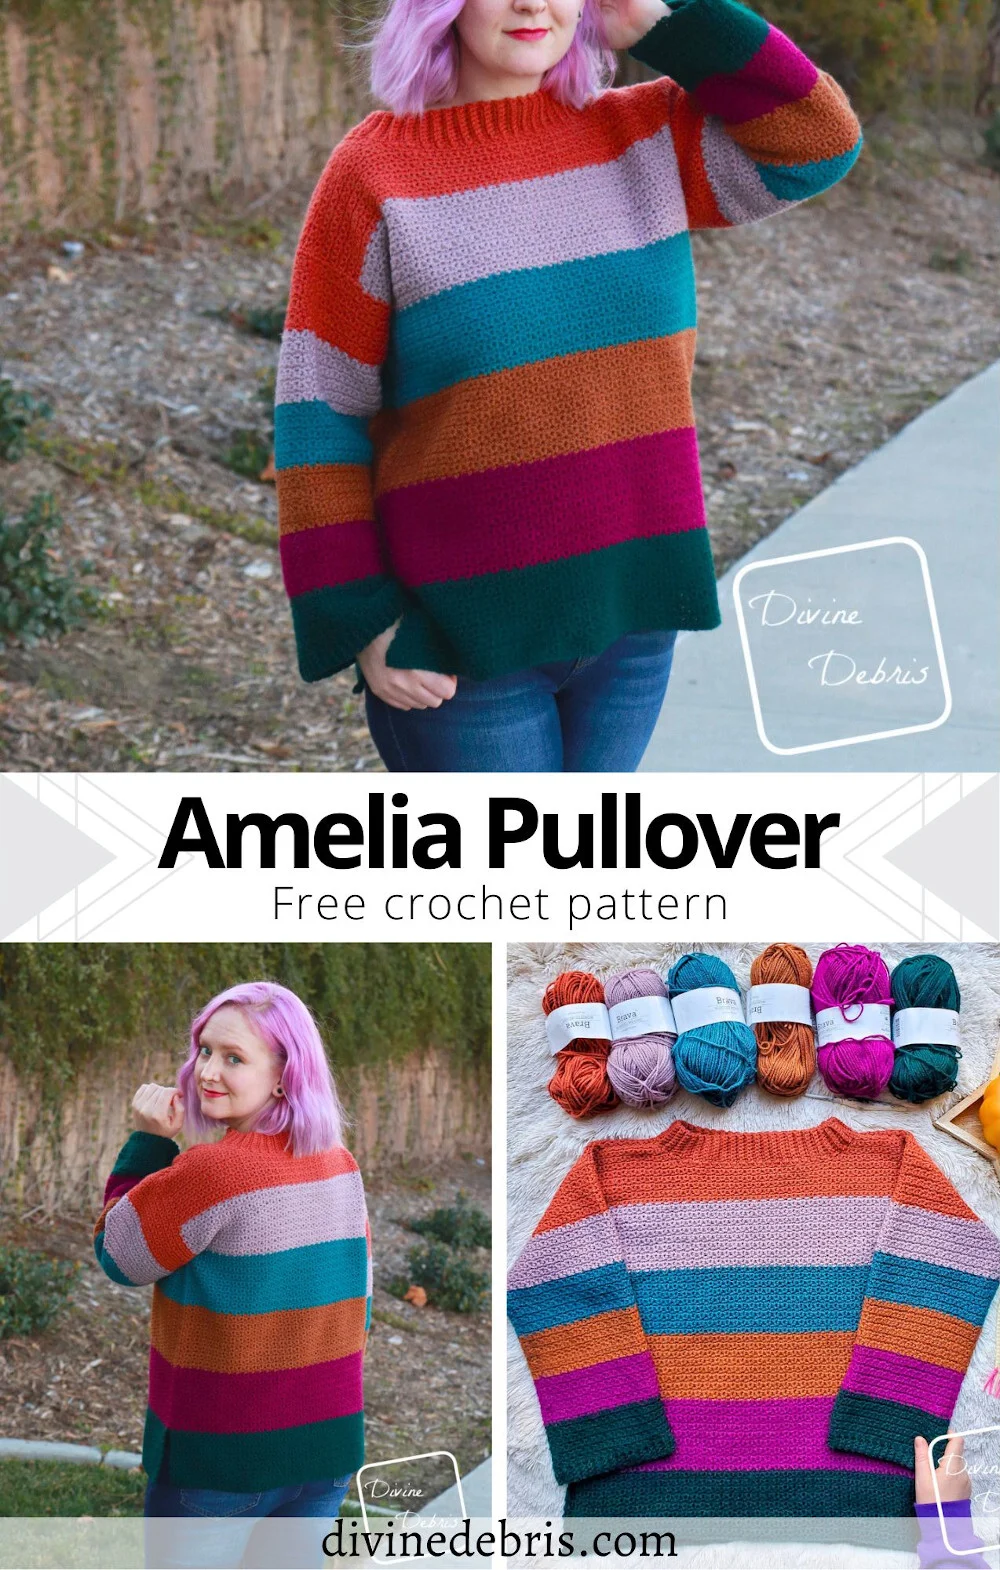
![[image description] White woman in striped crochet Amelia Pullover crochet pattern looking to the right in front of a wall of ivy](https://d3gel9wqxksnxm.cloudfront.net/wp-content/uploads/2021/02/AmeliaPullover-870x1000-1.jpg)
![[image description] White woman in striped crochet Amelia Pullover crochet pattern looking to the right in front of a wall of ivy](https://d3gel9wqxksnxm.cloudfront.net/wp-content/uploads/2021/02/AmeliaPullover-870x1000-1.jpg.webp)
Yay! Can you finally believe this day has come? After working on this pattern since December, I can finally release the Amelia Pullover crochet pattern and I must say, I am so happy. I have been living in this sweater lately so can’t to finally send it out into the world.
So… Like I said, I started this design in December (if you follow me on IG you will have already seen that) because I wanted to experiment with colors. I had idea for simple texture, oversized squish, and big striping and when I went looking through my stash I found colors I wouldn’t normally use together but I still went for it. Honestly, I thought this sweater was going to be, or lets say I was hoping, the cute kind of ugly but it kinda just turned out cute, right?
Did I mention the texture? In this pattern it makes me so happy! And all it is, is single crochet. With a fun alternating of BLO/FLO you can get so much texture in this sweater and create unique front and back sides of your work. But… that did pose a problem for the sleeves so make sure when you’re working the pattern you are keeping track of your BLO/FLO spots (maybe use a stitch marker) so you keep the same texture. I wrote that section so you can decrease as you’d like but that also means you have to keep an eye on your texture and not get mixed up. I believe in you, though, you can totally do it!
Oh, and before I let ya go, make sure you read the measurements fully. This is supposed to be an oversized sweater is supposed to be approx 2″ – 3″ in positive easy across (meaning 4″ to 6″ around) in the bust area so if that isn’t what you’re looking for, maybe look at a smaller size or even a smaller yarn/hook combo. Or play around and see what works for you in sizing! Remember, your finished object is for you, so you can customize as you like to make yourself happy <3 <3
Anyway, I hope you enjoy the Amelia Pullover crochet pattern and make some lovely stripes and texture!
I hope where ever you are you’re having a great time and being safe and healthy. Hugs friends. Wash your hands and masks.
Please note: I was provided the yarn for this pattern by We Crochet for the purposes of designing the Amelia Pullover crochet pattern, with compensation. I wasn’t provided the yarn with the expectations of positive or negative reviews but I did enjoy using this yarn, I’ve used it many times and it’s always a great worsted acrylic yarn. If you purchase yarn through any of the links in this post, I will be compensated.
This post is linked to Loop Scoop #8.
(this post contains affiliate links)
If you appreciate my weekly patterns I hope you’d consider purchasing an ad-free pdf of this pattern in my Ravelry shop and Lovecrafts shop!
Thank you Bonnie and Winnie for becoming my newest patrons on Patreon!
Where to purchase the Amelia Pullover crochet pattern


![[image description] The Amelia Pullover crochet pattern striped sweater laying on a white blanket with 6 skeins of yarn and a hand holding the bottom right corner](https://d3gel9wqxksnxm.cloudfront.net/wp-content/uploads/2021/02/AmeliaPullover-935x1000-1.jpg)
Level
Advanced Easy
Materials
- US I (5.50 mm) crochet hook
- US G (4.00 mm) crochet hook
- Size #4 worsted weight yarn
- measurements listed in the Details section
- I used 6 colors
- I used We Crochet’s Brava Worsted for this project
- Notions: scissors, measuring tape, yarn needle
- Stitch markers to help you made your sleeves (optional)
Gauge
- I: 14 sc x 16 rows =4″ (blocked)
- G: unnecessary
Terms/ Stitches used
- RS: right side
- Rnd: round
- Join
- St: stitch
- Ch: chain
- Sc: single crochet
- BLO/FLO: back loop/front loop only
Notes
- The Body pieces are worked back and forth, with a turn at the beginning/ end of the row. The Sleeves are worked in the round with a slip st into the first st to join the rnds.
- The ch 1 at the beginning of some rows/rnds does not count as a stitch.
- The I (5.50 mm) hook is used for the Body pieces and Sleeves. The G (4.00 mm) hook is used for the Collar and the Sleeve Cuffs to make a tighter fit.
- Blocking is recommended for this pattern.
- This design was made using 6 colors; color A is dark green (We Crochet’s Brava Worsted in Hunter), color B is magenta (Brava Worsted in Fairy Tale), color C is light brown (Brava Worsted in Brindle), color D is teal (Brava Worsted in Tidepool), color E is lavender (Brava Worsted in Seraphim), and color F is orange brown (Brava Worsted in Persimmon).
- The model is 5’4″ and is wearing the Large size.
Approx finished product dimensions (measurements may vary by gauge and yarn used)
| XSmall Height: 24” Across: 17” (Body) Fits Chest: 28″ – 30″ Yarn: 20 oz | 1241 yds total 3.3 oz | 207 yds each color | Small Height: 24” Across: 19” (Body) Fits Chest: 32″ – 34″ Yarn: 21 oz | 1303 yds total 3.5 oz | 217 yds each color | Medium Height: 25” Across: 21” (Body) Fits Chest: 36″ – 38″ Yarn: 22 oz | 1365 yds total 3.6 oz | 228 yds each color |
| Large Height: 25” Across: 23” (Body) Fits Chest: 40”- 42” Yarn: 26 oz | 1613 yds total 4.3 oz | 269 yds each color | 1X Height: 25” Across: 25” (Body) Fits Chest: 44″ – 46″ Yarn: 27 oz | 1675 yds total 4.5 oz | 279 yds each color | 2X Height: 27” Across: 27” (Body) Fits Chest: 48″ – 50″ Yarn: 28 oz | 1737 yds total 4.6 oz | 290 yds each color |
| 3X Height: 27” Across: 29” (Body) Fits Chest: 52″ – 54″ Yarn: 31 oz | 1923 yds total 4.8 oz | 300 yds each color | 4X Height: 27” Across: 31” (Body) Fits Chest:56″ – 58″ Yarn: 35 oz | 2171 yds total 5.9 oz | 362 yds each color | 5X Height: 27” Across: 33” (Body) Fits Chest: 60″ – 62″ Yarn: 36 oz | 2233 yds total 6 oz | 372 yds each color |
![[image description] White woman with pink hair stands facing away in the striped crochet Amelia Pullover crochet pattern looking back at the camera in front of a wall of ivy](https://d3gel9wqxksnxm.cloudfront.net/wp-content/uploads/2021/02/AmeliaPullover-801x1000-1.jpg)
Amelia Pullover Crochet Pattern Instructions
Body Pieces
(make 2)
Sizing as follows: XS (SM, MD, LG, 1X)(2X, 3X, 4X, 5X)
With US I (5.50 mm) crochet hook
(RS) Row 1: Ch 60 (68, 74, 82, 88)(96, 102, 110, 116), sc into the second ch from the hook and across – 59 (67, 73, 81, 87)(95, 101, 109, 115) sc
Row 2: Ch 1, turn, sc into the first st, *sc FLO into the next st, sc into the next st,* repeat from * to * 28 (32, 35, 39, 42)(46, 49, 53, 56) more times – 59 (67, 73, 81, 87)(95, 101, 109, 115) sc
Row 3: Ch 1, turn, sc into the first st, *sc BLO into the next st, sc into the next st,* repeat from * to * 28 (32, 35, 39, 42)(46, 49, 53, 56) more times – 59 (67, 73, 81, 87)(95, 101, 109, 115) sc
Rows 4 – 90 (90, 96, 96, 96)(102, 102, 102, 102): repeat rows 2 – 3, changing colors every 16 (16, 17, 17, 17)(18, 18, 18, 18) rows.
Do not fasten off.
The following rows are the neck shaping.
Amelia Pullover Right Side Neck Shaping
Row 91 (91, 97, 97, 97)(103, 103, 103, 103): Ch 1, turn, sc into the first st, *sc BLO into the next st, sc into the next st,* repeat from * to * 4 (6, 7, 9, 10)(12, 14, 16, 17) more times, sc2tog the next 2 sts, sc into the next st – 13 (17, 19, 23, 25)(29, 33, 37, 39) sc (includes sc2tog here and throughout)
Row 92 (92, 98, 98, 98)(104, 104, 104, 104): Ch 1, turn, sc into the first st, sc2tog the next 2 sts, *sc FLO into the next st, sc into the next st,* repeat from * 4 (6, 7, 9, 10)(12, 14, 16, 17) more times – 12 (16, 18, 22, 24)(28, 32, 36, 38) sc
Row 93 (93, 99, 99, 99)(105, 105, 105, 105): Ch 1, turn, sc into the first st, *sc BLO into the next st, sc into the next st,* repeat from * to * 3 (5, 6, 8, 9)(11, 13, 15, 16) more times, sc2tog the next 2 sts, sc into the next st – 11 (15, 17, 21, 23)(27, 31, 35, 37) sc
Row 94 (94, 100, 100, 100)(106, 106, 106, 106): Ch 1, turn, sc into the first st, sc2tog the next 2 sts, *sc FLO into the next st, sc into the next st,* repeat from * 3 (5, 6, 8, 9)(11, 13, 15, 16) more times – 10 (14, 16, 20, 22)(26, 30, 34, 36) sc
Row 95 (95, 101, 101, 101)(107, 107, 107, 107): Ch 1, turn, sc into the first st, *sc BLO into the next st, sc into the next st,* repeat from * to * 2 (4, 5, 7, 8)(10, 12, 14, 15) more times, sc2tog the next 2 sts, sc into the next st – 9 (13, 15, 19, 21)(25, 29, 33, 35) sc
Row 96 (96, 102, 102, 102)(108, 108, 108, 108): Ch 1, turn, sc into the first st, *sc FLO into the next st, sc into the next st,* repeat from * 3 (5, 6, 8, 9)(11, 13, 15, 16) more times – 9 (13, 15, 19, 21)(25, 29, 33, 35) sc
Fasten off color F leaving a tail long enough to seam row 96 (96, 102, 102, 102)(108, 108, 108, 108) to the other piece (as explained below in the seaming). You only need to leave this tail one of your Body pieces.
Amelia Pullover Left Side Neck Shaping
Row 91 (91, 97, 97, 97)(103, 103, 103, 103): Create a slipknot on your hook (this will make your first st of this row a standing sc) and skip 31 (31, 33, 33, 35)(35, 33, 33, 35) sts from the last st you made on row 91 (91, 97, 97, 97)(103, 103, 103, 103) of the Right Side, sc into the next st, sc2tog the next 2 sts, sc into the next st, *sc BLO into the next st, sc into the next st,* repeat from * to * 4 (6, 7, 9, 10)(12, 14, 16, 17) more times – 13 (17, 19, 23, 25)(29, 33, 37, 39) sc (includes sc2tog here and throughout)
Row 92 (92, 98, 98, 98)(104, 104, 104, 104): Ch 1, turn, sc into the first st, *sc FLO into the next st, sc into the next st,* repeat from * 3 (5, 6, 8, 9)(11, 13, 15, 16) more times, sc FLO into the next st, sc2tog the next 2 sts, sc into the last st – 12 (16, 18, 22, 24)(28, 32, 36, 38) sc
Row 93 (93, 99, 99, 99)(105, 105, 105, 105): Ch 1, turn, sc into the first st, sc2tog the next 2 sts, sc into the next st, *sc BLO into the next st, sc into the next st,* repeat from * to * 3 (5, 6, 8, 9)(11, 13, 15, 16) more times – 11 (15, 17, 21, 23)(27, 31, 35, 37) sc
Row 94 (94, 100, 100, 100)(106, 106, 106, 106): Ch 1, turn, sc into the first st, *sc FLO into the next st, sc into the next st,* repeat from * 2 (4, 5, 7, 8)(10, 12, 14, 15) more times, sc FLO into the next st, sc2tog the next 2 sts, sc into the last st – 10 (14, 16, 20, 22)(26, 30, 34, 36) sc
Row 95 (95, 101, 101, 101)(107, 107, 107, 107): Ch 1, turn, sc into the first st, sc2tog the next 2 sts, sc into the next st, *sc BLO into the next st, sc into the next st,* repeat from * to * 2 (4, 5, 7, 8)(10, 12, 14, 15) more times – 9 (13, 15, 19, 21)(25, 29, 33, 35) sc
Row 96 (96, 102, 102, 102)(108, 108, 108, 108): Ch 1, turn, sc into the first st, *sc FLO into the next st, sc into the next st,* repeat from * 3 (5, 6, 8, 9)(11, 13, 15, 16) more times – 9 (13, 15, 19, 21)(25, 29, 33, 35) sc
Fasten off color F leaving a tail long enough to seam row 96 (96, 102, 102, 102)(108, 108, 108, 108) to the other piece (as explained below in the seaming). You only need to leave this tail one of your Body pieces.
![[image description] White woman with pink hair stands facing the camera in striped crochet Amelia Pullover crochet pattern in front of a wall of ivy](https://d3gel9wqxksnxm.cloudfront.net/wp-content/uploads/2021/02/AmeliaPullover-855x1000-1.jpg)
Amelia Pullover Seaming
Neck Hole – Use the long tails you left after rows 96 (96, 102, 102, 102)(108, 108, 108, 108), seam together the front and back pieces along the 13 (15, 19, 21, 25)(29, 33, 35, 39) sts in your preferred method of seaming.
Sides – From the bottom up, skip the color A section and seam together the next 48 (48, 49, 49, 45)(50, 42, 42, 42) rows in your preferred method of seaming. Repeat on the other side. The unworked sts are your arm holes.
Amelia Pullover Sleeves
With US I (5.50 mm) crochet hook
Sizing as follows: XS (SM, MD, LG, 1X)(2X, 3X, 4X, 5X)
Note:
- Begin the sleeves with the RS and Front piece facing you. You will change colors every 11 rows to make it striped.
- For the decrease rnds: you will use the 2nd and 3rd sts as well as the last 2 sts to create 2 decreases (sc2tog) on the rnd and the rest of the rnd will be worked in alternating sc and FLO/BLO. Due to the decrease, the repeat of FLO/BLO and sc will be thrown off, adjust as needed to make sure the texture matches through the sleeves. Using a stitch marker is suggested to keep BLO/FLO rows lined up.
Rnd 1: F: Create a slipknot on your hook (this will make your first st a standing sc), sc into the first row end to the left of your seam on the side of the Body, sc into the next 31 (31, 35, 35, 39)(39, 47, 47, 47) row ends, move onto the Back piece, sc into the next 32 (32, 36, 36, 40)(40, 48, 48, 48) row ends, join – 64 (64, 72, 72, 80)(80, 96, 96, 96) sc
Rnd 2: Ch 1, turn, sc into the FLO of the first st, sc into the next st, *sc into the FLO of the next st, sc into the next st,* repeat from * to * 30 (30, 34, 34, 38)(38, 46, 46, 46) more times, join – 64 (64, 72, 72, 80)(80, 96, 96, 96) sc
Rnd 3: Ch 1, turn, sc into the first st, sc into the BLO of the next st, *sc into the next st, sc BLO of the next st,* repeat from * to * 30 (30, 34, 34, 38)(38, 46, 46, 46) more times, join – 64 (64, 72, 72, 80)(80, 96, 96, 96) sc
Rnds 4 – 9: repeat rnds 2 – 3, 3 times.
Rnd 10: repeat rnd 2.
Rnd 11: Decrease (sc2tog) using the 2nd and 3rd sts of the rnd and again using last 2 sts of the rnd, work the rest of the rnd alternating sc and BLO/FLO as the pattern requires.
Note: adjust as needed so your BLO/FLO line up in your sleeves, use stitch markers if that will assist.
Rnds 12 – 15: repeat rnds 2 – 3, twice (with new st counts).
Rnd 16: repeat rnd 11.17 – 66: repeat rnds 12 – 16 until you reach st count of 56 (56, 64, 64, 70)(70, 84, 84, 84), then continue repeating rnds 2 -3 (make sure your BLO/FLO and sc line up still) until you reach rnd 66 or 17”.
Sleeve Cuff
With US G (4.00 mm) crochet hook (optional for a tighter fit)
Row 1: Rotate your piece so you’re working perpendicularly to rnd 66 of the Sleeve. Ch 6, sc into the second ch from the hook and into the next 4 sts – 5 sc
Row 2: Slip st into the next 2 sts on the last rnd of the Sleeve, turn, sc into the BLO of the next 5 sc – 5 sc
Row 3: Ch 1, turn, sc into the BLO of the next 5 sc – 5 sc
Row 4: Slip st into the next 2 sts on the last rnd of the Sleeve, turn, sc into the BLO of the next 5 sc – 5 sc
Rows 5 – 56 (56, 64, 64, 70)(70, 84, 84, 84): repeat rows 3 – 4, 26 (26, 30, 30,33)(33, 40, 40, 40) more times.
Fasten off leaving a long tail and use the tail to seam up your final row with row 1. Weave in your ends. Block your Sleeve and Cuff so it measures 18” long. Remember, if you blocked your sweater you need to block your sleeves as well.
Repeat Sleeve instructions on the other Arm hole.
Amelia Pullover Collar
With US G (4.00 mm) crochet hook (optional for a tighter fit)
Note: the Collar is worked along the row ends of the neck shaping and the skipped sts of rows 90 (90, 96, 96, 96)(102, 102, 102, 102).
Row 1: Rotate your piece so you’re working perpendicularly along the Neck hole. With the RS facing you, pull up a loop in the last st of any row 96 (96, 102, 102, 102)(108, 108, 108, 108), ch 9, sc into the second ch from the hook and into the next 7 sts – 8 sc
Row 2: Slip st into the next 2 sts on neck shaping, turn, sc into the BLO of the next 8 sc – 8 sc
Row 3: Ch 1, turn, sc into the BLO of the next 8 sc – 8 sc
Row 4: Slip st into the next 2 sts on the last rnd of the neck shaping, turn, sc into the BLO of the next 8 sc – 8 sc
Rows 5 – 86 (90, 90, 94, 94)(90, 90, 94, 94): repeat rows 3 – 4, 41 (43, 43, 45, 45)(43, 43, 45, 45) more times.
Fasten off leaving a long tail and use the tail to seam up your final row with row 1. Weave in your ends.

Kat
Sunday 21st of February 2021
I absolutely love it! Excellent design. This is my very next item. Cant thank you enough!
Divine Debris
Tuesday 23rd of February 2021
I'm so glad you like it :)
Pam
Thursday 18th of February 2021
Hi Amber, I thought I recognized that hair! <3 Found this post at the Moogly link party, which is a new place for me to go :) Still summer here but sweaters will be back on my radar in a few months and I am determined to make my first crochet sweater that actually fits this year! :D