
Happy *just* about October everyone
I must admit, it’s my favorite time of year. I think I’ve said this before, but there’s so much to love about Fall and Halloween. The colors, the flavors, the crispness in the air (waiting for that any day now) and the decorations.
This week’s pattern is for the CAL Central Halloween CAL brings all that love to you from me.
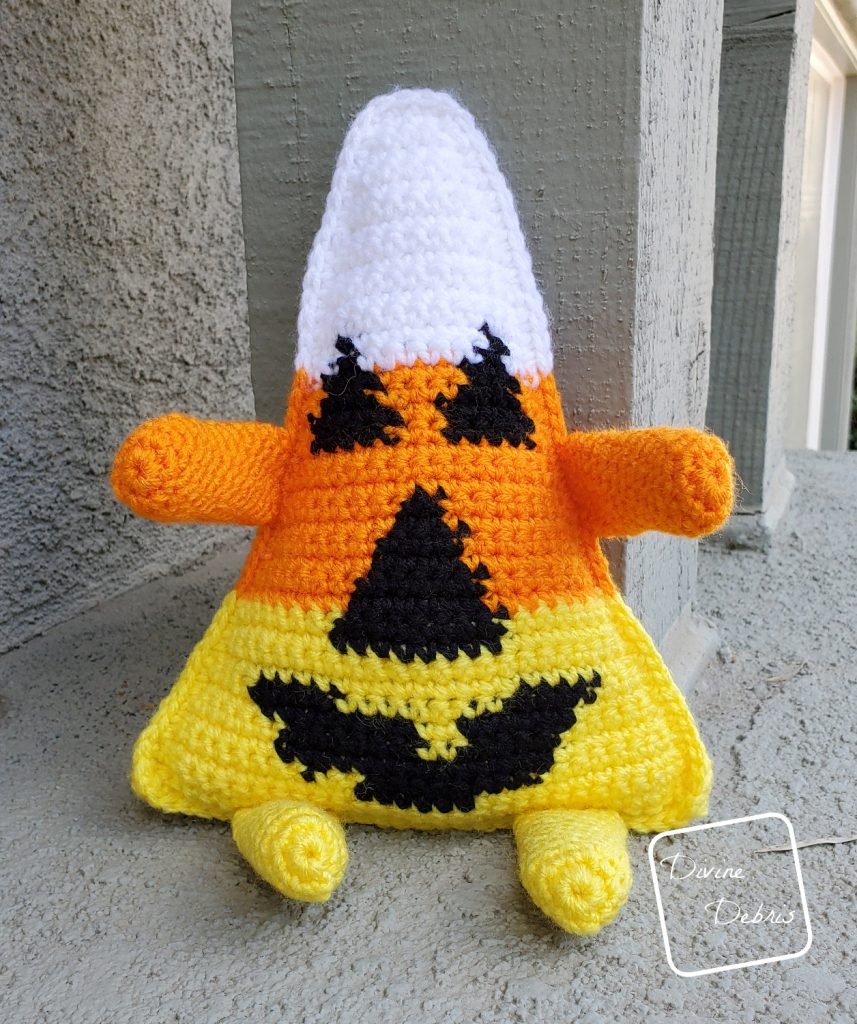
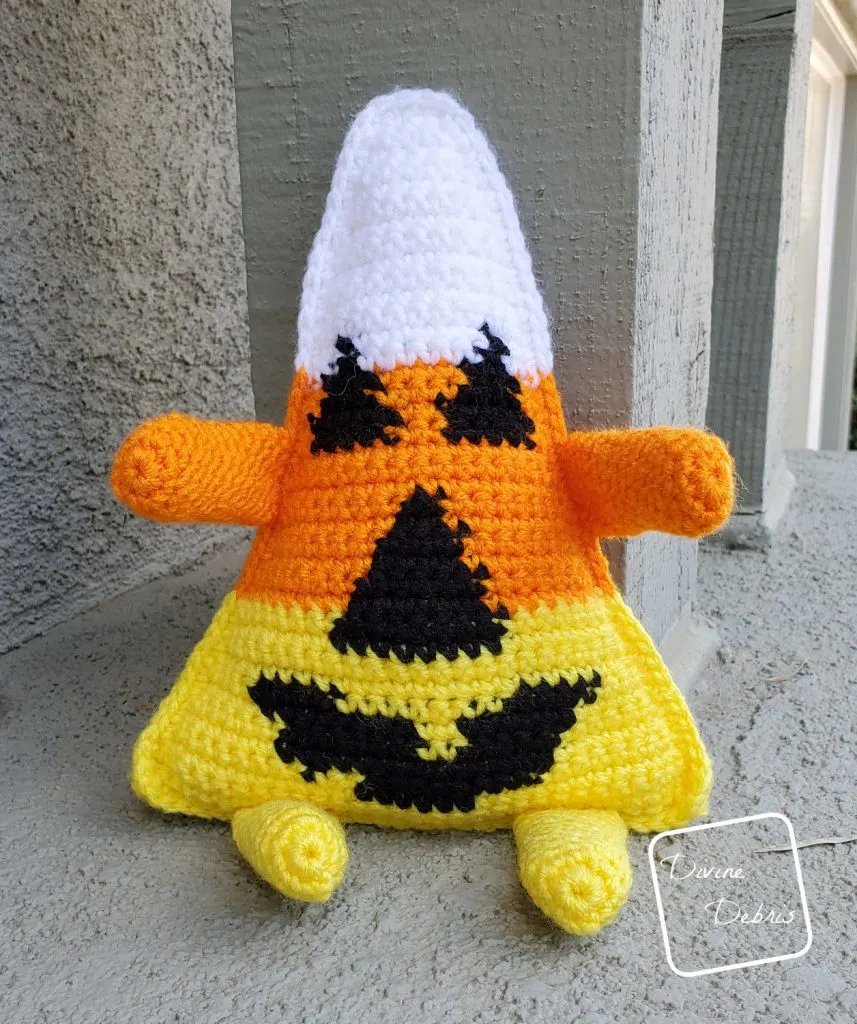
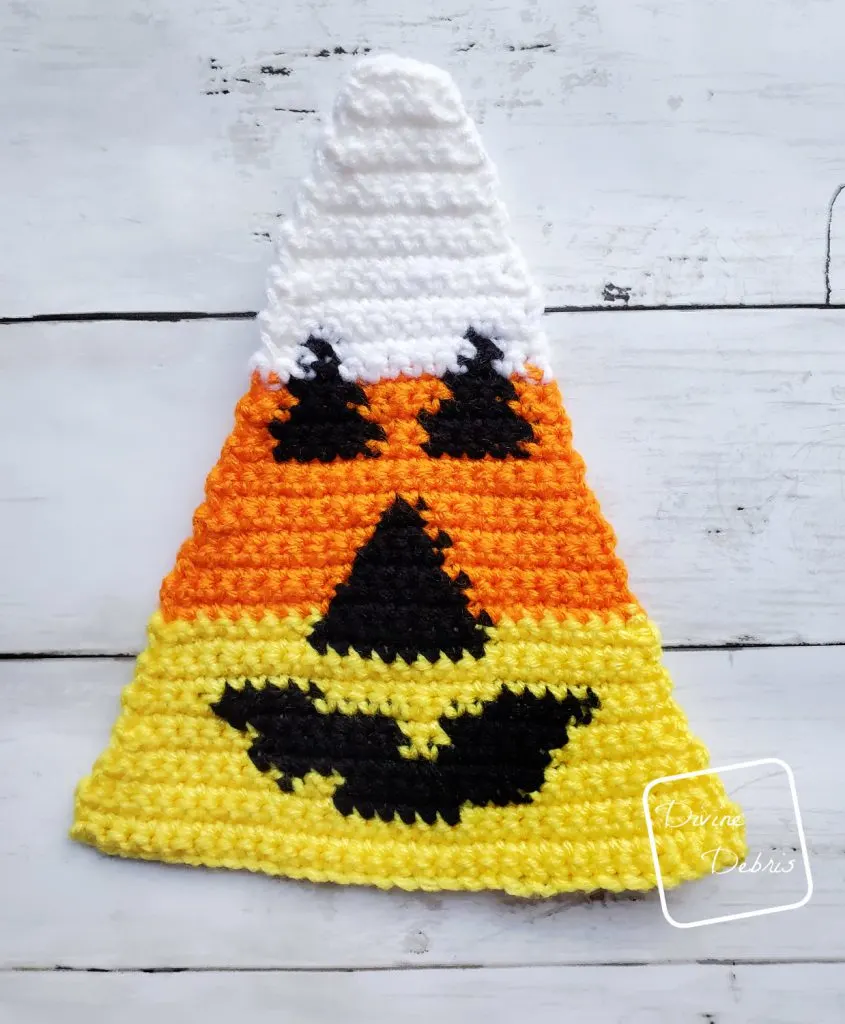
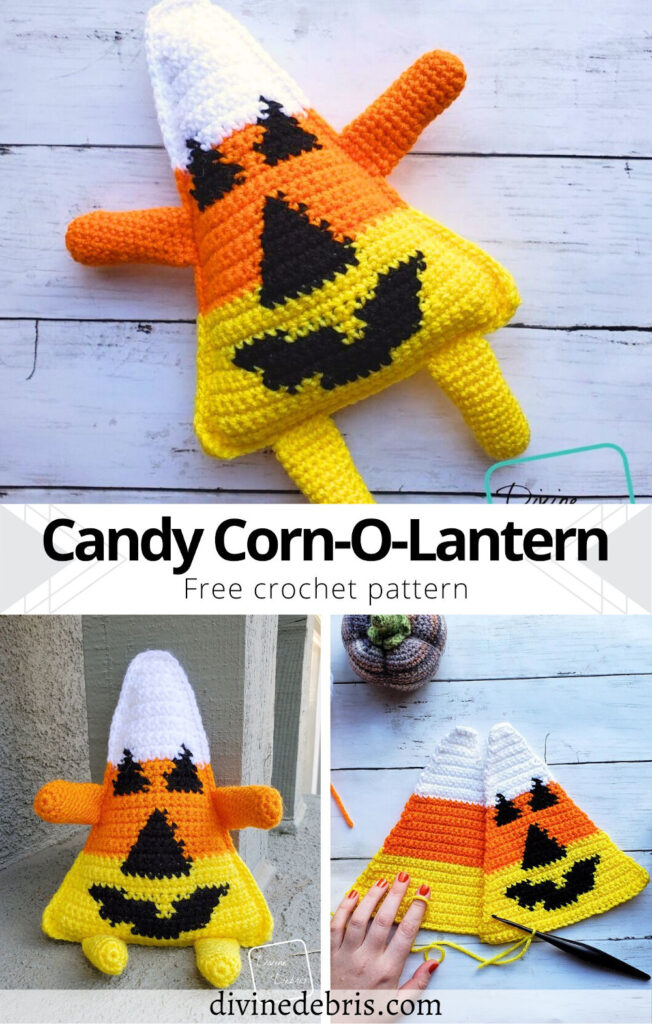
Of course I’m going to jump at an opportunity to join a Halloween CAL, it’s so much my “brand” and it is also so fun to see all the cute projects! For this post I wanted to make something fun and cute that you could get creative with. Enter, the Candy Corn-O-Lantern amigurumi.
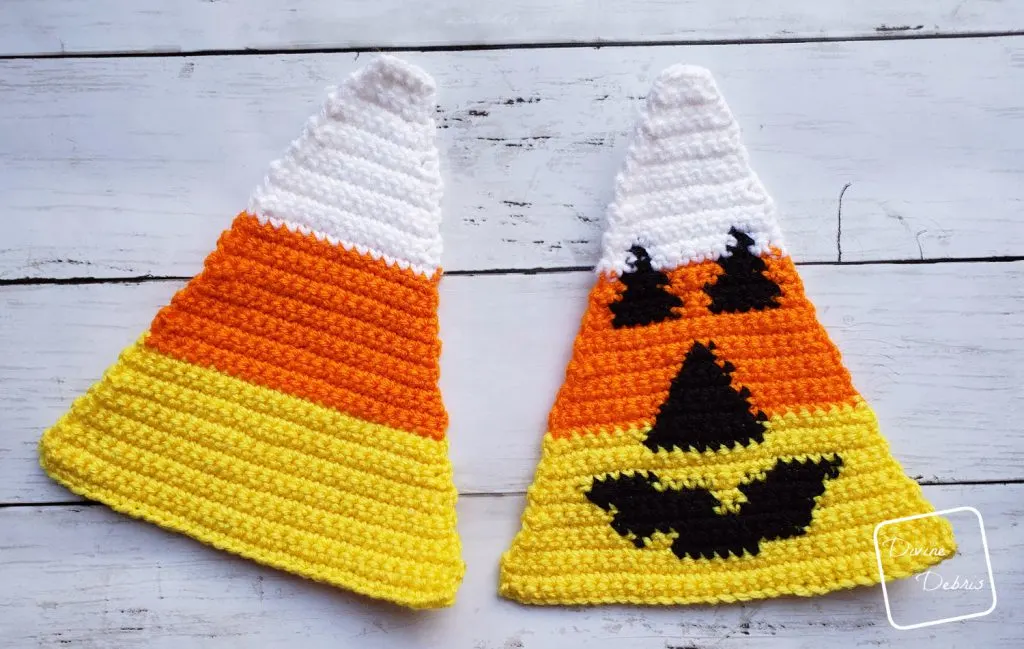
This little mischievous “corn on the shelf” is a lot easier than you think. Minimal color changes in the color work section (or you could skip over that entirely and just do 2 Back pieces & sew the face on separately), and very simple assembly. Also, if you have a large candy corn you don’t have to eat candy corn (which I do not, let the record show I find it disgusting). Or you could make bunting out of the candy corn Front/Back pieces (which would be so cute). Just have fun with it!
No matter how you get creative, I hope you give this design a chance. Or you could browse some of my other candy corn designs for other ideas. Don’t forget to join the CAL Central Facebook group, use the hashtag #CALCentral and #HalloweenCAL2019 on social media, and pop over to Underground Crafter to enter to win some goodies for this CAL.
Happy treats friends!
This post is linked to Hookin’ on Hump Day #200
(this post may contain affiliate links)
If you appreciate my weekly patterns I hope you’d consider purchasing an ad-free pdf of this pattern in my Ravelry shop.
Thank you Amanda for becoming my newest patron on Patreon!

Materials
- US G (4.00 mm) crochet hook
- Worsted/ medium/ size #4 weight yarn
- 4 colors
- 2 oz/ 130 yds total (less than 1 oz/ 52 yds each)
- I used Red Heart Yarns Super Saver
- Yarn needle
- Poly Fill
Gauge
- 17 sc x 18 rows = 4”


Terms/ Stitches used
- Magic circle
- RS: right side
- Rnd: round
- Ch: chain
- St: stitch
- Slip st: slip stitch
- Sc: single crochet
- Sc2tog: single crochet 2 sts together
Notes
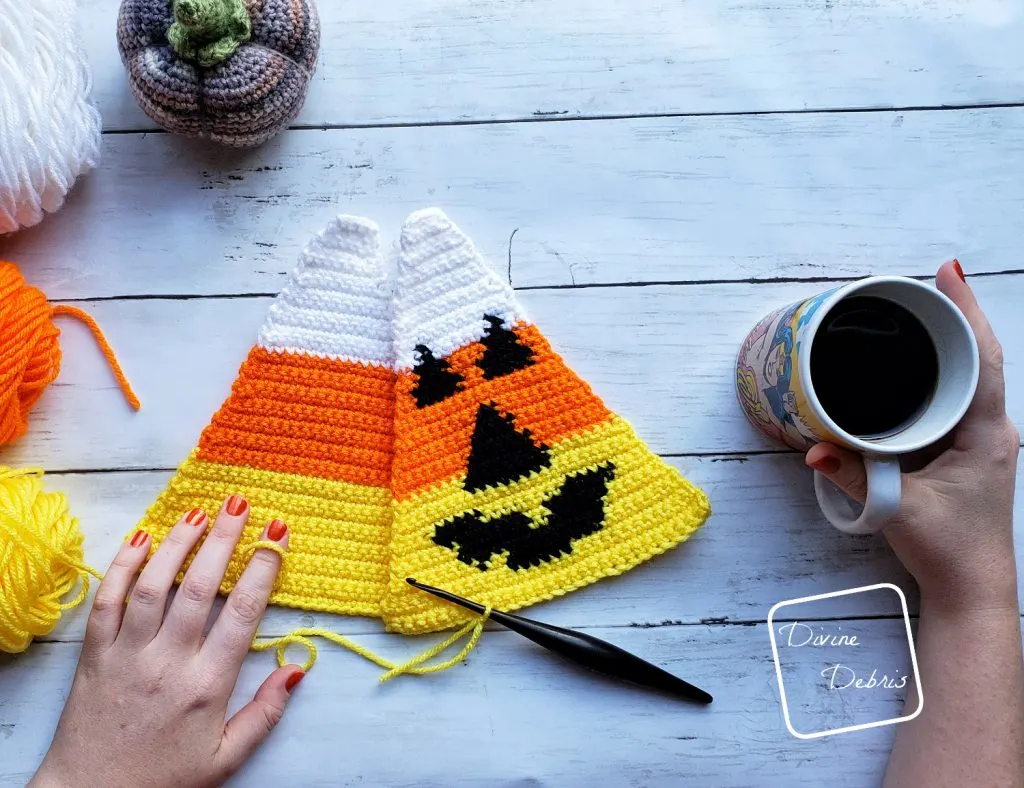
- This pattern is worked in 4 sections: the Front, the Back, the Securing, and the Arms/Legs. The Front and Back sections are worked in rows back and forth and the Securing and Arms/Legs are worked in the round with a slip st into the first st of the row.
- The ch-1 at the beginning of the row or rnd does not count as a stitch.
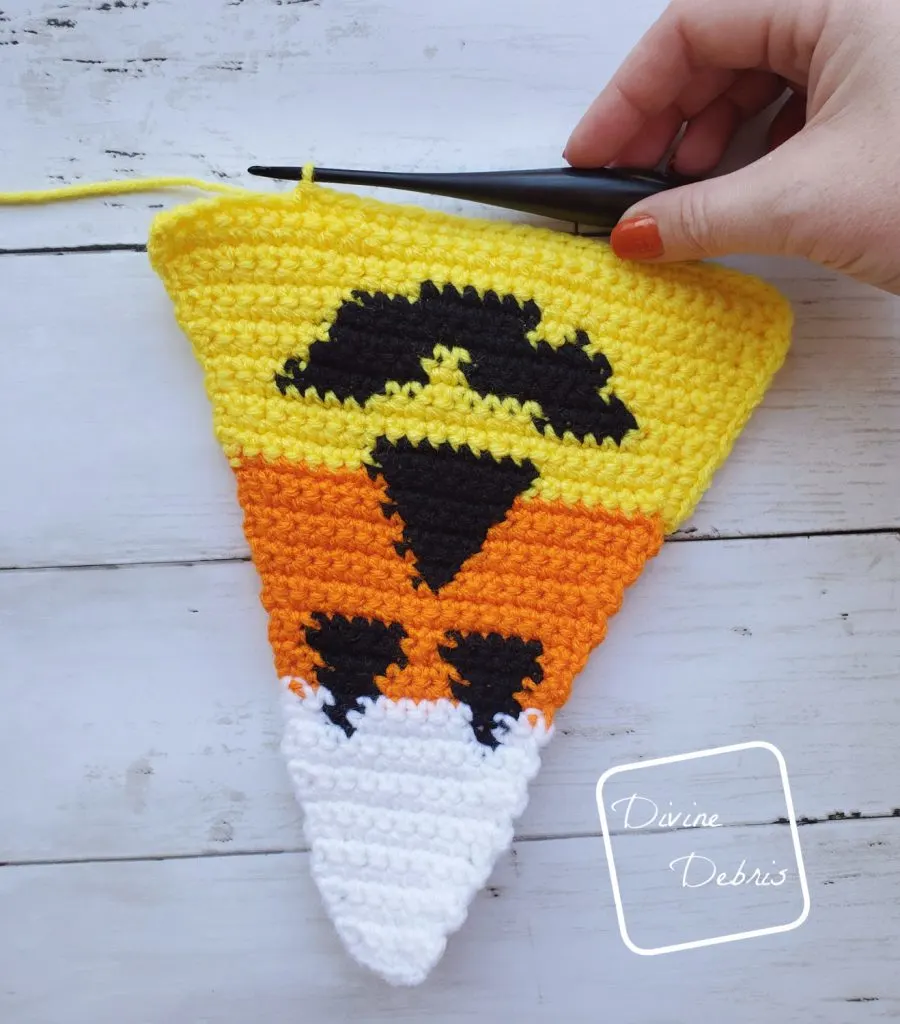
- The Front section is where the colorwork/face/tapestry section is and every stitch is a single crochet. For that section only, directions will only tell you what color (ie: Color A, Color B, etc…) and the number in the parentheses tells you how many scs to make.
- For the front the inactive yarn is carried behind the active. If this is confusing, you might want to check out the helpful Moogly video on tapestry.
- The instructions that read (sc2tog + a number) or (a number + sc2tog) mean that you sc2tog the first or last two sts of the row and work scs in the number of stitches indicated.
- In the photos: color A is yellow (RHSS in Bright Yellow), color B is black (RHSS in Black), color C is orange (RHSS in Pumpkin), and color D is white (RHSS in White).
Finished product dimensions (measurements may vary by gauge and yarn used)
Height: 9″ – 9.5″
Width: 7″ – 7.5″
Candy Corn-O-Lantern Amigurumi Pattern Instructions

Front
Row 1: A: Ch 31, sc into the second ch from the hook and across – 30 sc
Rows 2 – 3: A: Ch 1, turn, sc into the next 30 sts – 30 sc
Note:
- The following directions will only tell you what color (ie: Color A, Color B, etc…) and the number in the parentheses tells you how many stitches to make.
- The instructions that read (sc2tog + a number) or (a number + sc2tog) mean that you sc2tog the first or last two sts of the row and work scs in the number of stitches indicated.
Row 4: A: Ch 1, turn, (2c2tog + 10), B: (6), A: (10 + sc2tog) – 28 sc
Row 5: A: Ch 1, turn, (8), B: (1), A: (2), B: (9), A: (8) – 28 sc
Row 6: A: Ch 1, turn, (7), B: (14), A: (7) – 28 sc
Row 7: A: Ch 1, turn, (sc2tog + 5), B: (7), A: (2), B: (5), A: (5 + sc2og) – 26 sc
Row 8: A: Ch 1, turn, (5), B: (6), A: (2), B: (8), A: (5) – 26 sc
Row 9: A: Ch 1, turn, (4), B: (5), A: (8), B: (5), A: (4) – 26 sc
Fasten off color B here or carry it along the inside until you pick it up again on row 12.
Row 10: A: Ch 1, turn, (sc2tog + 22 + sc2tog) – 24 sc
Row 11: A: Ch 1, turn, (24) – 24 sc
Row 12: A: Ch 1, turn, (8). B: (8), A: (8) – 24 sc
Row 13: A: Ch 1, turn, (sc2tog + 6), B: (8). A: (6 + sc2tog) – 22 sc
Fasten off color A.
Rows 14 – 15: C: Ch 1, turn, (8), B: (6), C: (8) – 22 sc
Row 16: C: Ch 1, turn, (sc2tog + 7), B: (4), C: (7 + sc2tog) – 20 sc
Row 17: C: Ch 1, turn, (8), B: (4), C: (8) – 20 sc
Row 18: C: Ch 1, turn, (9), B: (2), C: (9) – 20 sc
Row 19: C: Ch 1, turn, (sc2tog + 7), B: (2), (7 + sc2tog) – 18 sc
Fasten off color B here or carry it along the inside until you pick it up again on 23.
Rows 20 – 21: C: Ch 1, turn, (18) – 18 sc
Row 22: C: Ch 1, turn, (sc2tog + 14 + sc2tog) – 16 sc
Rows 23 – 24: C: Ch 1, turn, (2). B: (5), C: (2), B: (5), C: (2) – 16 sc
Row 25: C: Ch 1, turn, (sc2tog + 1), B: (3), C: (4), B: (3), C: (1 + sc2tog) – 14 sc
Row 26: C: Ch 1, turn, (2), B: (3), C: (4), B: (3), C: (2) – 14 sc
Fasten off color C.
Row 27: D: Ch 1, turn, (3), B: (1), D: (6), B: (1), D: (3) – 14 sc
Row 28: D: Ch 1, turn, (sc2tog + 1), B: (1), D: (6), B: (1), D: (1 + sc2tog) – 12 sc
Fasten off color B.
Rows 29 – 30: D: Ch 1, turn, (12) – 12 sc
Row 31: D: Ch 1, turn, (sc2tog + 8 + sc2tog) – 10 sc
Rows 32 – 33: D: Ch 1, turn, (10) – 10 sc
Row 34: D: Ch 1, turn, (sc2tog + 6 + sc2tog) – 8 sc
Rows 35 – 36: D: Ch 1, turn, (8) – 8 sc
Row 37: D: Ch 1, turn, (sc2tog + 4 + sc2tog) – 6 sc
Row 38: D: Ch 1, turn, (6) – 6 sc
Row 39: D: Ch 1, turn, (sc2tog + 2 + sc2tog) – 4 sc
Row 40: D: Ch 1, turn, (4) – 4 sc
Fasten off, weave in all your ends.

Back
Row 1: A: Ch 31, sc into the second ch from the hook and across – 30 sc
Rows 2 – 3: A: Ch 1, turn, sc into the next 30 sts – 30 sc
Row 4: A: Ch 1, turn, sc2tog the first 2 sts, sc into the next 26 sts, sc2tog the last 2 sts – 28 sc
Rows 5 – 6: A: Ch 1, turn, sc into the next 28 sts – 28 sc
Row 7: A: Ch 1, turn, sc2tog the first 2 sts, sc into the next 24 sts, sc2tog the last 2 sts – 26 sc
Rows 8 – 9: A: Ch 1, turn, sc into the next 26 sts – 26 sc
Row 10: A: Ch 1, turn, sc2tog the first 2 sts, sc into the next 22 sts, sc2tog the last 2 sts – 24 sc
Rows 11 – 12: A: Ch 1, turn, sc into the next 24 sts – 24 sc
Row 13: A: Ch 1, turn, sc2tog the first 2 sts, sc into the next 20 sts, sc2tog the last 2 sts – 22 sc
Fasten off color A.
Rows 14 – 15: C: Ch 1, turn, sc into the next 22 sts – 22 sc
Row 16: C: Ch 1, turn, sc2tog the first 2 sts, sc into the next 18 sts, sc2tog the last 2 sts – 20 sc
Rows 17 – 18: C: Ch 1, turn, sc into the next 20 sts – 20 sc
Row 19: C: Ch 1, turn, sc2tog the first 2 sts, sc into the next 16 sts, sc2tog the last 2 sts – 18 sc
Rows 20 – 21: C: Ch 1, turn, sc into the next 18 sts – 18 sc
Row 22: C: Ch 1, turn, sc2tog the first 2 sts, sc into the next 14 sts, sc2tog the last 2 sts – 16 sc
Rows 23 – 24: C: Ch 1, turn, sc into the next 16 sts – 16 sc
Row 25: C: Ch 1, turn, sc2tog the first 2 sts, sc into the next 12 sts, sc2tog the last 2 sts – 14 sc
Row 26: C: Ch 1, turn, sc into the next 14 sts – 14 sc
Fasten off color C.
Row 27: D: Ch 1, turn, sc into the next 14 sts – 14 sc
Row 28: D: Ch 1, turn, sc2tog the first 2 sts, sc into the next 10 sts, sc2tog the last 2 sts – 12 sc
Rows 29 – 30: D: Ch 1, turn, sc into the next 12 sts – 12 sc
Row 31: D: Ch 1, turn, sc2tog the first 2 sts, sc into the next 8 sts, sc2tog the last 2 sts – 10 sc
Rows 32 – 33: D: Ch 1, turn, sc into the next 10 sts – 10 sc
Row 34: D: Ch 1, turn, sc2tog the first 2 sts, sc into the next 6 sts, sc2tog the last 2 sts – 8 sc
Rows 35 – 36: D: Ch 1, turn, sc into the next 8 sts – 8 sc
Row 37: D: Ch 1, turn, sc2tog the first 2 sts, sc into the next 4 sts, sc2tog the last 2 sts – 6 sc
Row 38: D: Ch 1, turn, sc into the next 6 sts – 6 sc
Row 39: D: Ch 1, turn, sc2tog the first 2 sts, sc into the next 2 sts, sc2tog the last 2 sts – 4 sc
Row 40: D: Ch 1, turn, sc into the next 4 sts – 4 sc
Fasten off, weave in your ends.

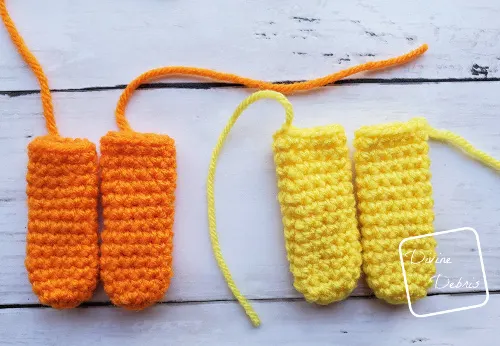
Arms/Legs
Make 4 of these – 2 color A and 2 in color C.
Rnd 1: Create a magic circle, ch 1, sc 8 times into the circle, slip st into the first st – 8 sc
Rnd 2: Ch 1, sc into the same st as join, sc twice into the next st, *sc into the next st, sc twice into the next st,* repeat from * to * twice more, slip st into the first st – 12 sc
Rnds 3 -14: Ch 1, sc into the same st as join and into the next 11 sts, slip st into the first st – 12 sc
Fasten off leaving a long tail, you will use this tail to securing the Arm/Legs to the body of your candy corn.

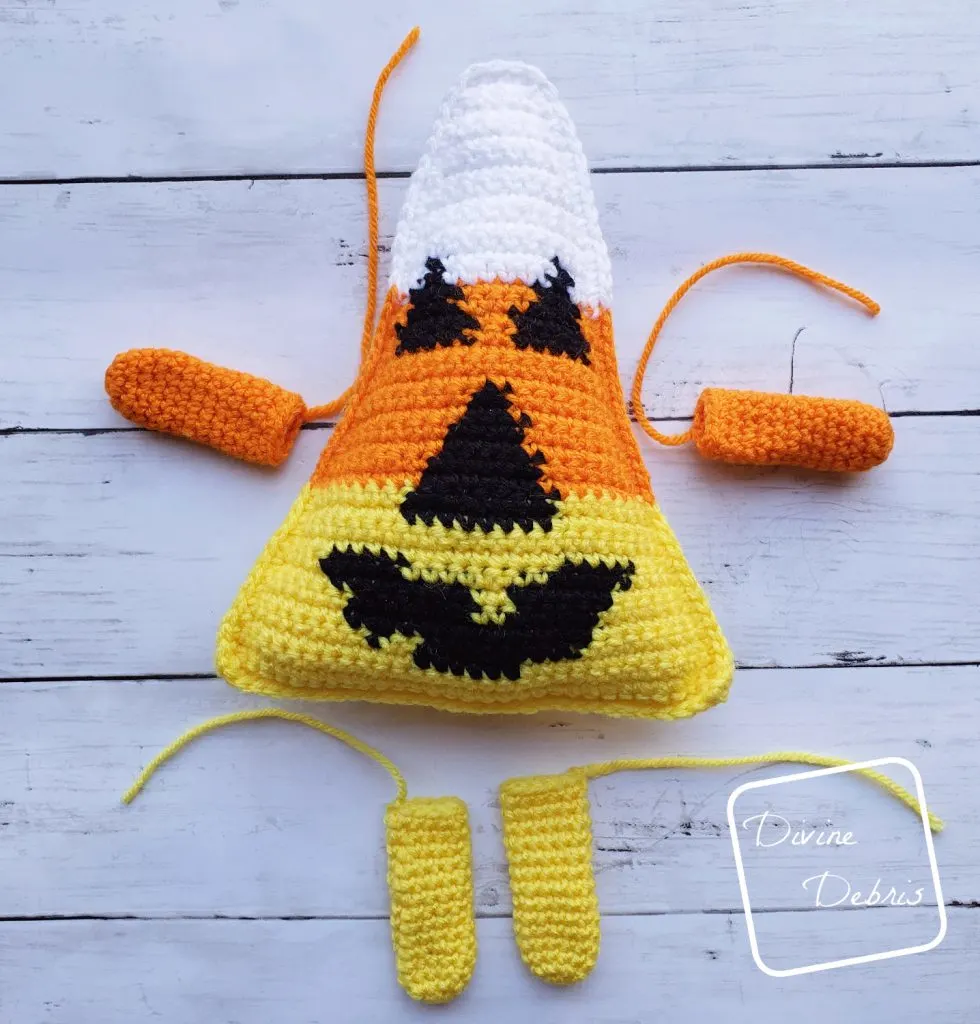

Securing
For this section you’re scing the Front and Back piece together using the colors A, C, and D in the areas that match the colors. Be sure to stuff your candy corn before closing completely
Lay your Front and Back pieces together so that the wrong sides are touching. Create a slipknot on your hook with color A and with the RS of the Front facing you, sc into the row 13 color A row end (you will be working down the row ends towards row 1), sc into the next 12 row ends, ch 1 at the corner and rotate your piece, sc into the next 30 sts (the other side of the original ch row), ch 1 at the corner and rotate your piece, sc into the next 13 row ends, switch to color C (fasten off color A) and sc into the next 13 row ends, switch to color D (and fasten off color C) and sc into the next 13 row ends, sc into the 4 sts of row 40, sc into the next 13 row ends, (don’t forget to stuff your candy corn at this point), switch to color C (and fasten off color D) and sc into the next 13 row ends, slip st into the first st – 112 sc, 2 ch-1 spaces
Fasten off, weave in all your ends.
Stuff a little bit of stuffing into the Arms/Legs and use the tails you left to secure them to the body in your preferred method of seaming.

Alexandra
Wednesday 2nd of October 2019
Cute! Can even use the single candy corn piece as an applique on a bag, scarf or throw pillow.