It’s been a hard year, I’m not going to lie about that. It could have been so much worse and that’s something that’s not far from my mind. I’m so very grateful for my spouse, my family, and my community of crafters who are there. With all the ups and downs I’ve gone through this year I’ve really taken the time to enjoy the Falloween designs I’ve made, because it brings me such joy. I love making these and I love hearing from people how they feel about them. I really hope that designs (like the Big Ol’ Pumpking or Smiling Pumpkins Pillow) make people happy because I think the world needs more happiness all over. Alright, got all that mushy stuff out of the way. I must be a bit emotional because my b-day is coming up (next month, can yo believe it?) and I’ve got so many feelings.
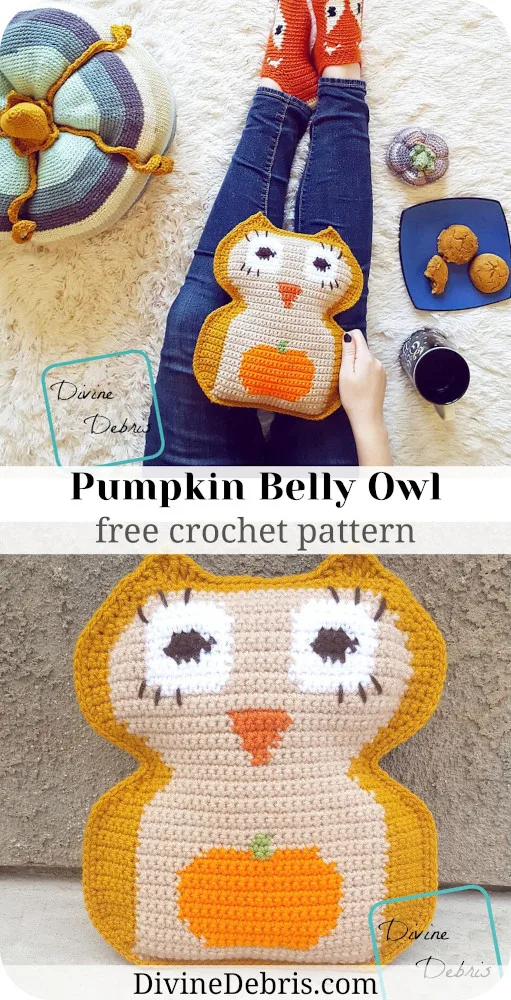
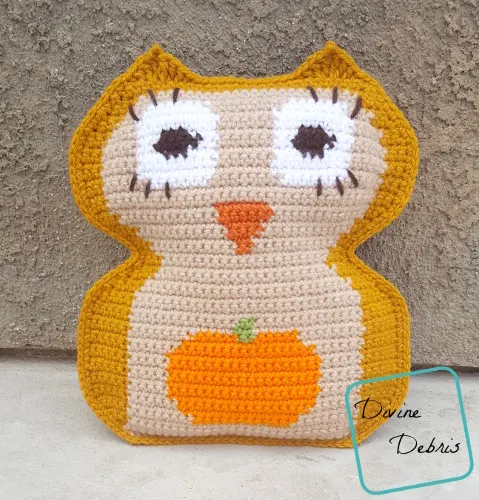
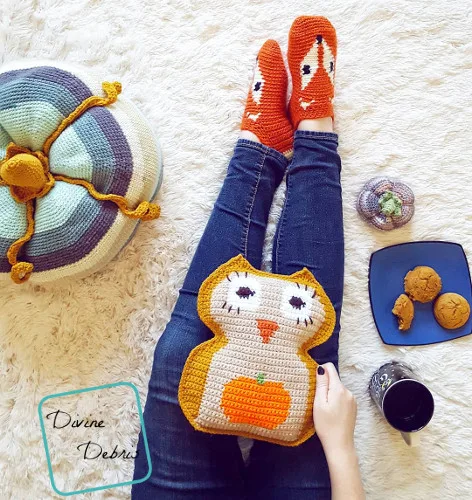
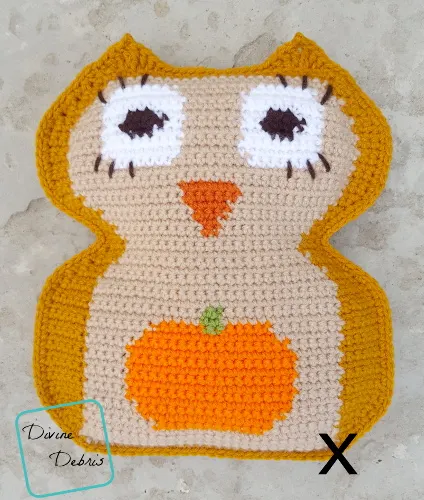
So… this week’s design is one I’ve shown off on Instagram for a while and it seems like she’s got more fans that I do! It’s gotta be those big eyes… or maybe the pumpkin? Who can say for sure but this is a cute design and I’m really glad I decided to do it. This is the third this year of the “Belly Design Amis” which also feature my Heart Belly Cat and Snowflake Belly Penguin. I don’t know why I like doing these but I imagine it’s because I used to wake up early on the weekends to watch the Care Bares Movie. Who can say? But I do know this design is fun and you can make it in a variety of colors (purple owls anyone?) or even add a face in puffy paint to really make the Falloween come alive. 😀 I’ve already got a couple ideas for a Winter version of the belly design ami but if you want to see something special, let me know in the comments!
Alas, this is also my last Falloween design. I’ve got 2 designs and a TSAP post for next month already planned and then we’re fully into Winter! So, see you next year my favorite designing time of year. I will miss you.
<3 <3
This post is linked to Hookin’ on Hump Day #176
If you appreciate my weekly patterns I hope you’d consider purchasing an ad-free pdf of this pattern in my Ravelry shop.

Thank you to all my great patrons on Patreon!
Materials
- US G (4.00 mm) crochet hook
- Aran/ medium/ size #4 weight yarn
- 3.6 oz. / 228 yards
- At least 6 – 7 colors
- I usedLoops and Threads Impeccable and Red Heart Super Saver
- Yarn needle
- Stuffing Ami
Terms/stitches used
- RS: right side
- Ch: chain
- St: stitch
- Slip st: slip stitch
- Sc: single crochet
- Hdc: half double crochet
- Dc: double crochet
- Tr: treble crochet
- Picot
Notes
- This pattern is worked flat back in forth in rows, with a turn at the beginning/ end of the row, from the bottom up.
- This pattern is worked in 3 parts, the Front (owl face), Back, and the Seaming the 2 pieces together.
- The ch 1 at the beginning of the row does not count as a stitch.
- You’re going to need to know how to create a slipknot on your hook for this pattern.
- Every stitch in this pattern is a single crochet. The directions will only tell you what color (ie: Color A, Color B, etc…) and the number in the parentheses tells you how many scs to make.
- The instructions that read (sc2tog + a number) or (a number + sc2tog) mean that you sc2tog the first or last two sts of the row and work scs in the number of stitches indicated.
- The instructions that read (2x + a number) or (a number + 2x) mean that you sc twice into the first or last st of the row and work scs in the number of stitches indicated.
- In the example, the inactive yarn is carried behind the active. If this is confusing, you might want to check out the helpful Moogly video on tapestry.
- Color A is tan (Bernat Super Value in Mushroom), color B is gold (Loops and Threads Impeccable in Gold), color C is bright orange (Red Heart Super Saver in Pumpkin), color D is green (Caron One Pound in Green Grass), color E is dark orange (Red Heart Super Saver in Carrot), color F is white (Red Heart Super Saver in White), and color G is brown (Red Heart Super Saver in Brown).
Approx finished measurements
| Width: 7” – 10” (widest) | Height: 11” – 11.5” (highest) |

Pumpkin Belly Owl Amigurumi Pattern Instructions
Row 1: A: Ch 29, sc into the second ch from the hook and into the next 27 sts – 28 sc
(RS) Row 2: A: Ch 1, turn, sc twice into the first st, sc into the next 26 sts, sc twice into the last st – 30 sc
Note:
- Every stitch in this pattern is a single crochet. The following directions will only tell you what color (ie: Color A, Color B, etc…) and the number in the parentheses tells you how many single crochets to make.
- The instructions that read (a number +sc2tog + a number) or (a number + sc2tog + a number) means that you sc2tog the specified sts and work scs in the number of stitches indicated.
- The instructions that read (a number +2x + a number) or (a number + 2x + a number) mean that you sc twice into the st and work scs in the number of stitches indicated.
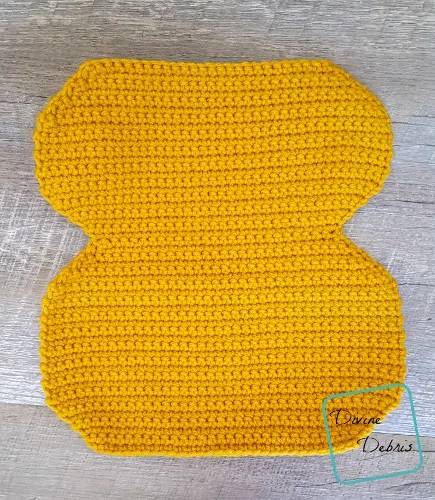
- The Front piece features all the color changes to create the owl face, the Back is just done in color B.
Row 3: B: Ch 1, turn, (2x), A: (28), B: (2x) – 32 sc
Row 4: B: Ch 1, turn, (2x +1), A: (28), B: (1 + 2x) – 34 sc
Row 5: B: Ch 1, turn, (2x + 2), A: (28), B: (2 + 2x) – 36 sc
Row 6: B: Ch 1, turn, (2x + 3), A: (8), C: (12), A: (8), B: (3 + 2x) – 38 sc
Row 7: B: Ch 1, turn, (2x + 4), A: (7), C: (14), A: (7), B: (4 + 2x) – 40 sc
Row 8: B: Ch 1, turn, (6), A: (6), C: (16), A: (6), B: (6) – 40 sc
Rows 9 – 15: B: Ch 1, turn, (6), A: (5), C: (18), A: (5), B: (6) – 40 sc
Row 16: B: Ch 1, turn, (6), A: (6), C: (16), A: (6), B: (6) – 40 sc
Row 17: B: Ch 1, turn, (6), A: (7), C: (14), A: (7), B: (6) – 40 sc
Row 18: B: Ch 1, turn, (6), A: (8), C: (5), D: (2), C: (5), A: (8), B: (6) – 40 sc
Fasten off color C.
Rows 19 – 20: B: Ch 1, turn, (6), A: (13), D: (2), A: (13), B: (6) – 40 sc
Row 21: B: Ch 1, turn, (6), A: (28), B: (6) – 40 sc
Row 22: B: Ch 1, turn, (sc2tog + 4), A: (28), B: (4 + sc2tog) – 38 sc
Row 23: B: Ch 1, turn, (sc2tog + 3), A: (28), B: (3 + sc2tog) – 36 sc
Row 24: B: Ch 1, turn, (sc2tog + 3), A: (26), B: (3 + sc2tog) – 34 sc
Row 25: B: Ch 1, turn, (sc2tog + 3), A: (24), B: (3 + sc2tog) – 32 sc
Row 26: B: Ch 1, turn, (sc2tog + 3), A: (22), B: (3 + sc2tog) – 30 sc
Row 27: B: Ch 1, turn, (sc2tog + 3), A: (20), B: (3 + sc2tog) – 28 sc
Row 28: B: Ch 1, turn, (sc2tog + 2), A: (20), B: (2 + sc2tog) – 26 sc
Row 29: B: Ch 1, turn, (2x + 1), A: (22), B: (1 + 2x) – 28 sc
Row 30: B: Ch 1, turn, (2x + 1), A: (11), E: (2), A: (11), B: (1 + 2x) – 30 sc
Row 31: B: Ch 1, turn, (2x + 1), A: (12), E: (2), A: (12), B: (1 + 2x) – 32 sc
Row 32: B: Ch 1, turn, (2x + 1), A: (12), E: (4), A: (12), B: (1 + 2x) – 34 sc
Row 33: B: Ch 1, turn, (2x + 1), A: (13), E: (4), A: (13), B: (1 + 2x) – 36 sc
Row 34: B: Ch 1, turn, (2x + 1), A: (13), E: (6), A: (13), B: (1 + 2x) – 38 sc
Row 35: B: Ch 1, turn, (2x + 1), A: (14), E: (6), A: (14), B: (1 + 2x) – 40 sc
Fasten off color E.
Rows 36 – 37: B: Ch 1, turn, (3), A: (34), B: (3) – 40 sc
Row 38: B: Ch 1, turn, (3), A: (6), F: (7), A: (8), F: (7), A: (6), B: (3) – 40 sc
Rows 39 – 40: B: Ch 1, turn, (3), A: (5), F: (9), A: (6), F: (9), A: (5), B: (3) – 40 sc
Row 41: B: Ch 1, turn, (3), A: (5), F: (3), G: (3), F: (3), A: (6), F: (3), G: (3), F: (3), A: (5), B: (3) – 40 sc
Row 42: B: Ch 1, turn, (3), A: (5), F: (2), G: (5), F: (2), A: (6), F: (2), G: (5), F: (2), A: (5), B: (3) – 40 sc
Row 43: B: Ch 1, turn, (3), A: (5), F: (3), G: (3), F: (3), A: (6), F: (3), G: (3), F: (3), A: (5), B: (3) – 40 sc
Fasten off color G.
Row 44: B: Ch 1, turn, (sc2tog + 2), A: (4), F: (9), A: (6), F: (9), A: (4), B: (2 + sc2tog) – 38 sc
Row 45: B: Ch 1, turn, (sc2tog + 2), A: (3), F: (9), A: (6), F: (9), A: (3), B: (2 + sc2tog) – 36 sc
Row 46: B: Ch 1, turn, (sc2tog + 2), A: (3), F: (7), A: (8), F: (7), A: (3), B: (2 + sc2tog) – 34 sc
Fasten off color F.
Row 47: B: Ch 1, turn, (sc2tog + 2), A: (26), B: (2 + sc2tog) – 32 sc
Row 48: B: Ch 1, turn, (sc2tog + 2), A: (24), B: (2 + sc2tog) – 30 sc
Fasten off color A.
Row 49: B: Ch 1, turn, (sc2tog + 26 + sc2tog) – 28 sc
Row 50: B: Ch 1, turn, (sc2tog + 24 + sc2tog) – 26 sc
Fasten off color B. Weave in all your ends.
Optional: add the eyelashes with some extra contrasting yarn before weaving in your yarn.
-Back-
Row 1: B: Ch 29, sc into the second ch from the hook and into the next 27 sts – 28
(RS) Row 2: Ch 1, turn, sc twice into the first st, sc into the next 26 sts, sc twice into the last st – 30 sc
Row 3: Ch 1, turn, sc twice into the first st, sc into the next 28 sts, sc twice into the last st – 32 sc
Row 4: Ch 1, turn, sc twice into the first st, sc into the next 30 sts, sc twice into the last st – 34 sc
Row 5: Ch 1, turn, sc twice into the first st, sc into the next 32 sts, sc twice into the last st – 36 sc
Row 6: Ch 1, turn, sc twice into the first st, sc into the next 34 sts, sc twice into the last st – 38 sc
Row 7: Ch 1, turn, sc twice into the first st, sc into the next 36 sts, sc twice into the last st – 40 sc
Rows 8 – 21: Ch 1, turn, sc into the next 40 sts – 40 sc
Row 22: Ch 1, turn, sc2tog the first 2 sts, sc into the next 36 sts, sc2tog the last 2 sts – 38 sc
Row 23: Ch 1, turn, sc2tog the first 2 sts, sc into the next 34 sts, sc2tog the last 2 sts – 36 sc
Row 24: Ch 1, turn, sc2tog the first 2 sts, sc into the next 32 sts, sc2tog the last 2 sts – 34 sc
Row 25: Ch 1, turn, sc2tog the first 2 sts, sc into the next 30 sts, sc2tog the last 2 sts – 32 sc
Row 26: Ch 1, turn, sc2tog the first 2 sts, sc into the next 28 sts, sc2tog the last 2 sts – 30 sc
Row 27: Ch 1, turn, sc2tog the first 2 sts, sc into the next 26 sts, sc2tog the last 2 sts – 28 sc
Row 28: Ch 1, turn, sc2tog the first 2 sts, sc into the next 24 sts, sc2tog the last 2 sts – 26 sc
Row 29: Ch 1, turn, sc twice into the first st, sc into the next 24 sts, sc twice into the last st – 28 sc
Row 30: Ch 1, turn, sc twice into the first st, sc into the next 26 sts, sc twice into the last st – 30 sc
Row 31: Ch 1, turn, sc twice into the first st, sc into the next 28 sts, sc twice into the last st – 32 sc
Row 32: Ch 1, turn, sc twice into the first st, sc into the next 30 sts, sc twice into the last st – 34 sc
Row 33: Ch 1, turn, sc twice into the first st, sc into the next 32 sts, sc twice into the last st – 36 sc
Row 34: Ch 1, turn, sc twice into the first st, sc into the next 34 sts, sc twice into the last st – 38 sc
Row 35: Ch 1, turn, sc twice into the first st, sc into the next 36 sts, sc twice into the last st – 40 sc
Rows 36 – 43: Ch 1, turn, sc into the next 40 sts – 40 sc
Row 44: Ch 1, turn, sc2tog the first 2 sts, sc into the next 36 sts, sc2tog the last 2 sts – 38 sc
Row 45: Ch 1, turn, sc2tog the first 2 sts, sc into the next 34 sts, sc2tog the last 2 sts – 36 sc
Row 46: Ch 1, turn, sc2tog the first 2 sts, sc into the next 32 sts, sc2tog the last 2 sts – 34 sc
Row 47: Ch 1, turn, sc2tog the first 2 sts, sc into the next 30 sts, sc2tog the last 2 sts – 32 sc
Row 48: Ch 1, turn, sc2tog the first 2 sts, sc into the next 28 sts, sc2tog the last 2 sts – 30 sc
Row 49: Ch 1, turn, sc2tog the first 2 sts, sc into the next 26 sts, sc2tog the last 2 sts – 28 sc
Row 50: Ch 1, turn, sc2tog the first 2 sts, sc into the next 24 sts, sc2tog the last 2 sts – 26 sc
Fasten off, weave in all your ends.
-Seaming-
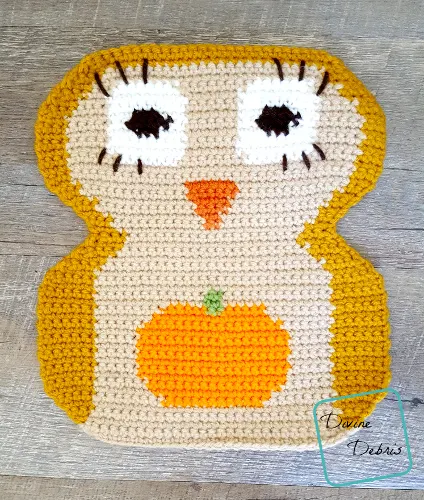
With the wrong sides facing each other, start in the bottom right of the ami when the right side of the Front piece is facing you. Create a slipknot on your hook and begin in the bottom right corner (where the X is on the photo above) and sc the two pieces together going up the row 50 ends, rotate the piece so you’re working along both row 50s (this creates the ears at the top), sc into the first st, hdc into the next st, dc into the next st, tr twice into the next st, picot, tr twice into the next st, dc into the next st, hdc into the next st, sc into the next 12 sts, hdc into the next st, dc into the next st, tr twice into the next st, picot, tr twice into the next st, dc into the next st, hdc into the next st, sc into the next st, rotate the piece so you’re working down the row ends, sc into the next 50 row ends, rotate the piece so you’re working across the other side of the chain row and sc into the next 28 sts, slip st into the first st – 142 sc, 2 hdc, 2 dc, 8 tr, 2 picots

Jennifer
Tuesday 2nd of October 2018
This little lady is super cute!
Divine Debris
Thursday 4th of October 2018
Thank you, Jennifer <3 <3
Crystal
Tuesday 2nd of October 2018
So cute!