Hello and welcome to all!
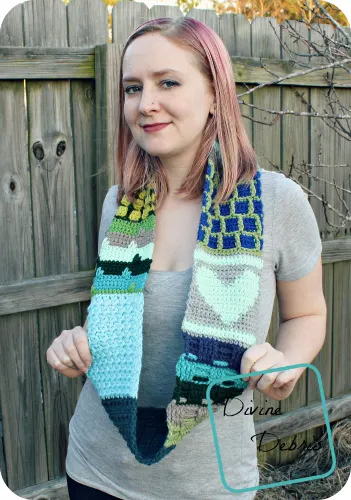
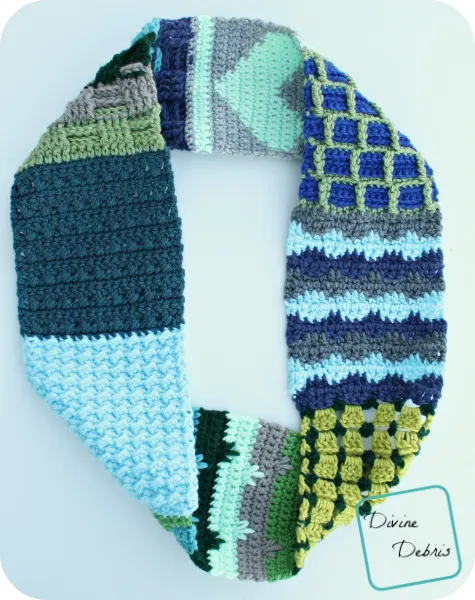
This year I’m a contributing designer to HodgePodge Crochet’s 2016 Sampler Afghan CAL and as I’m seeing so many different and gorgeous patterns, I got inspired. I thought this would be a nice idea to turn into a scarf or a cowl, as I prefer. This post is also my first for Crochetville’s National Crochet Month and I’m so excited to be participating. I love being involved in the community and seeing the posts all month by other great designers. I hope that you’re inspired by this cowl and make one of your own!
Materials:
- US J (6.00 mm) crochet hook
- Worsted/ medium/ size #4 weight yarn
- 4.5 oz/ 275 yards
- I used Bernat Super Value
- Yarn needle
Gauge:
- 5” x 5” = 8 rows x 17 DCs
Terms/ Stitches used:
- Ch: Chain
- St: Stitch
- Slip st: Slip Stitch
- Sc: Single Crochet
- Hdc: Half Double Crochet
- Dc: Double Crochet
- Fpdc: Front Post Double Crochet
- Bpdc: Back Post Double Crochet
Special stitches:
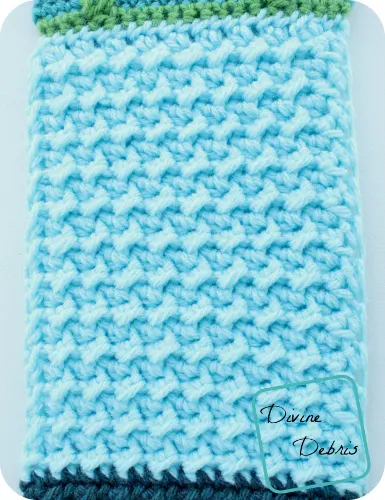
- Quad connected dc: insert hook into the front loop only of the next st, yarn over and pull up a loop (2 loops on hook), insert hook into the front (un-used) loop of the stitch of the row below, yarn over and pull up a loop (3 loops on hook), insert hook into the front (un-used) loop of the stitch of the row below, yarn over and pull up a loop (4 loops on hook), insert hook into the front (un-used) loop of the stitch of the row below, yarn over and pull up a loop (5 loops on hook), yarn over and pull through 2 loops on the hook (4 loops remaining on hook), yarn over and pull through 2 loops on the hook (3 loops remaining on hook), yarn over and pull through 2 loops on the hook (2 loops remaining on hook), yarn over and pull through remaining 2 loops on the hook. Here’s a how to on this stitch.
- Spike cluster sc (for square 8): it’s like a sc3tog that you work spike stitches into 3 different stitches. Here’s a how to on this stitch.
Notes:
- There are a total of 8 squares in this cowl. Some will require you to use special stitches (explained below).
- From square 1 on, you will work the next square where you finished off the last one.
- Each square is worked back and forth, with a turn at the beginning of the next row.
- The measurements for each individual square are listed with the square.
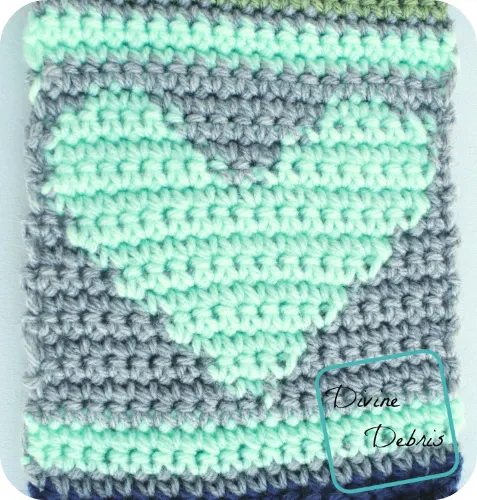
- Square #4 is similar to my Heidi Cowl, where rather than changing, cutting, and weaving in the ends of all the colors, the yarn is carried through the scarf in the photos. Here’s a great tutorial on color changes. In this pattern, the active yarn is worked over the inactive.
Finished measurements (for the whole cowl):
Width (on average): 6″
Diameter (of flat cowl): 24″
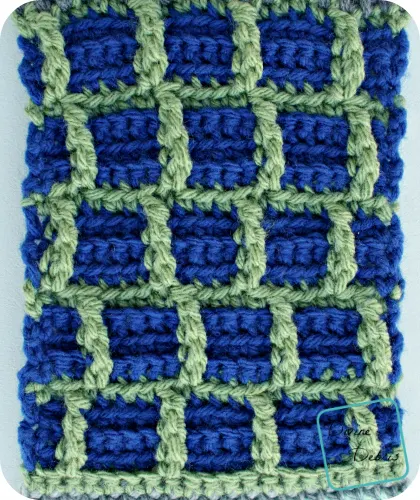
Square 1:
Finished Measurements:
- Width: 5.75″
- Height: 6.25″
Row 1: Ch 21, turn, slip st into the second ch from the hook, hdc into the next st, *slip st into the next st, hdc into the next st,* repeat from * to * 8 more times – 10 hdcs, 10 slip sts
Rows 2 – 24: Ch 1 (this will count as a slip st space here and you will work your later hdcs into it) skip the first st, hdc into the next st, *slip st into the next st, hdc into the next st,* repeat from * to * 8 more times – 10 hdcs, 10 slip sts
Fasten off, weave in your ends.
Square 2:
You will start this where you left off from the previous square.
Finished Measurements:
- Width: 5.75″
- Height: 6.50″
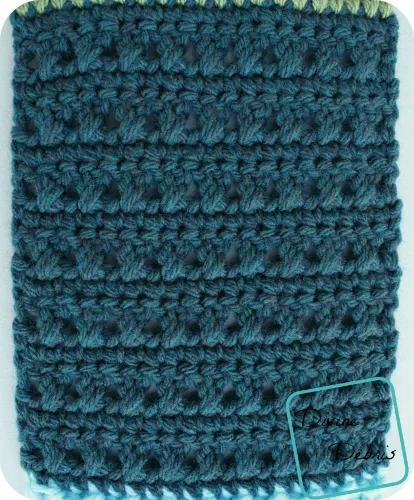
Row 1: Ch 1, sc into the next 20 sts – 20 scs
Row 2: Ch 3 (counts as dc here and throughout this square), turn, *skip the next st, dc into the next st, dc around the last st and into the skipped st,* repeat from * to * 8 more times, dc into the last st – 20 dcs
Row 3: Ch 1, turn, sc into the next 20 sts – 20 scs
Rows 4 – 15: repeat rows 2 – 3, 6 times
Fasten off, weave in your ends.
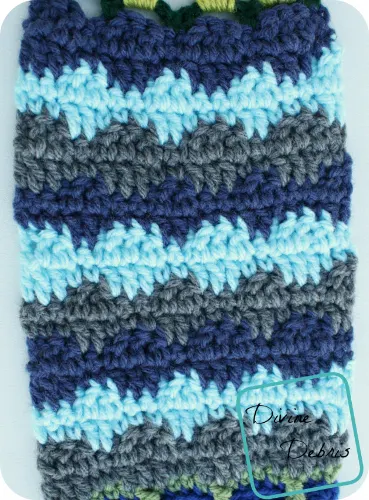
Square 3:
You will start this where you left off from the previous square.
Finished Measurements:
- Width: 5.50″
- Height: 6.50″
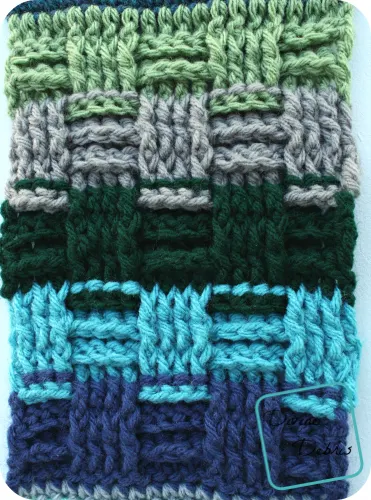
Row 1: Color A: Ch 3 (counts as dc here and throughout this square), dc into the next 19 sts – 20 dcs
Row 2: Ch 3, turn, bpdc around the next 3 sts, fpdc around the next 4 sts, bpdc around the next 4 sts, fpdc around the next 4 sts, bpdc around the next 3 sts, dc into the last st – 20 dcs (includes fpdcs and bpdcs)
Row 3: Ch 3, turn, fpdc around the next 3 sts, bpdc around the next 4 sts, fpdc around the next 4 sts, bpdc around the next 4 sts, fpdc around the next 3 sts, dc into the last st – 20 dcs (includes fpdcs and bpdcs)
Row 4: Color B: Ch 3, turn, bpdc around the next 3 sts, fpdc around the next 4 sts, bpdc around the next 4 sts, fpdc around the next 4 sts, bpdc around the next 3 sts, dc into the last st – 20 dcs (includes fpdcs and bpdcs)
Row 5: Ch 3, turn, fpdc around the next 3 sts, bpdc around the next 4 sts, fpdc around the next 4 sts, bpdc around the next 4 sts, fpdc around the next 3 sts, dc into the last st – 20 dcs (includes fpdcs and bpdcs)
Row 6: Ch 3, turn, bpdc around the next 3 sts, fpdc around the next 4 sts, bpdc around the next 4 sts, fpdc around the next 4 sts, bpdc around the next 3 sts, dc into the last st – 20 dcs (includes fpdcs and bpdcs)
Rows 7 – 9: Color C: repeat rows 4 – 6
Rows 10 – 12: Color D: repeat rows 4 – 6
Rows 13 – 15: Color E: repeat rows 4 – 6
Square 4:
You will start this where you left off from the previous square.
Finished Measurements:
- Width: 5.25″
- Height: 5.50″
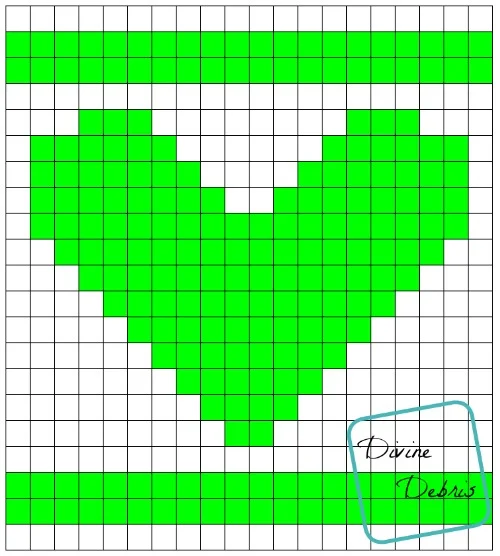
Row 1: Color A: Ch 1, sc into the next 20 sts – 20 scs
Rows 2 – 3: Color B: Ch 1, turn sc into the next 20 sts – 20 scs
Row 4: Ch 1, turn, sc into the next 20 sts – 20 scs
Row 5: Color B: Ch 1, turn, sc into the next 9 sts, Color A: sc into the next 2 sts, Color B: sc into the next 9 sts – 20 scs
Row 6: Color B: Ch 1, turn, sc into the next 8 sts, Color A: sc into the next 4 sts, Color B: sc into the next 8 sts – 20 scs
Row 7: Color B: Ch 1, turn, sc into the next 7 sts, Color A: sc into the next 6 sts, Color B: sc into the next 7 sts – 20 scs
Row 8: Color B: Ch 1, turn, sc into the next 6 sts, Color A: sc into the next 8 sts, Color B: sc into the next 6 sts – 20 scs
Row 9: Color B: Ch 1, turn, sc into the next 5 sts, Color A: sc into the next 10 sts, Color B: sc into the next 5 sts – 20 scs
Row 10: Color B: Ch 1, turn, sc into the next 4 sts, Color A: sc into the next 12 sts, Color B: sc into the next 4 sts – 20 scs
Row 11: Color B: Ch 1, turn, sc into the next 3 sts, Color A: sc into the next 14 sts, Color B: sc into the next 3 sts – 20 scs
Row 12: Color B: Ch 1, turn, sc into the next 2 sts, Color A: sc into the next 16 sts, Color B: sc into the next 2 sts – 20 scs
Row 13: Color B: Ch 1, turn, sc into the next st, Color A: sc into the next 18 sts, Color B: sc into the next st – 20 scs
Row 14: Color B: Ch 1, turn, sc into the next st, Color A: sc into the next 8 sts, Color B: sc into the next 2 sts, Color A: sc into the next 8 sts, Color B: sc into the next st – 20 scs
Row 15: Color B: Ch 1, turn, sc into the next st, Color A: sc into the next 7 sts, Color B: sc into the next 4 sts, Color A: sc into the next 7 sts, Color B: sc into the next st – 20 scs
Row 16: Color B: Ch 1, turn, sc into the next st, Color A: sc into the next 6 sts, Color B: sc into the next 6 sts, Color A: sc into the next 6 sts, Color B: sc into the next st – 20 scs
Row 17: Color B: Ch 1, turn, sc into the next 3 sts, Color A: sc into the next 3 sts, Color B: sc into the next 8 sts, Color A: sc into the next 3 sts, Color B: sc into the next 3 sts – 20 scs
Row 18: Color A: Ch 1, turn, sc into the next 20 sts – 20 scs
Rows 19 – 20: Color B: Ch 1, turn, sc into the next 20 sts – 20 scs
Row 21: Color A: Ch 1, turn, sc into the next 20 sts – 20 scs
Fasten off, weave in your ends.
Square 5:
You will start this where you left off from the previous square.
Here’s a photo tutorial on how to do the quac connected dc.
Finished Measurements:
- Width: 5.25″
- Height: 5.25″
Row 1: Color A: Ch 1, sc into the next 20 sts – 20 scs
Fasten off Color A.
Row 2: Color B: Ch 1, turn, sc into the first st, sc into back loop only of the next 18 sts, sc into the last st – 20 scs
Row 3: Ch 1, turn, sc into the first st, front loop only of the next 18 sts, sc into the last st – 20 scs
Row 4: Ch 1, turn, sc into the first st, sc into back loop only of the next 18 sts, sc into the last st – 20 scs
Fasten off Color B.
Begin the next row where you started the previous row.
Row 5: Color A: Ch 1, sc into the first st, sc into the back loop only of the next st, *quad connected dc into the next st, sc into the back loop only of the next 4 sts,* repeat from * to * twice more, quad connected dc into the next st, sc into the back loop only of the next st, sc into the last st – 16 scs, 4 quad connected dcs
Fasten off Color A.
Begin the next row where you started the previous row.
Rows 6 – 8: Color B: repeat rows 2 – 4
Fasten off Color B.
Begin the next row where you started the previous row.
Row 9: Color A: Ch 1, sc into the first st, *quad connected dc into the next st, sc into the back loop only of the next 4 sts,* repeat from * to * twice more, quad connected dc into the next st, sc into the back loop only of the next 2 sts, sc into the last st – 16 scs, 4 quad connected dcs
Fasten off Color A.
Rows 10 – 12: Color B: repeat rows 2 – 4
Fasten off Color B.
Row 13: Color A: Ch 1, sc into the first st, sc into the back loop only of the next 2 sts, *quad connected dc into the next st, sc into the back loop only of the next 4 sts,* repeat from * to * twice more, quad connected dc into the next st, sc into the last st – 16 scs, 4 quad connected dcs
Fasten off Color A.
Rows 14 – 16: Color B: repeat rows 2 – 4
Fasten off Color B.
Row 17: Color A: Ch 1, sc into the first st, sc into the back loop only of the next st, *quad connected dc into the next st, sc into the back loop only of the next 4 sts,* repeat from * to * twice more, quad connected dc into the next st, sc into the back loop only of the next st, sc into the last st – 16 scs, 4 quad connected dcs
Fasten off Color A.
Rows 18 – 20: Color B: repeat rows 2 – 4
Fasten off Color B.
Row 21: Color A: Ch 1, sc into the first st, sc into the back loop only of the next 2 sts, *quad connected dc into the next st, sc into the back loop only of the next 4 sts,* repeat from * to * twice more, quad connected dc into the next st, sc into the last st – 16 scs, 4 quad connected dcs
Fasten off Color A.
Square 6:
You will start this where you left off from the previous square.
Finished Measurements:
- Width: 5.75″
- Height: 6.75″
Row 1: Color A: Ch 1, sc into the first st, sc into the next st, *dc into the next 3 sts, sc into the next 2 sts,* * repeat from * to * twice more, dc into the next 3 sts – 12 dcs, 8 scs
Row 2: Ch 3 (counts as a dc in this square, throughout), turn, dc into the next 2 sts, sc into the next 2 sts, *dc into the next 3 sts, sc into the next 2 sts,* repeat from * to * twice more – 12 dcs, 8 scs
Row 3: Color B: Ch 3, turn, dc into the next st, sc into the next 3 sts, *dc into the next 2 sts, sc into the next 3 sts,* repeat from * to * twice more – 12 dcs, 8 scs
Row 4: Ch 1, turn, sc into the first st, sc into the next 2 sts, dc into the next 2 sts, *sc into the next 3 sts, dc into the next 2 sts,* repeat from * to * twice more – 12 dcs, 8 scs
Row 5: Color C: ch 1, turn, sc into the next 2 sts, dc into the next 3 sts, *sc into the next 2 sts, dc into the next 3 sts,* repeat from * to * twice more – 12 dcs, 8 scs
Row 6: Ch 3, turn, dc into the next 2 sts, sc into the next 2 sts, *dc into the next 3 sts, sc into the next 2 sts,* repeat from * to * twice more – 12 dcs, 8 scs
Row 7: Color A: Ch 3, turn, dc into the next st, sc into the next 3 sts, *dc into the next 2 sts, sc into the next 3 sts*, repeat from * to * twice more – 12 dcs, 8 scs
Row 8: Ch 1, turn, sc into the next 3 sts, dc into the next 2 sts, *sc into the next 3 sts, dc into the next 2 sts,* repeat from * to * twice more – 12 dcs, 8 scs
Row 9: Color B: Ch 1, sc into the next 2 sts, dc into the next 3 sts, *sc into the next 2 sts, dc into the next 3 sts,* repeat from * to * twice more – 12 dcs, 8 scs
Row 10: Ch 3, turn, dc into the next 2 sts, sc into the next 2 sts, *dc into the next 3 sts, sc into the next 2 sts,* repeat from * to * twice more – 12 dcs, 8 scs
Row 11: Color C: Ch 3, turn, dc into the next st, sc into the next 3 sts, *dc into the next 2 sts, sc into the next 3 sts,* repeat from * to * twice more – 12 dcs, 8 scs
Row 12: Ch 1, turn, sc into the next 3 sts, dc into the next 2 sts, *sc into the next 3 sts, dc into the next 2 sts,* repeat from * to * twice more – 12 dcs, 8 scs
Row 13: Color A: Ch 1, turn, sc into the next 2 sts, dc into the next 3 sts, * sc into the next 2 sts, dc into the next 3 sts,* repeat from * to * twice more – 12 dcs, 8 scs
Row 14: Ch 3, turn, dc into the next 2 sts, sc into the next 2 sts, *dc into the next 3 sts, sc into the next 2 sts,* repeat from * to * twice more – 12 dcs, 8 scs
Row 15: Color B: Ch 3, turn, dc into the next st, sc into the next 3 sts, *dc into the next 2 sts, sc into the next 3 sts,* repeat from * to * twice more – 12 dcs, 8 scs
Row 16: Ch 1, turn, sc into the next 3 sts, dc into the next 2 sts, *sc into the next 3 sts, dc into the next 2 sts,* repeat from * to * twice more – 12 dcs, 8 scs
Row 17: Color C: Ch 1, turn, sc into the next 2 sts, dc into the next 3 sts, *sc into the next 2 sts, dc into the next 3 sts,* repeat from * to * twice more – 12 dcs, 8 scs
Row 18: Ch 3, turn, dc into the next 2 sts, sc into the next 2 sts, *dc into the next 3 sts, sc into the next 2 sts,* repeat from * to * twice more – 12 dcs, 8 scs
Fasten off, weave in all your ends.
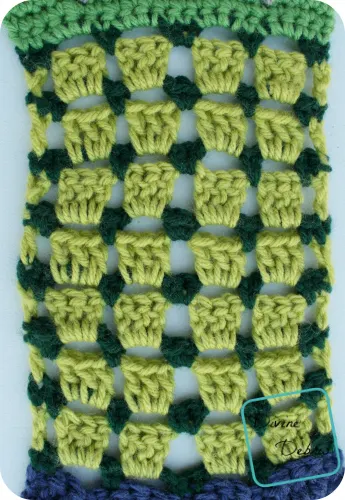
Square 7:
You will start this where you left off from the previous square.
Finished Measurements:
- Width: 5″
- Height: 6″
Row 1: Color A: Ch 1, sc into the next 2 sts, ch 3, skip the next 3 sts, sc into the next st, ch 3, skip the next 3 sts, sc into the next 2 sts, ch 3, skip the next 3 sts, sc into the next st, ch 3, skip the next 3 sts, sc into the next 2 sts – 8 scs
Row 2: Color B: Ch 3 (counts as dc in this square, throughout), ch 1, skip the next sc, dc 3 times into the next ch 3 space, ch 1, skip the next sc, dc 3 times into the next ch 3 space, ch 2, skip the next 2 scs, dc 3 times into the next ch 3 space, ch 1, skip the next sc, dc 3 times into the next ch 3 space, ch 1, skip the next sc, dc into the last st – 14 scs
Row 3: Color A: Ch 1, turn, sc into the next st and ch 1 space, ch 3, skip the next 3 dcs, sc into the next ch 1 space, ch 3, skip the next 3 dcs, sc twice into the next ch 2 space, ch 3, skip the next 3 dcs, sc into the next ch 1 space, ch 3, skip the next 3 dcs, sc into the next ch 1 space, sc into the next st – 8 scs
Rows 4 – 15: repeat rows 2 – 3 six more times
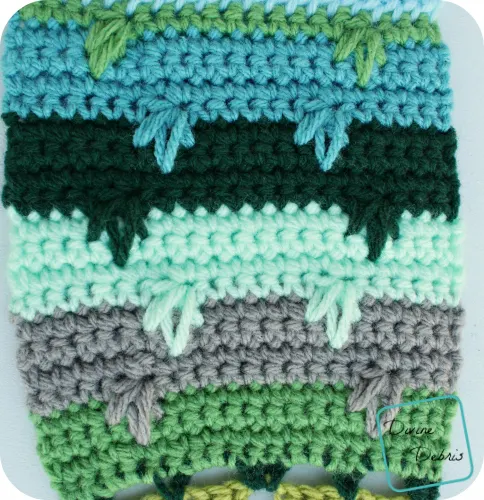
Square 8:
You will start this where you left off from the previous square.
Here’s a photo tutorial on how to do the spike cluster sc.
Finished Measurements:
- Width: 5.5″
- Height: 5″
Row 1: Color A: Ch 1, sc into the first 2 sts, sc 3 times into the next ch 3 space, sc into the next st, sc 3 times into the next ch 3 space, sc once into the next 2 sts, sc 3 times into the next ch 3 space, sc into the next st, sc 3 times into the next ch 3 space, sc into the next 2 sts – 20 scs
Rows 2 – 4: Ch 1, turn, sc into the next 20 sts – 20 scs
Row 5: Color B: Ch 1, turn, sc into the next 4 sts, spike cluster sc into the next st, sc into the next 10 sts, spike cluster sc into the next st, sc into th enext 4 sts – 18 scs, 2 spike cluster scs
Rows 6 – 8: Ch 1, turn, sc into the next 20 sts – 20 scs
Row 9: Color C: Ch 1, turn, sc into the next 6 sts, spike cluster sc into the next st, sc into the next 6 sts, spike cluster sc into the next st, sc into the next 6 sts – 18 scs, 2 spike cluster scs
Rows 10 – 12: Ch 1, turn, sc into the next 20 sts – 20 scs
Row 13: Color D: Ch 1, turn, sc into the next 4 sts, spike cluster sc into the next st, sc into the next 10 sts, spike cluster sc into the next st, sc into th enext 4 sts – 18 scs, 2 spike cluster scs
Rows 14 – 16: Ch 1, turn, sc into the next 20 sts – 20 scs
Row 17: Color E: Ch 1, turn, sc into the next 6 sts, spike cluster sc into the next st, sc into the next 6 sts, spike cluster sc into the next st, sc into the next 6 sts – 18 scs, 2 spike cluster scs
Rows 18 – 20: Ch 1, turn, sc into the next 20 sts – 20 scs
Row 21: Color A: Ch 1, turn, sc into the next 4 sts, spike cluster sc into the next st, sc into the next 10 sts, spike cluster sc into the next st, sc into the next 4 sts – 18 scs, 2 spike cluster scs
Fasten off, weave in your ends.
Finishing:
Unless you decide to add more squares, which you totally can I’m just trying to provide you with inspiration to make your own sampler cowl, or if you want to leave it long and make it a traditional scarf, secure the last square to the first square in your favorite method of joining.
So, there it is! My first NACROMO post and pattern. I hope you like this pattern and give this sampler scarf idea a try. I had fun mixing textures and colors in one scarf. I definitely think I’ll be trying this idea again. Hhmmm… I wonder how I could turn this into a hat design! 😀

JACKIE
Monday 12th of November 2018
LOVE IT AND MAKING SEVERAL IN DIFFERENT COLORS FOR THIS WINTER AND THE UPCOMING SPRING!!
Divine Debris
Wednesday 14th of November 2018
I'm glad you like it! :D
Linky Ladies ~ Community Link Party #44 | Crystalized Designs Blog
Tuesday 22nd of March 2016
[…] CLICKED: 1. Sampler Crochet Scarf by Divine Debris 2. Rosie Bookkeeper by Karine Larose 3. Spring Green, A Lacy Crochet Mesh […]
Liz
Thursday 17th of March 2016
What a fun way to try out and show off some new stitch patterns! Thanks for celebrating NatCroMo 2016 with this cowl and the offer!
Kay
Thursday 17th of March 2016
The Sandra Cowl is awesome! Can't wait to make one!
Divine Debris
Thursday 17th of March 2016
Thank you! To be honest, I was a little worried no one would like it. So thank you for saying you do. :D