

Wow, look it that, it’s July already!
If you follow me on IG you may have seen my post talking about how fast it felt like June flew by, while it also felt like it was the slowest month this year. I’m finally settling into my new home here in California, although my craftroom isn’t fully unpacked yet though… so I definitely need to get on that. I am still feeling a bit out of sorts, like everything will change again and I’ll be trying to start over, again. It’s been a few years since the last time I moved so I can’t quite remember how I was feeling but I bet it was a lot like this, just not quite sure of everything. I guess it’ll just take time. Luckily there’s yarn! I’ve talked about how I move often and how nice it is that I’ve made a ton of friends online, in the crafter community, and how it is so comforting that I still have that base when I move, regardless of where I live. I can’t even put into words how much that means to me, it does make the transition so much easier. *hugs*
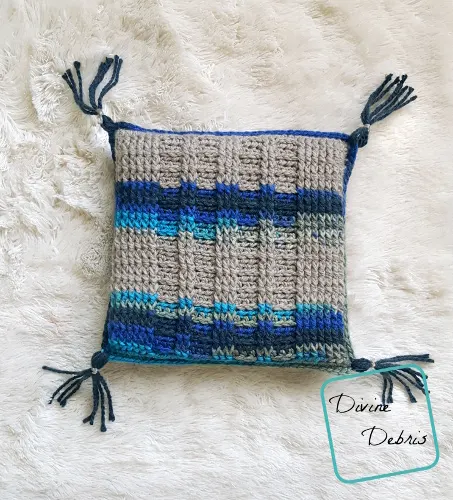
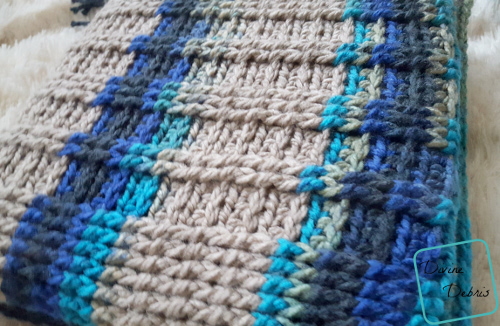
So, now that I got a little update on my on-goings out of the way, this week’s design is one I’ve had for a minute but I really love. This was made with Charisma from Loops and Threads (which you can purchase at Michael’s) and the bulky yarn really makes the stitch definition POP! I think I’m going to make a bag or hat with this design because it’s so wonderfully textured and the variegated yarn worked so well to create a left to right color splash that the up and down design of the post stitches get to be beautiful on their own. When I made this design I was trying to reuse an old pad that holds it shape harder than if I would have used stuffing. If I make this pattern again, I’d totally stuff it with Polyfill or something rather than using hard pad (I was trying to recycle something and it didn’t work out quite right), but the pattern does look good either way, so I’m pretty happy all around.
I really hope you like this design! Let me know what you think in the comments <3 <3
If you appreciate my weekly patterns I hope you’d consider purchasing an ad-free pdf of this pattern in my Ravelry shop.
Materials
- US K (6.50 mm) crochet hook
- Bulky/ size #5 weight yarn
- 2.4 oz. / 122 yards
- I used Loops and Threads Charisma
- Yarn needle
- Polyfill/ pillow form
Gauge
- 7 rows x 10 hdcs = 3.75″


Terms/stitches used:
- RS: right side
- Ch: chain
- St: stitch
- Slip st: slip stitch
- Sc: single crochet
- Hdc: half double crochet
- Fphdc: front post half double crochet
- Bphdc: back post half double crochet
Notes
- This pattern is worked in 3 sections: the Front panel, the Back panel, and the securing around an insert (or ami filling). The individual panels are worked back and forth in rows, with a turn at the beginning (or end) of the row, until you get to the last row, which is a border that goes all the way around. Securing is a round of single crochet that goes around the both panels.
- You will need to know how to work into the back third loop of a half double crochet for this pattern.
- The ch-2 at the beginning of the rows does counts as a hdc.
- The stitch count at the end of the row counts hdcs, fphdcs, and bphdcs as hdcs.
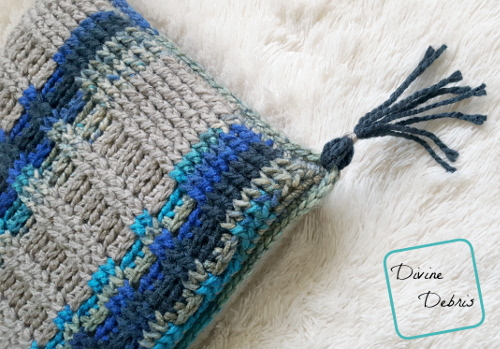
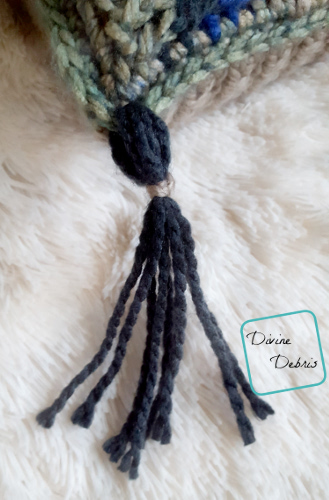
- You can finish the pillow with tassels, pompoms, or nothing at all.
- The instructions create a very tight design that will stretch well if you’re working around a form.
- I used a piece of foam to fill this pillow, so there’s a lot of stretch to the pattern – yours might be less stretched out.
- Charisma in Cascade Loops and Threads from Michael’s Stores was used to make this pillow.
- Feel free to make both sides of your pillow textured.
Finished product dimensions
Height: 12″ – 13″ (stretched)
Width: 12″ – 13″ (stretched)


Lovely Ridges Pillow Pattern instructions
– Side 1 –
(these instructions are for the textured side you see in the photos)
Row 1: Ch 36, hdc into the 3rd chain from the hook (the skipped sts count as a hdc), hdc into the next 33 sts – 35 hdcs
(RS) Row 2: Ch 2 (counts as hdc here & throughout), turn, bphdc around the next 7 sts, hdc into the back 3 loop of the next 3 sts, bphdc around the next 2 sts, hdc into the back 3 loop of the next 3 sts, bphdc around the next 3 sts, hdc into the back 3 loop of the next 3 sts, bphdc around the next 2 sts, hdc into the back 3 loop of the next 3 sts, bphdc around the next 7 sts, hdc into the last st – 35 hdcs
Row 3: Ch 2, turn, fphdc around the next 7 sts, hdc into the next 3 sts, fphdc around the next 2 sts, hdc into the next 3 sts, fphdc around the next 3 sts, hdc into the next 3 sts, fphdc around the next 2 sts, hdc into the next 3 sts, fphdc around the next 7 sts, hdc into the last st – 35 hdcs
Row 4: Ch 2, turn, bphdc around the next 7 sts, hdc into the back 3 loop of the next 3 sts, bphdc around the next 2 sts, hdc into the back 3 loop of the next 3 sts, bphdc around the next 3 sts, hdc into the back 3 loop of the next 3 sts, bphdc around the next 2 sts, hdc into the back 3 loop of the next 3 sts, bphdc around the next 7 sts, hdc into the last st – 35 hdcs
Rows 5 – 28: repeat rows 3 – 4, 12 more times
Do not fasten off, move onto the border.
Border
Row 29: Ch 1, turn, sc into the next 35 sts, ch 1 at the corner & rotate your whole piece, sc into the next 28 row ends, ch 1 at the corner & rotate your whole piece, sc into the back side of your original ch row (35 sts), ch 1 at the corner & rotate your whole piece, sc into the next 28 row ends, ch 1 at the corner & slip st into the first sc – 126 scs, 4 ch-1 spaces
Fasten off, weave in your ends.
– Side 2 –
(these instructions are for a blank side of hdc rows)
(RS) Row 1: Ch 36, hdc into the 3rd chain from the hook (the skipped sts count as a hdc), hdc into the next 33 sts – 35 hdcs
Rows 2 – 28: Ch 2 (counts as hdc here & throughout), hdc into the next 34 sts – 35 hdcs
Do not fasten off, move onto the border.
Border
Row 29: Ch 1, turn, sc into the next 35 sts, ch 1 at the corner & rotate your whole piece, sc into the next 28 row ends, ch 1 at the corner & rotate your whole piece, sc into the back side of your original ch row (35 sts), ch 1 at the corner & rotate your whole piece, sc into the next 28 row ends, ch 1 at the corner & slip st into the first sc – 126 scs, 4 ch-1 spaces
Fasten off, weave in your ends.
– Securing –
Place your two pieces together with the wrong sides facing each other (you can use stitch markers to hold the ch-1 spaces together to help you keep track of how they fit together). Create a slipknot on your hook and start in a sc right next to a ch-1 space on a 35 st row (top row of both sides), sc into the next 35 sts of both pieces, ch 1 at the corner & rotate your whole project, skip the ch-1 space on both pieces, sc into the next 28 sts of both pieces, ch 1 at the corner & rotate your whole project, skip the ch 1 space on both pieces, sc into the next 35 sts of both pieces, ch 1 at the corner & rotate your whole project, skip the ch-1 space on both pieces, (fill your pillow with your form or ami filling before you close the next 28 sts) sc into the next 28 sts of both pieces, ch 1 at the corner, skip the ch 1 space on both pieces, slip st into the first sc – 126 scs, 4 ch-1 spaces
Note: don’t forget to fill your pillow before finishing the last 28 sts!
– Finishing –
You can add tassels, pompoms, or leave the corners blank as you’d like. Use the ch-1 spaces at the corners to attach your embellishments (if you want them). I wanted the tassels because I thought they’d look super cute. 😀