
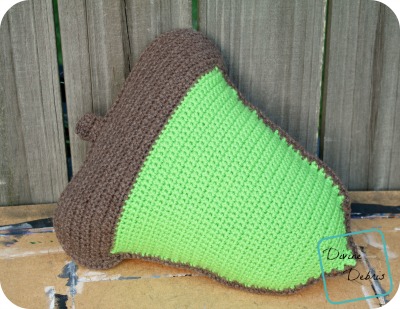
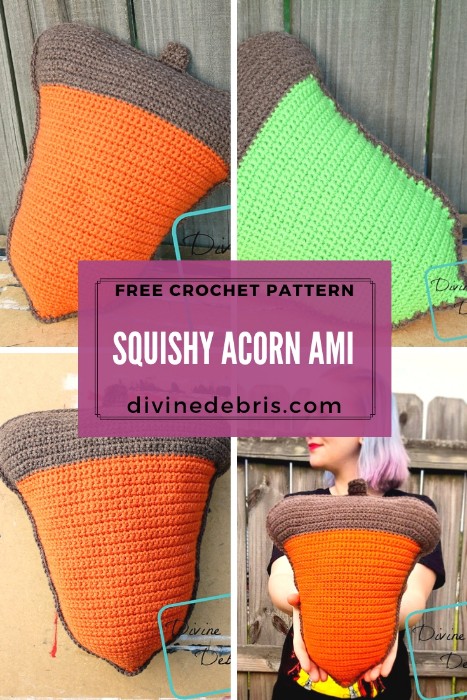
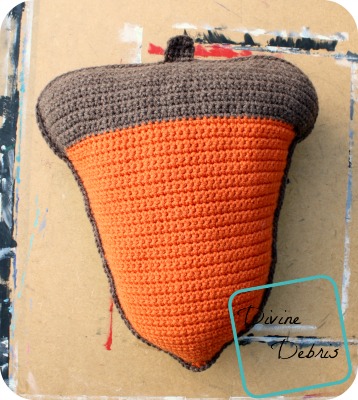
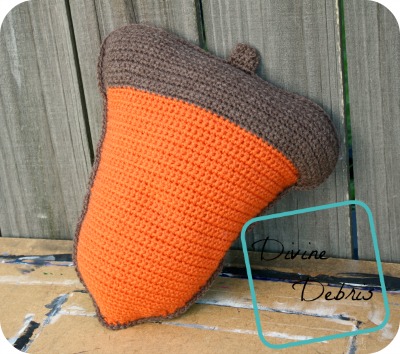
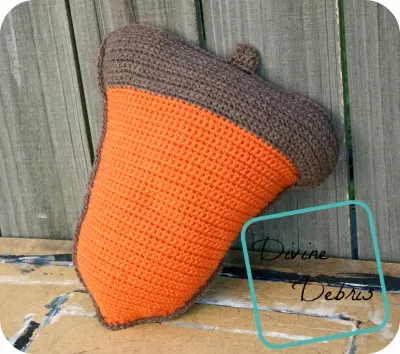
Hi! How’s everyone this week? It’s rainy and overcast here so I’m already feeling the Fall, in my head at least because it’s still like 80 degrees outside. Last week I said that I was going for it, no more waiting, it’s Fall ya’all! And to celebrate I’m bringing you a few different acorn designs, last week’s Acorn Mug Cozy and this week’s Squeezable Acorn Ami make two and you’ll be getting a basket design next week! Then it’s going to be some Halloween designs I’ve been thinking of. 😀
For this week’s design I decided to keep it simple, making it easy for more crocheters to make. I know that a lot of people would like to see some texture in the top of the acorn, and that’s fine, add it! I didn’t want to because I wanted it to be simple enough to understand and make that everyone can have cute acorns adoring their beds and couches. I sure do hope you’re as excited for the Fall as I am.
You can purchase an ad-free downloadable pdf for this pattern in my Ravelry shop.
Materials
- US G (4.00 mm) crochet hook
- Worsted/ medium/ size #4 weight yarn
- 4.5 oz. / 218 yards
- At least 2 colors
- I used Bernat Super Value and Red Heart Super Saver
- Yarn needle
- Amigurumi stuffing 1.5 – 3 oz
Gauge
- 18 sc x 19 rows = 4.25”


Terms/stitches used
- Ch: chain
- St: stitch
- Slip st: slip stitch
- Sc: single crochet
- Sc2tog: single crochet 2 sts together
- Sc3tog: single crochet 3 sts together
Notes
- This pattern is worked in 4 sections – the acorn body and the top, you work those two twice. The top is worked from the other side of the first row of the acorn body. Then you single crochet all the way around the two pieces and stuff it with stuffing before closing.
- This pattern is worked back and forth, with a turn at the end or the beginning of the row.
- The ch 1 at the beginning of the row does not count as a stitch.
- You can replace the chain row (row 1) with a foundation single crochet row.
- Feel free to add some texture to the top with surface crochet or alternating BLO/ FLO.
- You’re going to need to know how to create a slipknot on your hook for this pattern.
- Color A is green or orange and color B is brown in the photos.
Finished directions
Height: 14.25″ (at tallest, not counting stem)
Width: 12.5″ (at widest)
Squeezable Acorn Ami Pattern instructions
– Acorn Body –
Row 1: A: Ch 42, sc into the second st from the hook and across – 41 scs
Rows 2 – 8: Ch 1, turn, sc into the next 41 sts
Row 9: Ch 1, sc2tog, sc into the next 37 sts, sc2tog the last 2 sts – 39 scs
Rows 10 – 15: Ch 1, turn, sc into the next 39 sts – 39 scs
Row 16: Ch 1, sc2tog, sc into the next 35 sts, sc2tog – 37 scs
Rows 17 – 21: Ch 1, turn, sc into the next 37 sts – 37 scs
Row 22: Ch 1, turn, sc2tog, sc into the next 33 sts, sc2tog – 35 scs
Rows 23 – 26: Ch 1, turn, sc into the next 35 sts – 35 scs
Row 27: Ch 1, turn, sc2tog, sc into the next 31 sts, sc2tog – 33 scs
Rows 28 – 31: Ch 1, turn, sc into the next 33 sts – 33 scs
Row 32: Ch 1, turn, sc2tog, sc into the next 29 sts, sc2tog – 31 scs
Row 33: Ch 1, turn, sc into the next 31 sts – 31 scs
Row 34: Ch 1, turn, sc2tog, sc into the next 27 sts, sc2tog – 29 scs
Row 35: Ch 1, turn, sc into the next 29 sts – 29 scs
Row 36: Ch 1, turn, sc2tog, sc into the next 25 sts, sc2tog – 27 scs
Row 37: Ch 1, turn, sc into the next 27 sts – 27 scs
Row 38: Ch 1, turn, sc2tog, sc into the next 23 sts, sc2tog – 25 scs
Row 39: Ch 1, turn, sc into the next 25 sts – 25 scs
Row 40: Ch 1, turn, sc3tog, sc into the next 19 sts, sc3tog – 21 scs
Row 41: Ch 1, turn, sc3tog, sc into the next 15 sts, sc3tog – 17 scs
Row 42: Ch 1, turn, sc2tog, sc into the next 13 sts, sc2tog – 15 scs
Row 43: Ch 1, turn, sc3tog, sc into the next 9 sts, sc3tog – 11 scs
Row 44: Ch 1, turn, sc2tog, sc into the next 7 sts, sc2tog – 9 scs
Row 45: Ch 1, turn, sc2tog, sc into the next 5 sts, sc2tog – 7 scs
Row 46: Ch 1, turn, sc2tog, sc into the next 3 sts, sc2tog – 5 scs
Row 47: Ch 1, turn, sc2tog, sc into the next st, sc2tog – 3 scs
Row 48: Ch 1, turn, sc3tog the next 3 sts – 1 sc
Fasten off, weave in your ends.
– Top –
Row 1: B: Create a slip knot on your hook and sc into the row end of Row 2 from the acorn body, sc into the next row end, rotate your piece so your working along the other side of Row 1 from the acorn body, sc into the next 41 sts, rotate your piece, sc into the next 2 row ends – 45 scs
Row 2: Ch 1, turn, sc into the next 7 sts, sc twice into the next st, sc into the next 29 sts, sc twice into the next st, sc into the next 7 sts – 47 scs
Row 3: Ch 1, turn, sc into the next 7 sts, sc twice into the next st, sc into the next 31 sts, sc twice into the next st, sc into the next 7 sts – 49 scs
Rows 4 – 9: Ch 1, turn, sc into the next 49 scs – 49 scs
Row 10: Ch 1, turn, sc2tog, sc into the next 45 sts, sc2tog – 47 scs
Row 11: Ch 1, turn, sc2tog, sc into the next 43 sts, sc2tog – 45 scs
Row 12: Ch 1, turn, sc2tog, sc into the next 41 sts, sc2tog – 43 scs
Row 13: Ch 1, turn, sc2tog, sc into the next 39 sts, sc2tog – 41 scs
Row 14: Ch 1, turn, sc2tog, sc into the next 37 sts, sc2tog – 39 scs
Row 15: Ch 1, turn, sc2tog, sc into the next 35 sts, sc2tog – 37 scs
Fasten off, weave in your ends.
Row 16: B: Create a slip knot on your hook and go back to where you started row 1, sc into the next 14 row ends, skip next row end, sc into the next 37 sts, skip the next row end, sc into the next 14 row ends – 65 scs
Fasten off, weave in all your ends.
– Assembly –
Repeat the acorn body and top again so that you have two pretty lil’ acorns. Start wherever you’d like and sc around the row ends/ outside edges of both pieces, pausing when you’re 80% of the way to stuff your ami with stuffing. When you’re back to where you began, fasten off and weave in all your ends.
– Stem –
Row 1: B: Create a slipknot on your hook and skip 16 sts from the end of row 15 on the top (you can also eyeball this if you don’t want to make sure it’s 16 sts), sc into the next 5 sts – 5 scs
Rows 2 – 4: Ch 1, turn, sc into the next 5 sts – 5 scs
Fasten off, weave in your ends.
Tada, there it is! I hope you have a great week.
This post is linked to Hookin’ on Hump Day #150.