
Willow Snow Owl Pattern by Divinedebris.com
Materials:
- US G (4.25 mm) crochet hook
- 6 colors of worsted weight yarn
- 2.5 – 3 oz total
- 2 – 3 oz ami filling/ stuffing
- Tapestry needle
Gauge:
- G: 4.5” x 4.5” = 19 dcs x 9 rows
Terms/stitches used:
- St: stitch
- Slip st: slip stitch
- Ch: chain
- Sc: Single crochet
- Hdc: Half double crochet
- Magic circle
- Dc: double crochet
- Tr: treble crochet
- Spike sc: spike single crochet
- picot (explained below)
Notes:
- Picot: ch 3, insert your hook in the third chain from the hook, yarn over, pull through st and loop.
- This pattern is worked in the round, following row 4 (rows 1 – 4 are base rows and are worked back and forth) with slip sts at the end of each row.
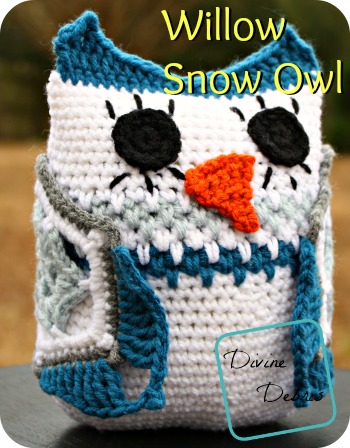
- Four colors are used in the creation of this ami and are labeled A, B, C, and D. The beak and the eyes are done in orange and black, respectively, and are not included in the A, B, C, and D assignment.
- In the pictures, color A is white, color B is dark blue, color C is light blue and color D is gray.
- You need to create 2 eyes and 2 wings.
- You can use the ends from your eyes, beak, and wings to secure them to the main body of the ami- just make sure they long.
- You should attach the eyes before you stuff/ fill the ami and close the top, that way you can create the “eyelashes,” which is easier to do before it’s closed. However, attaching the wings is better after you fill and stuff it, that way you can tell if they are lined up correctly. The beak is the same either before or after the stuffing/ filling.
- Rotate on row 5 means rotate the whole piece 90°.
Finished product dimensions:
- Height: 8.5” – 10” (from top of ami to middle of the bottom)
- Diameter: 8” – 8.5”
Pattern Instructions:
Main Body:
Color A: Row 1: Ch 13, sc into 12 sts – 12 scs
Rows 2 – 4: Turn, ch 1, into the next 12 sts – 12 scs
Row 5: Turn, ch 1, sc once into the first st, sc twice into next st, *sc once into the next st, sc twice into the next st,* repeat from * to * 4 more times, rotate, sc into next 4 sts, rotate, *sc into the next st, sc twice into the next st,* repeat from * to * 5 more times, rotate, sc into next 4 sts, slip st into first sc to secure – 44 scs
Row 6: Ch 1, sc once into the same st as join, sc once into the next 2 sts, sc twice into the next st, *sc once into the next 3 sts, sc twice into the next st,* repeat from * to * 9 more times, slip st into the first sc to secure – 55 scs
Row 7: Ch 1, sc once into the same st as join, sc once into the next 3 sts, sc twice into the next st, *sc once into the next 4 sts, sc twice into the next st,* repeat form * to * 9 more times, slip st into the first sc to secure – 66 scs
Rows 8 – 11: Ch 1, sc into the same st as join and into the next 65 sts, slip st into the first sc to secure – 66 scs
Row 12: Ch 1, sc once into the same st as join and into the next 8 sts, sc2tog the next 2 sts, *sc once into the next 9 sts, sc2tog the next 2 sts,* repeat from * to * 4 more times, slip st into the first sc to secure – 60 scs
Row 13 – 18: Ch 1, sc into the same st as join and into the next 59 sts, slip st into the first sc to secure – 60 scs
Row 19: Ch 1, sc into the same st as join and into the next 7 sts, sc2tog the next 2 sts, *sc into the next 8 sts, sc2tog the next 2 sts,* repeat from * to * 4 more times, slip st into the first sc to secure – 54 scs
Row 20: Ch 1, sc into the same st as join and into the next 53 sts, slip st into the first sc to secure – 54 scs
Row 21: Ch 1, sc2tog the first 2 sts, sc once into the next 7 sts, *sc2tog the next 2 sts, sc once into the next 7 sts,* repeat from * to * 4 more times, slip st into the first sc to secure – 48 scs
Row 22: Ch 1, sc into the same st as join and into the next 47 sts, slip st into the first sc to secure – 48 scs
Color B: Row 23: Ch 1, sc into the same st as join, spike sc into the next st, *sc into the next st, spike sc into the next st,* repeat from * to * 22 more times, slip st into the first sc to secure – 24 scs, 24 spike scs
Row 24: Ch 1, spike sc into the same st as join, sc once into the next st, *spike sc once into the next st, sc once into the next st,* repeat from * to * 22 more times, slip st into the first spike sc to secure – 24 spike scs, 24 scs
Color A: Rows 25 – 26: repeat rows 24 – 25
Color C: Rows 27 – 28: repeat rows 24 – 25
Color A: Row 29: repeat row 24
Rows 30 – 39: Ch 1, sc into the same st as join and into the next 47 sts, slip st into the first sc to secure – 48 scs
Fasten off.
Eyes:
(Create 2)
Row 1: Create a magic circle, 6 scs into circle, slip st into the first sc to secure – 6 scs
Row 2: Ch 1, sc twice into the same st as join and into the next 5 sts, slip st into the first sc to secure – 12 scs
Fasten off.
Beak:
Row 1: Ch 7, sc into second ch from the hook and into the next 5 sts – 6 scs
Row 2: Turn, ch 1, sc2tog the first 2 sts, sc once into next 2 sts, sc2tog the last 2 sts – 4 scs
Row 3: Turn, ch 1, sc into the next 4 sts – 4 scs
Row 4: Turn, ch 1, sc2tog the first 2 sts, sc2tog the last 2 sts – 2 scs
Row 5: Turn, ch 1, sc once into the first st and into the next st – 2 scs
Row 6: Turn, ch 1, sc2tog the next 2 sts – 1 sc
Row 7: Turn, ch 1, sc once – 1 sc
Fasten off.
Wing:
(Create 2)
Color C: Row 1: Create a magic circle: 6 scs into the circle, slip st into first sc to secure – 6 scs
Row 2: ch 3 (counts as dc), ch 2, *dc into next st, ch 2,* repeat from * to * 4 more times, slip st into top of ch 3 to secure – 6 dcs
Row 3: ch 1, sc into same st as join, [hdc, dc, ch 2, dc, hdc] into next ch 2, *sc into the next dc, [hdc, dc, ch 2, dc, hdc] into the next ch 2 space,* repeat from * to * 4 more times, slip st into the top of the first sc to secure – 6 scs, 12 hdcs, 12 dcs
Fasten off with this color.
Color A: Row 4: pull up a loop in ch 2 from previous row, sc into same ch 2 space, ch 6, sc into next ch 2, *ch 6, sc into next ch 2,* repeat from * to * 4 more times, slip st into the first sc to secure – 6 scs
Row 5: Ch 1, sc into the same st as join, [sc 4 times, ch 4, sc 4 times] into the next ch 6 space, sc into the next sc, * [sc 4 times, ch 4, sc 4 times] into the next ch 6 space, sc into the next sc,* repeat from * to * 4 more times, slip st into the first sc to secure – 54 scs
Fasten off with this color.
Color D: Row 6: Pull up a loop with the new color, ch 1, sc into the same st as join, sc into the next 4 sts, ch 5, skip ch 4, sc into the next 9 sts, ch 5, skip ch 4, * sc into the next 9 sts, ch 5, skip ch 4,* repeat from * to * 4 more times, sc into the next 4 sts, slip st into the first sc to secure – 54 scs
Fasten off.
Color B: Row 7: Pull up a loop in the first sc after a ch 5, sc once into the first sc, sc once into the next st, hdc once into the next 2 sts, dc once into the next 2 sts, tr once into the next 2 sts, tr twice into the next st, ch 2, picot, ch 2, skip ch 5, tr twice into the next st, tr once into the next 2 sts, dc once into the next 2 sts, hdc once into the next 2 sts, sc once into the next 2 sts – 4 scs, 4 hdcs, 4 dcs, 8 trs
Fasten off. Weave in all your ends or use them to attach the wings to your owl’s body.
Finishing & Assembly:
The “eyelashes” around the eyes are easier to do when the ami isn’t stuffed. Just attach the eyes and with your tapestry needle sew through the sts, around the eyes, to create some eyelashes.
Closing:
After you stuff the owl, fold the opening in half and make sure the seam is parallel with the front of the owl, or else your owl might look a little strange when finished.
Color B: Row 1: With the face/ front turned away from you, sc across both pieces of the opening, this will seam up the opening – 22 scs.
Row 2: Turn, ch 3 (counts as a dc), tr into next st, picot, tr into next st, dc into next st, hdc into next 4 sts, sc into next 2 sts, slip st into next 4 sts, sc into next 2 sts, hdc into next 4 st, dc into next st, tr into the next st, picot, tr into next st, dc into last st – 6 dcs, 4 trs, 8 hdcs, 4 scs
Fasten off.
Attach the beak between the eyes and the wing on the sides.
You may sell all finished products made from this pattern; however you may not share, sell, or distribute this pattern in any way, in whole or in part. I would greatly appreciate a link back to my shop or this pattern anytime you sell this item online.
You MAY NOT use any of the photos from this listing, or the ones contained in the pattern, to sell your item. You MUST take your own photos.
Copyright @ Divine Debris 2012 – 2015. No part of this document may be reproduced or transmitted in any form by any means, electronic, mechanical, photocopying, or otherwise, without prior written permission from the author. Sales of finished product are permitted, but designer requests that you link back to pattern and credit Divine Debris with the original design under the Creative Commons Attribution-Share Alike license. If you have any questions, comments or concerns please contact info@divinedebris.com.
Terri C.
Tuesday 6th of September 2016
Adorable, thanks for sharing :)
Awesome Amigurumi – The Crochet Cafe
Monday 24th of August 2015
[…] Divine Debris’ Willow the Snow Owl is such a cute owl for winter. I love […]