I have been in the best mood the last couple of weeks. I’m working on tons of patterns, having fun doing it, and just throwing together some fun accessories to wear to work. I’m also enjoying school. 😀 I have this assignment where I have to watch Pushing Daisies, the wonderful gone too soon show from like 6 years ago, to analyze it for it’s use of math and then write a paper on that. Sounds fun, right? Tedious, sure, but still enjoyable because Lee Pace. *growl* Whoa, got off topic. Ha.
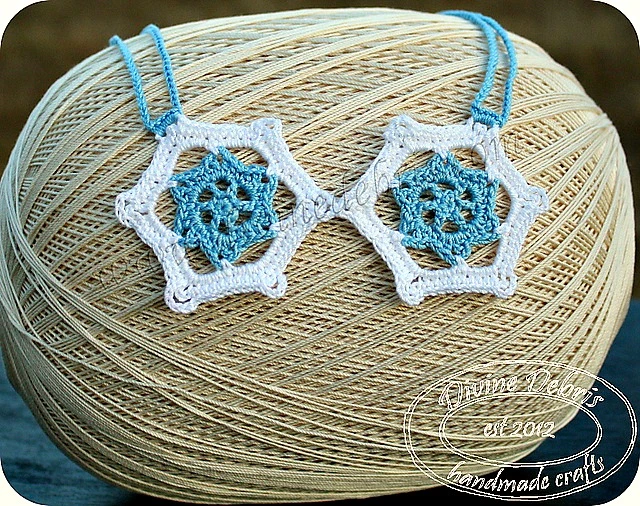
Anyway, want a pattern for a fun snowflake themed necklace that you could probably wear until February or later depending upon where you live?
You’re going to need a US 2.00 mm crochet hook and 2 colors of size 10 crochet thread, I used Aunt Lydia’s in light blue and white, I’d say less than a full oz.
Materials
- US 2.00 mm steel crochet hook
- Size 10 crochet thread
- I used Aunt Lydia‘s
- Needle that will weave in your ends
- Fabric stiffener (optional)
Gauge
Terms/stitches used
- Magic ring
- Ch: chain
- St: stitch
- Slip st: slip stitch
- Sc: single crochet
- Hdc: half double crochet
- Dc: double crochet
Notes
- This pattern is worked in 4 parts – the two individual snowflakes, and the straps. You work both snowflakes in the round, with a slip st into the first st of your row, and on your second snowflake you secure it to the first using the ch-5 space on row 6. The straps are worked as a long chain, which you secure with scs into another ch-5 space on row 6.
- The ch 1 at the beginning of the some rows does not count as a stitch.
- You’re going to need to know how to create a slipknot on your hook for this pattern.
- Color A is blue and color B is white in the photos.
Finished directions
Height: 2.25″
Width: 4.5″ (at widest)
Straps: 8.75″ in length
Pattern instructions
– Snowflake –
(Make 2)
Row 1: A: Create a magic circle, ch 1, sc 6 times into the circle, slip st into the first st – 6 scs
Row 2: Ch 3(counts as dc), ch 2, *dc into next st, ch 2,* repeat from * to * 4 more times, slip st into the top of the ch 3 – 6 dcs, 6 ch-2 spaces
Row 3: Ch 1, sc into same st as join, [hdc, dc, ch 2, dc, hdc] into the next ch-2 space, *sc into next st, [hdc, dc, ch 2, dc, hdc] into next ch-2 space,* repeat from * to * 4 more times, slip st into the first st – 12 dcs, 12 hdcs, 6 scs, 6 ch-2 spaces
Row 4: B: Create a slipknot on your hook, sc into any ch-2 space from row 3, ch 6, *skip to next ch-2 space, sc, ch 6,* repeat from * to * 4 more times, slip st into first st – 6 scs, 6 ch-6 spaces
Row 5: Ch 1, sc into same st as join, [sc 4 times, ch 4, sc 4 times] into ch-6 space, *sc into the next sc, [sc 4 times, ch 4, sc 4 times] into ch-6 space,* repeat from * to * 4 more times, slip st into first st – 54 scs, 6 ch-4 spaces
1st snowflake Row 6: Ch 1, sc into same st as join, sc into next 4 sts, ch 5, skip the next ch-4 space, *sc into next 9 scs, ch 5, skip the next ch-4 space* repeat from * to * 4 more times, sc into last 4 scs, slip st into first st – 54 scs, 6 ch-5 spaces
2nd snowflake Row 6:
Work as you did the first snowflake, just when you come to one of the ch-5 spaces, slip st into one of the ch-5 spaces of the 6th row of the your 1st snowflake.
– Straps –
With color B: ch 80, sc 5 times into a ch-5 space 2 ch-2 spaces away from the ch-5 space where you joined the snowflakes, ch 75 and sc into the last 5 chains of the first ch 80. Repeat this on the other snowflake.
You could definitely add more snowflakes if you want or you could turn these into cute earrings. You could add jump rings and necklace findings if you would like or you could just tie the straps.
I hope you like and make your own necklace for the winter season. I’ll be updating again a couple of days with another Willow pattern, the boot cuffs, which I’ve already added to my website. I’m also working on a new hat and playing around with crochet cables, which I’ve had issues doing in the past.
Add this necklace pattern to your Ravelry queue. Pin it here.
Have a good weekend! I’m looking forward to a great week next week, lots of fun coming up. 😀 Happy holidays.

