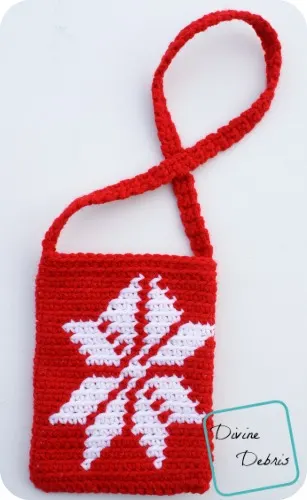
How ya doin’ today? Getting a lot of crochet done? I know it’s the busy season, or at least it is for me. I feel like ever spare second I have goes toward crocheting something for someone because I’ve got a lot to get done before January.
That’s why I came up with this design, it’s quick and makes a cute little gift for you or someone else. I was able to design and complete this in one evening, so I hope it goes as fast for you and checks a couple of gifts off your list.
You can purchase an ad-free downloadable pdf of this pattern in my Ravelry shop for $1.50.
Materials:
- US G (4.00 mm) crochet hook
- Aran/ medium/ size #4 weight yarn
- 2 oz. / 104 yards
- I used Red Heart Super Saver
- Yarn needle
Gauge:
- 4″ = 15 scs x 14 rows (BLO)
Terms/ stitches:
Notes:
- This pattern is worked in 2 sections: the bag and the strap.
- This pattern is worked from the bottom up, in the round with a slip st into the first st of the row.
- The ch 1 at the beginning of the row does not count as a stitch.
- Following the first row, sc into the back loop only, until you get to the strap. If you don’t work this pattern in the back loop only, it might end up leaning. You can block the finished item to make it lean less. At the end of the row, slip st into both loops of your 1st st, this will help to keep your seam straight.
- Every stitch in the sides portion of this pattern is a single crochet. The directions will only tell you what color (ie: Color A, Color B, etc…) and the number in the parentheses tells you how many scs to make.
- In the example, the inactive yarn is carried behind the active. If this is confusing, you might want to check out the helpful Moogly video on tapestry.
- You’re going to need to know how to create a slipknot on your hook for this pattern.
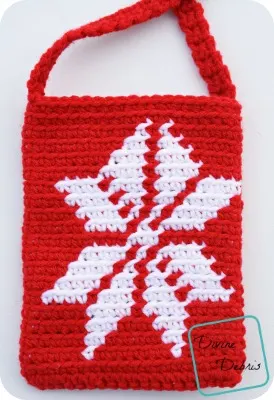
- Color A is red and B is white.
Finished measurements:
- Height: 6.25″
- Diameter: just under 5″
Pattern instructions:
Row 1: A: Ch 40, slip st to form a ring, ch 1, sc into each st around, slip st into the first st to secure – 40 scs
Note:
- Every row of the sides are worked into the back loop only. (until you get to the handles)
- Every stitch in the sides portion of the pattern is a single crochet, because of this the directions only tell you what color (ie: Color A, Color B, etc…) and the number in the parentheses then tells you how many single crochets to make.
- Following the ch 1, the first st is worked into the same st as join.
– Sides –
(RS) Row 2: A: Ch 1, (5), B: (1), A: (7), B: (1), A: (11), B: (1), A: (7), B: (1), A: (6), slip st into the first st to secure – 40 scs
Row 3: A: Ch 1, (5), B: (2), A: (5), B: (2), A: (11), B: (2), A: (5), B: (2), A: (6), slip st into the first st to secure – 40 scs
Row 4: A: Ch 1, (5), B: (3), A: (3), B: (3), A: (11), B: (3), A: (3), B: (3), A: (6), slip st into the first st to secure – 40 scs
Row 5: A: Ch 1, (5), B: (4), A: (1), B: (4), A: (11), B: (4), A: (1), B: (4), A: (6), slip st into the first st to secure -40 scs
Row 6: A: Ch 1, (1), B: (4), A: (1), B: (3), A: (1), B: (3), A: (1), B: (4), A: (3), B: (4), A: (1), B: (3), A: (1), B: (3), A: (1), B: (4), A: (2), slip st into the first st to secure – 40 scs
Row 7: A: Ch 1, (2), B: (4), A: (1), B: (2), A: (1), B: (2), A: (1), B: (4), A: (5), B: (4), A: (1), B: (2), A: (1), B: (2), A: (1), B: (4), A: (3), slip st into the first st to secure – 40 scs
Row 8: A: Ch 1, (3), B: (4), A: (1), B: (1), A: (1), B: (1), A: (1), B: (4), A: (7), B: (4), A: (1), B: (1), A: (1), B: (1), A: (1), B: (4), A: (4), slip st into the first st to secure – 40 scs
Row 9: A: Ch 1, (4), B: (4), A: (1), B: (1), A: (1), B: (4), A: (9), B: (4), A: (1), B: (1), A: (1), B: (4), A: (5), slip st into the first st to secure – 40 scs
Row 10: A: Ch 1, (8), B: (3), A: (17), B: (3), A: (9), slip st into the first st to secure – 40 scs
Row 11: A: Ch 1, (4), B: (4), A: (1), B: (1), A: (1), B: (4), A: (9), B: (4), A: (1), B: (1), A: (1), B: (4), A: (5), slip st into the first st to secure – 40 scs
Row 12: A: Ch 1, (3), B: (4), A: (1), B: (1), A: (1), B: (1), A: (1), B: (4), A: (7), B: (4), A: (1), B: (1), A: (1), B: (1), A: (1), B: (4), A: (4), slip st into the first st to secure – 40 scs
Row 13: A: Ch 1, (2), B: (4), A: (1), B: (2), A: (1), B: (2), A: (1), B: (4), A: (5), B: (4), A: (1), B: (2), A: (1), B: (2), A: (1), B: (4), A: (3), slip st into the first st to secure – 40 scs
Row 14: A: Ch 1, (1), B: (4), A: (1), B: (3), A: (1), B: (3), A: (1), B: (4), A: (3), B: (4), A: (1), B: (3), A: (1), B: (3), A: (1), B: (4), A: (2), slip st into the first st to secure – 40 scs
Row 15: A: Ch 1, (5), B: (4), A: (1), B: (4), A: (11), B: (4), A: (1), B: (4), A: (6), slip st into the first st to secure – 40 scs
Row 16: A: Ch 1, (5), B: (3), A: (3), B: (3), A: (11), B: (3), A: (3), B: (3), A: (6), slip st into the first st to secure – 40 scs
Row 17: A: Ch 1, (5), B: (2), A: (5), B: (2), A: (11), B: (2), A: (5), B: (2), A: (6), slip st into the first st to secure – 40 scs
Row 18: A: Ch 1, (5), B: (1), A: (7), B: (1), A: (11), B: (1), A: (7), B: (1), A: (6), slip st into the first st to secure – 40 scs
Fasten off color B.
Rows 19 – 20: A: Ch 1, (40), slip st into the first st to secure – 40 scs
– Strap –
Row 1: A: Ch 1, sc into the st to the right of the seam and then into the next st – 2 scs
Rows 2 – 96: Ch 1, turn, sc into the next 2 sts – 2 scs
Feel free to make the strap longer or wider as you would like.
Fasten off, leaving a long tail and use it to secure the other side of the handle 18 sts from the other side of the handle.
Bottom:
Fold the whole purse in half, create a slip knot on your hook, and sc across both sides of the purse to close the bottom – 20 scs
Fasten off, weave on all your ends.
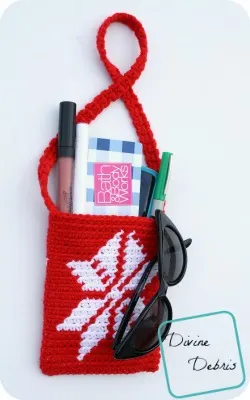
Tada! I hope you like this cute little purse. It’s big enough for some goodies and would make a great bag for a lil.
Tada! There it is. I hope you love it and make lots. See you next week!


