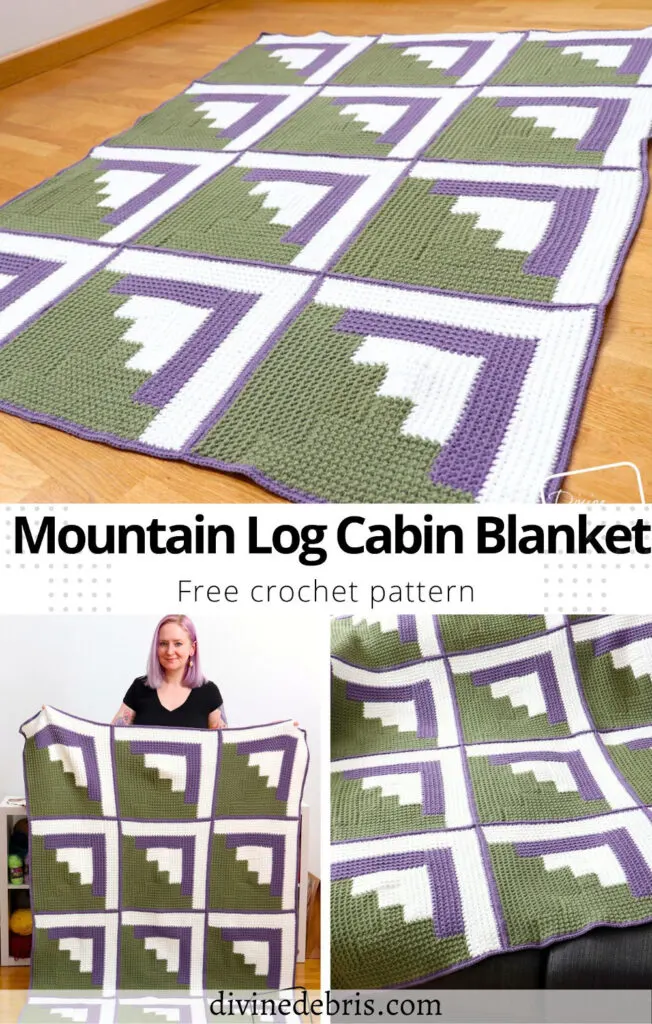
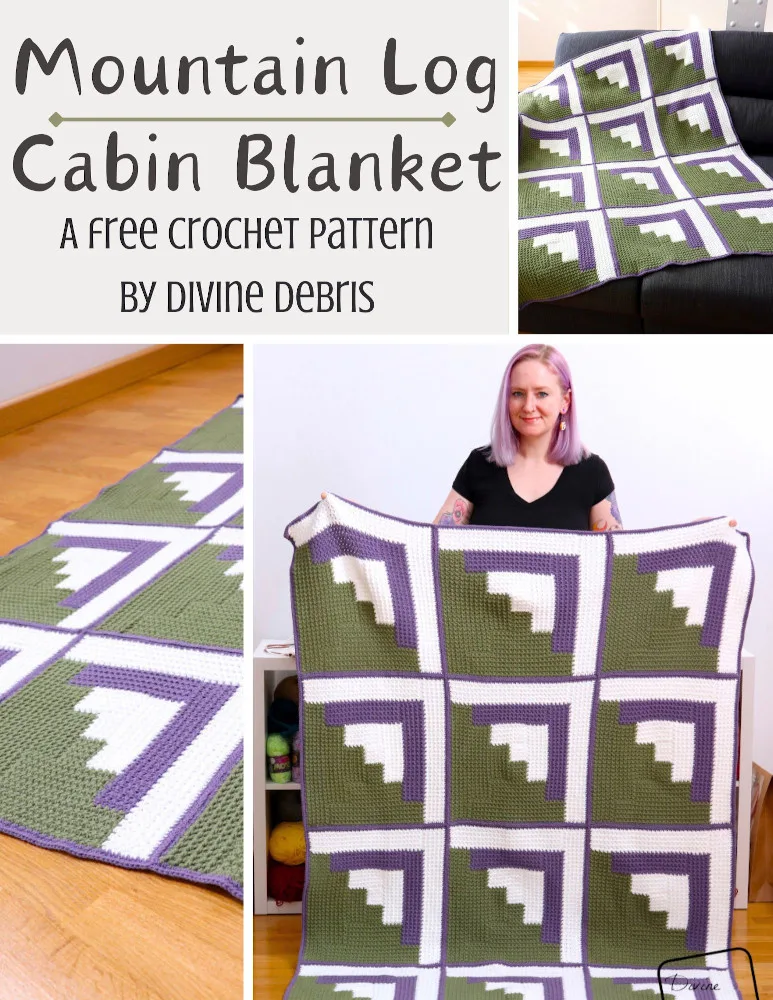
How’s the winter treating you, friends (also in the northern hemisphere)? I love a good mild winter, usually, but I need some actual cold to feel like it’s been a proper winter. And you know why? Cozy season! I love when it’s cold outside and I’m snuggly under yarn and warm. And that’s why this week’s new pattern is the Mountain Log Cabin Blanket crochet pattern.
Now if you know me, you know I love a good blanket pattern. As I said above, I love being cozy and warm (especially when it’s cold outside) and so that means I’m releasing blanket designs as often as I have time. They make me happy and they’re like a hug I can share with the world. 😀 And this week I’ve got a good newbie for ya with a squishy dense stitch.
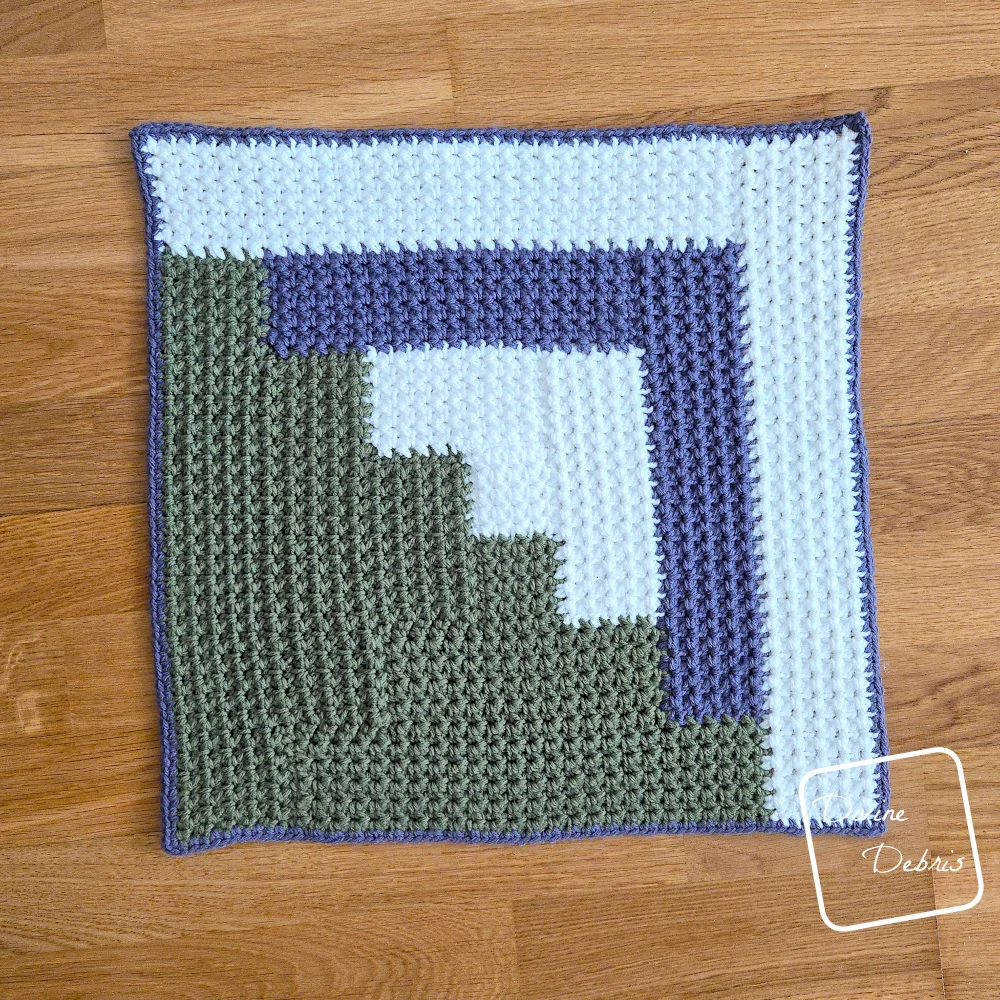
Like I’ve done before, this blanket is quilt inspired (because quilts are amazing, am I right?) – with the classic log cabin design (hence the name). And even though this pattern is labeled “intermediate +” or sort of advanced” it’s actually only because rotating – which happens after ever color section. And maybe where you place the stitches can be a bit confusing, just keep a good count and if you’re confused check the WS to make sure you did the stitch correctly on the previous row. As always, make sure your stitch count is correct. I swear, it’s truly not hard “hard” but a little complicated at first And I picked a higher level rating because I wanted the difficulty level to make people pay close attention.
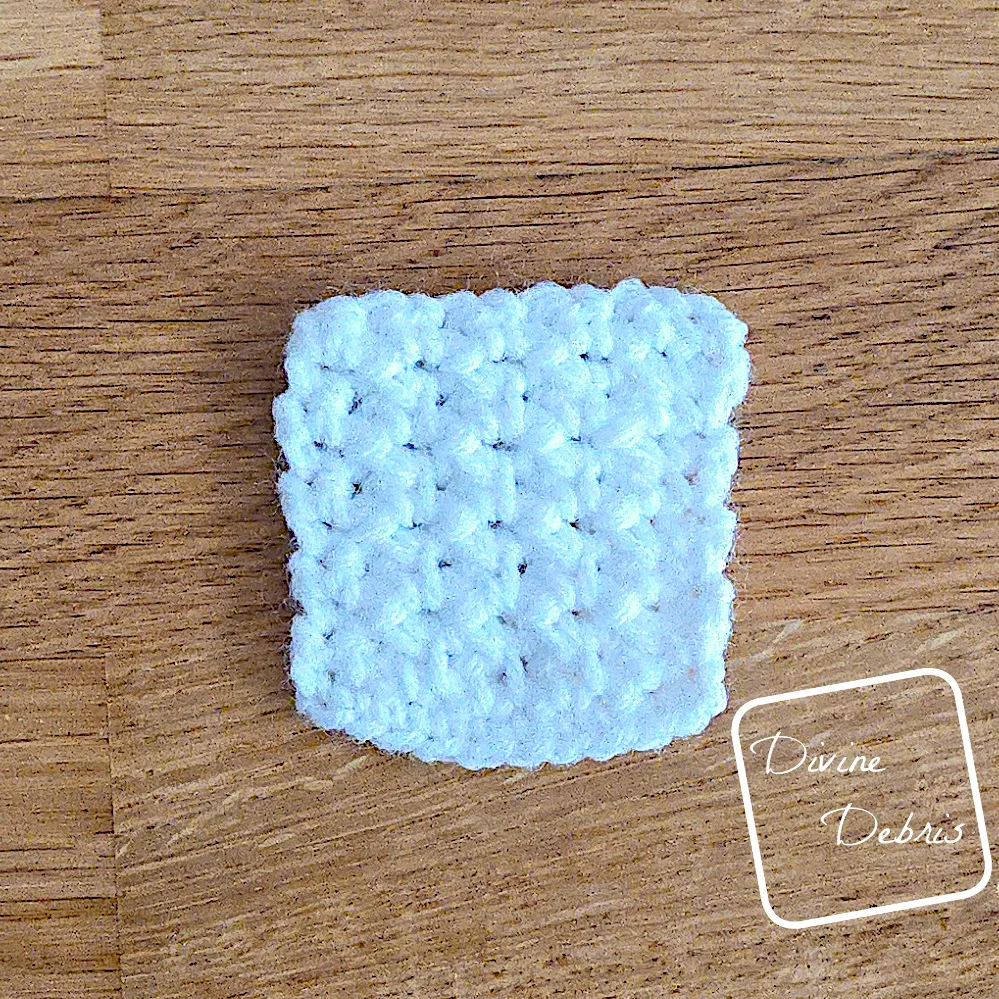
As much as 90% of this pattern is worked in the single crochet cluster (scc) stitch, which is a combo stitch. You do a sc2tog (a decrease stitch worked over 2 sts) and a ch 1 but they count together as 1 stitch, and when you work back into them, you work into both the sc2tog and the ch1 parts. There is a full description below if you’re kinda confused. I also recently shared a video of me using it on Instagram here if you want to see how I work it. It’s a really easy stitch, you just need to keep track of where you place the stitches on the subsequent rows and keep an even tension.
Did I mention that it’s a great stash buster (like the Linen Log Cabin Blanket from a few years ago)? Or you can do like I did here, 3 deliberately arranged colors to make a fun design in addition to the texture of the scc. Both would look fantastic, IMO. 😀
Overall, thank you for checking out this week’s new pattern and I hope you like it. IMO it’s a fun design that, once you get into the rhythm of the stitches and how you need to rotate the design, makes a good “catching up on your favorite tv shows or a good movie” wip. I made mine working while re-watching New Girl (as always) and catching up on Severance 😀 And I can verify, few errors were committed (and I caught them).
Please note: I was provided the yarn for this pattern by Lion Brand Yarn for the purposes of designing a kit and used it for the Mountain Log Cabin Blanket crochet pattern, with compensation. I wasn’t provided the yarn with the expectations of positive or negative reviews but been using Pound of Love Yarn for as long as I’ve been crocheting, it’s one of my favorite worsted with yarns for blankets. And I was commissioned to make this pattern and you can buy a kit for this pattern on Lion Brand’s Website. This post contains affiliate links. If you purchase yarn through any of the links in this post, I may be compensated. And do not make videos using my patterns.
Copyright @ Divine Debris 2025. No part of this document may be reproduced or transmitted in any form by any means, electronic, mechanical, photocopying, or otherwise, without prior written permission from the author. Sales of finished products are permitted, but the designer requests that you link back to the pattern and credit Divine Debris with the original design under the Creative Commons Attribution-Share Alike license. If you have any questions, comments or concerns please contact info@divinedebris.com.
(this post contains affiliate links)
If you appreciate my patterns I hope you’d consider purchasing an ad-free pdf of this pattern in my Ravelry shop and Lovecrafts shop (coming soon)!
Where to purchase the Mountain Log Cabin Blanket crochet pattern
Language
American English
Level
Intermediate +
Materials
- US G (4.00 mm) crochet hook
- US H (5.00 mm) crochet hook
- Worsted weight/ size #4 yarn
- 3 colors
- A (white): 24 oz/ 1530 yds
- B (green): 24 oz/ 1530 yds
- C (purple): 13.5 oz/ 861 yds
- I used Pound of Love by Lion Brand Yarn
- Check out the kit here
- 3 colors
- Notions: scissors, measuring tape, yarn needle
Gauge
- 10 scc x 20 rows = 4.5”
- For gauge: Row 1: Begin an odd number of chains that’s wider than 4” across, sc into the 2nd ch from the hook, scc across until 1 st remains, sc into the last st. Row 2: Ch 1, turn, sc into the first st, scc across until 1 st remains, sc into the last st. Rows 3 +: repeat Row 2 until you’ve got a center section more than 4” x 4” you can measure.
Terms/ Stitches Used
- St: Stitch
- Ch: Chain
- Rnd: Round
- RS: Right Side
- Sc: Single Crochet
- Sc2tog: Sc 2 sts together
Special Stitches Used
- Scc (Single Crochet Cluster): (this stitch is worked into two stitches) insert the hook into the first st, pull up a loop, insert the hook into the next st, pull up a loop, yarn over, pull through all 3 loops on the hook, ch 1. This stitch is worked like a sc2tog and a ch 1 that count together as one stitch. When working into this stitch, you will work into both the sc2tog and the ch-1 spaces.
Notes
- You can buy an ad-free pdf of this pattern on Ravelry if you’d prefer a pdf. It features 2 pdfs, one that is a photo tutorial like this post and another that is an “easy print” version that has minimal photos.
- This pattern is worked in individual squares and then seamed together.
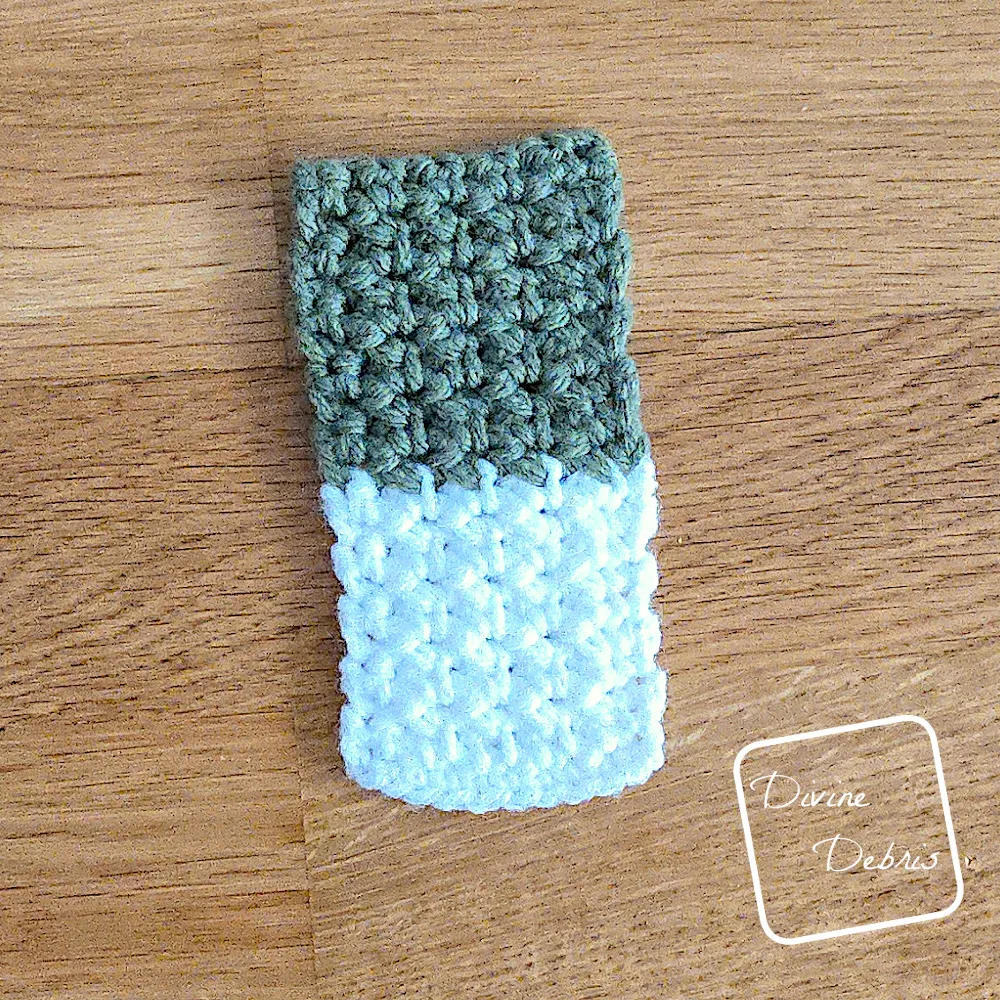
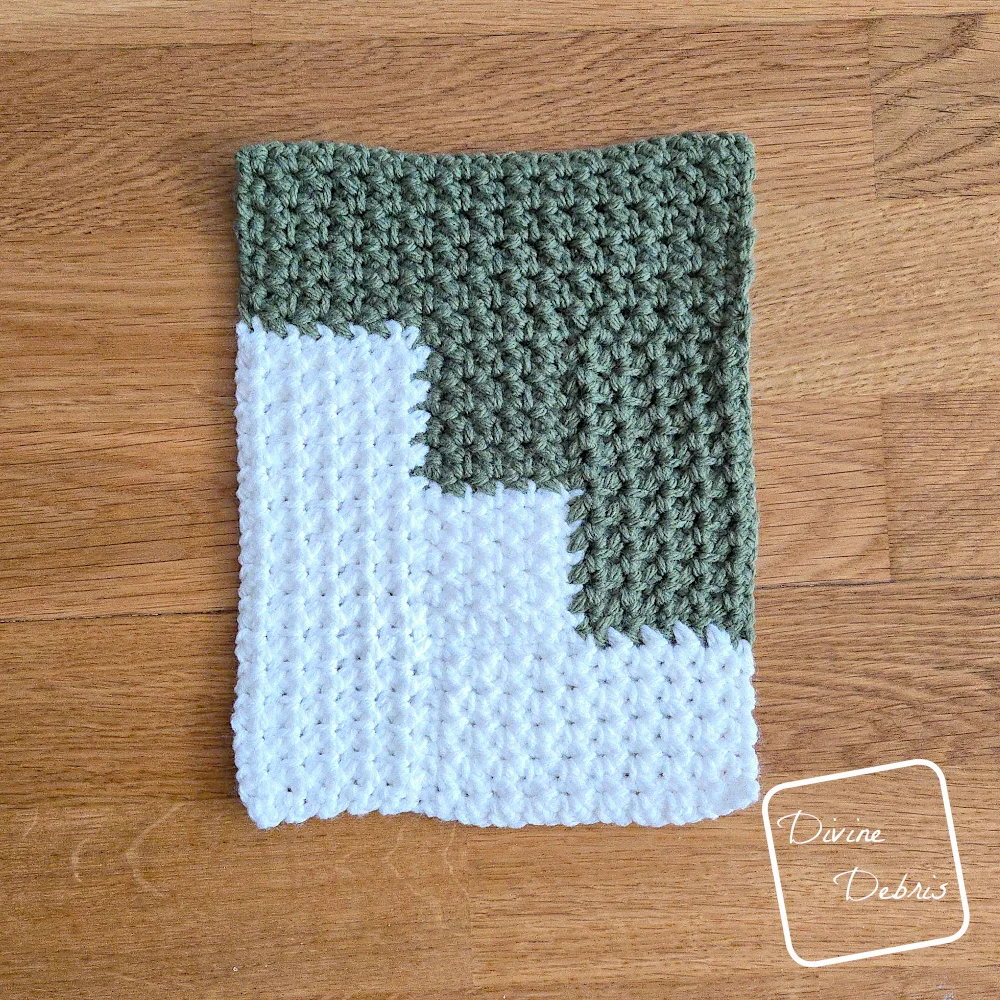
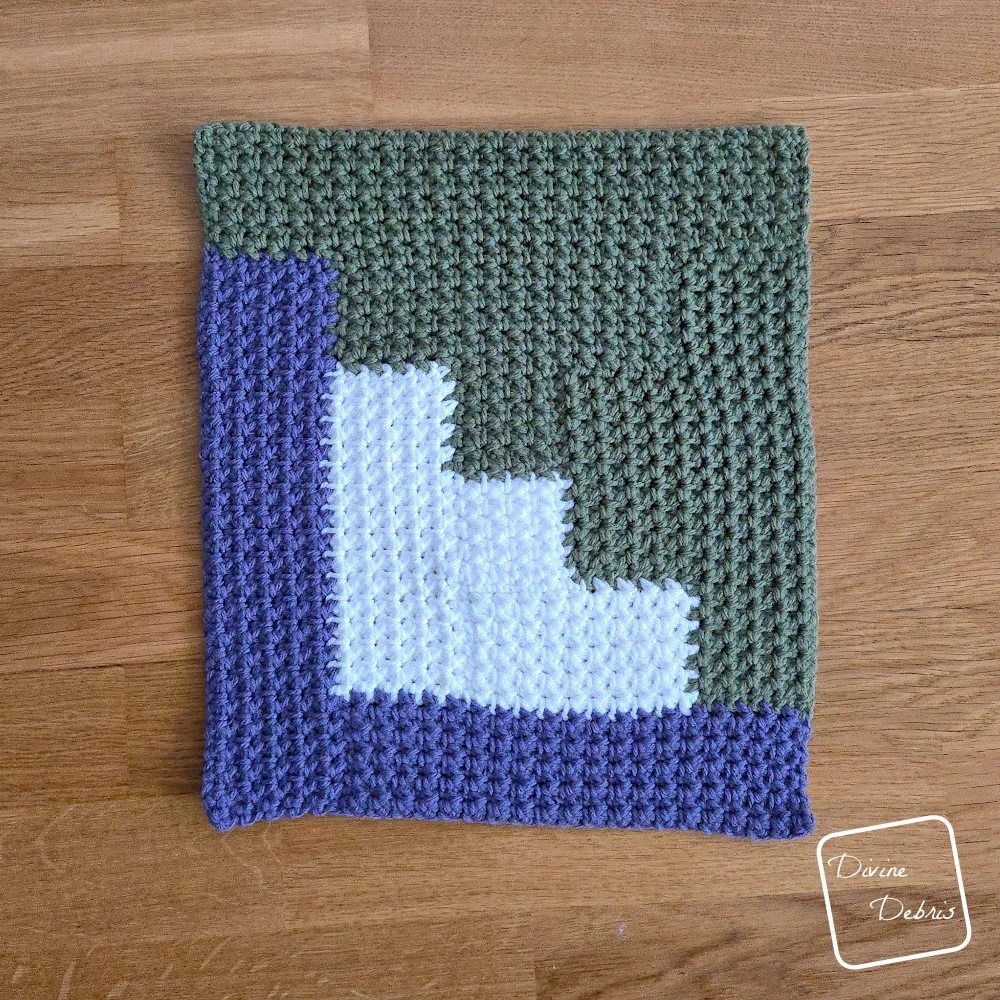
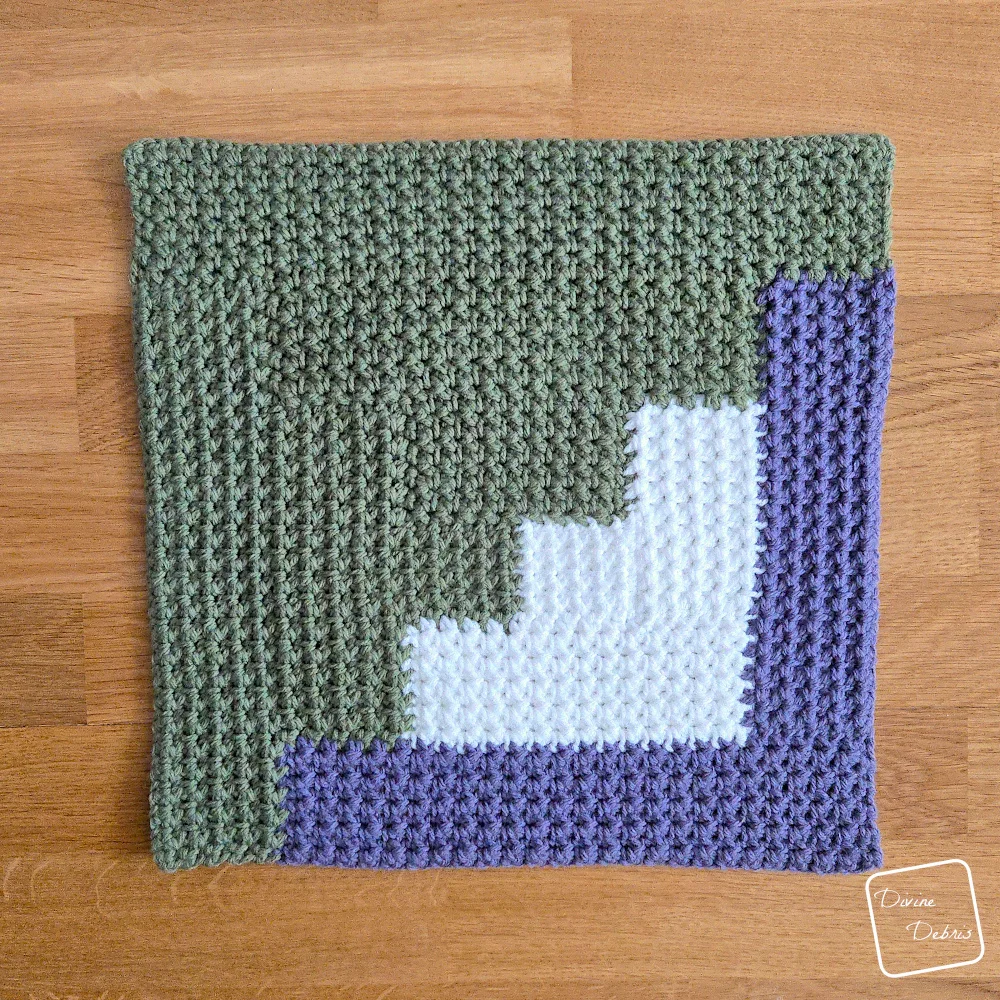
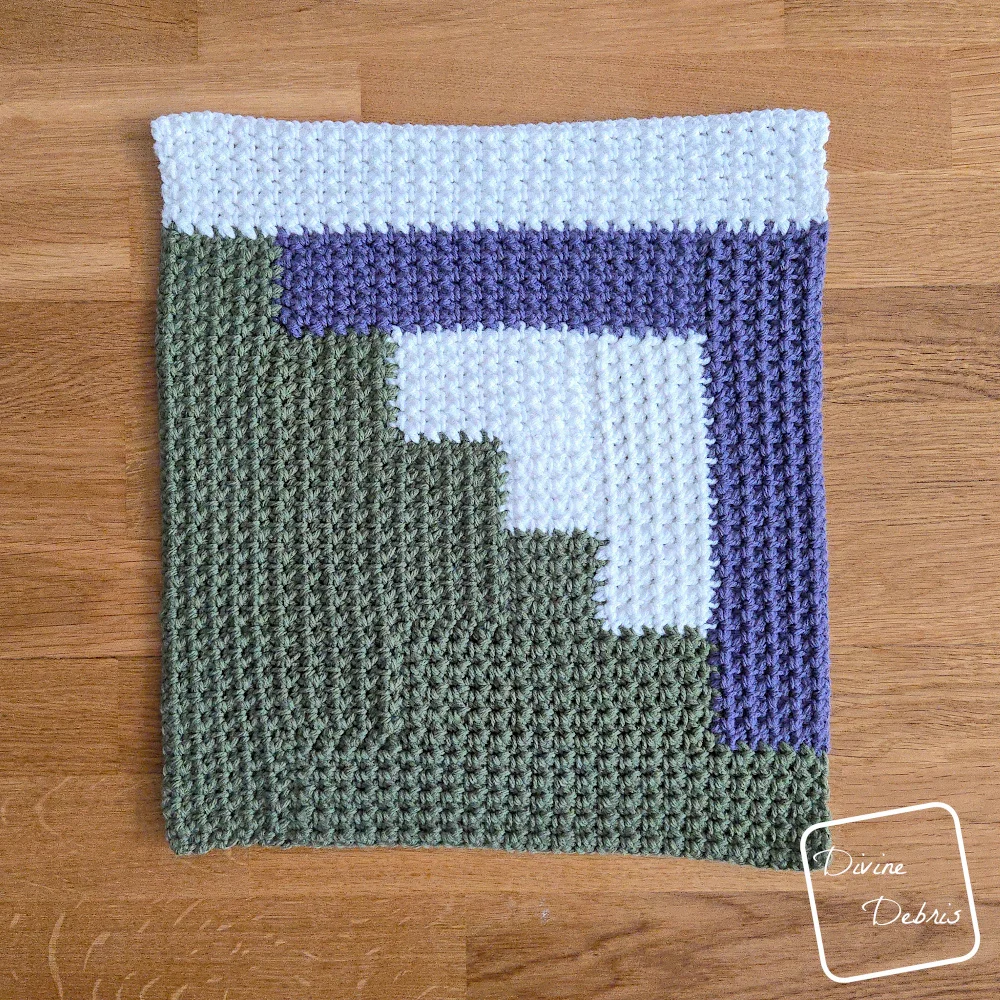
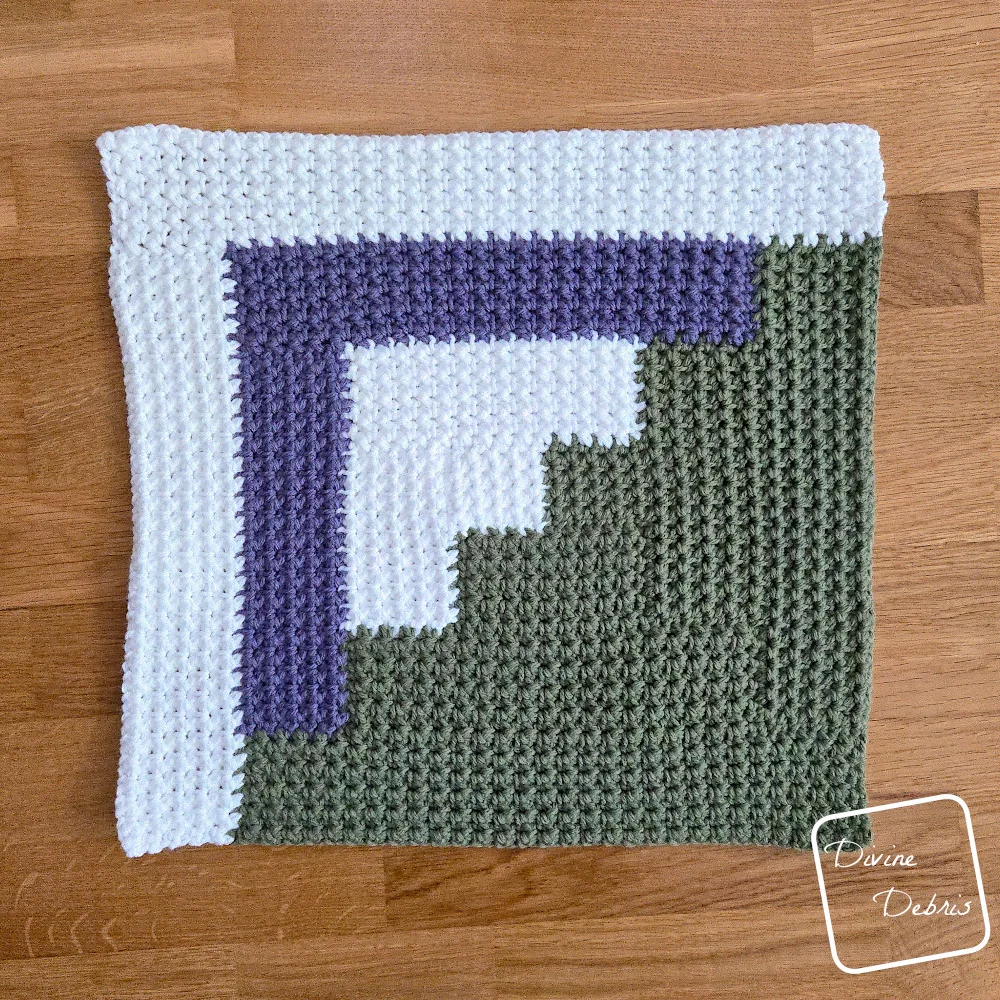
- Each square is worked in 13 separate sections and you will fasten off after each section. After the first section, which is a square, you will return to the RS and work each subsequent section onto the previous section(s). After the second section, you will need to turn 90 degrees or a quarter turn to the left with the RS facing you.
- In the 13 sections of the square, the 4.00 mm hook is only used for the first row of section 1, to help keep the gauge consistent. This row is only sc and can be looser than the other sections. If you go down a hook for this pattern, feel free to adjust the size you use for this row as well.
- Using the 4.00 mm hook (or a smaller hook if need), you will add a sc border to each square when the 13 sections of the square are complete.
- The 4.00 mm hook is also used on the Blanket Border.
- Blocking is suggested for this pattern.
- In the photos: Pound of Love was used for all colors: color A is white, color B is green, and color C is purple. Buy the kit from Lion Brand Yarn for this pattern here.
Blocked Mountain Log Cabin Blanket crochet pattern Finished Product Details (approx)
| Individual Squares with border | Blanket with border |
| 16” x 16” | 49” x 65” |
Tips
When working this pattern it can be hard to identify both parts of the scc (refer to Special Stitches Used for stitch instructions), especially when you’re moving from section to section and row ends are lining up with the wrong side of another section. In addition to making sure your stitch counts for each section are correct, I found using stitch markers when looking at the wrong side to mark the first and last stitches of the sections can help you identify where to place your stitches. There’s an example below of where to place stitch markers from the right side.
Be sure to note, as you’re working from one section to another, the scc you make will begin in one section and end in the next – this means you will pull up your first loop in one section and then the next loop in the next section before finishing the sc2tog and ch 1. See the close up on the right for an example – the next scc will start in the green section on the right and ends in the purple section on the above.
Section 1 (Color A)
With 4.00 mm hook
(RS) Row 1: Ch 11, sc into the 2nd ch from the hook and across – 10 sc
With 5.00 mm hook
Row 2: Ch 1, turn, sc into the first st, scc across until 1 st remains, sc into the last st – 2 sc, 4 scc
Rows 3 – 10: Ch 1, turn, sc into the first st, scc across (remember to use both parts of the previous row’s scc, the sc2tog and the ch 1) until 1 st remains, sc into the last st – 2 sc, 4 scc
Fasten off, weave in your ends.
Section 2 (Color B)
With 5.00 mm hook
Note: Flip your previous work back to the RS (Section 1’s Row 1 should be facing you)
(RS) Row 1: Ch 1, sc into the first st, scc across until 1 st remains, sc into the last st – 2 sc, 4 scc
Rows 2 – 10: Ch 1, turn, sc into the first st, scc across until 1 st remains, sc into the last st – 2 sc, 4scc
Fasten off, weave in your ends.
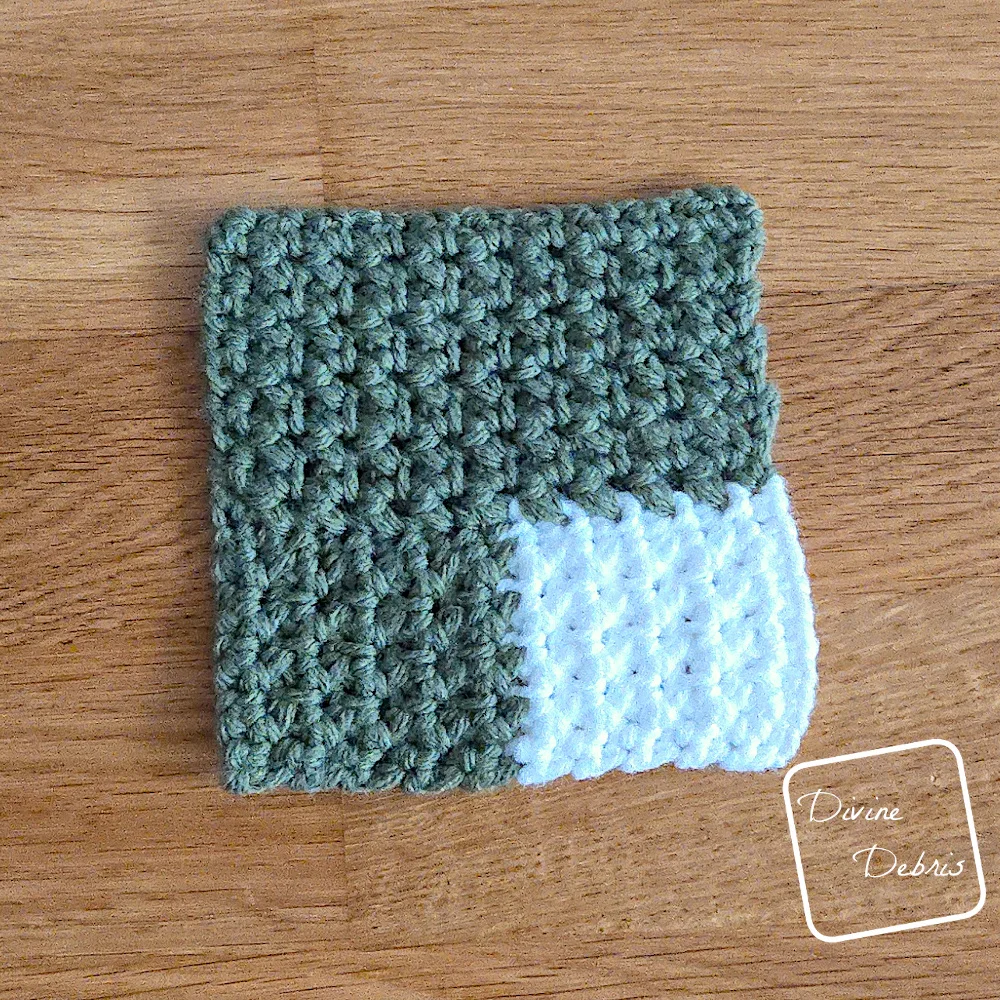
Section 3 (Color B)
With 5.00 mm hook
Note: Flip your previous work back to the RS and rotate the whole piece 90 degrees/ a quarter turn to the left. You will work into the row ends of Sections 1 and 2.
(RS) Row 1: Ch 1, sc into the first row end, scc the row ends from Section 1 and Section 2 across until 1 row end remains, sc into the last st – 2 sc, 9 scc
Rows 2 – 10: Ch 1, turn, sc into the first st, scc across until 1 st remains, sc into the last st – 2 sc, 9 scc
Fasten off, weave in your ends.
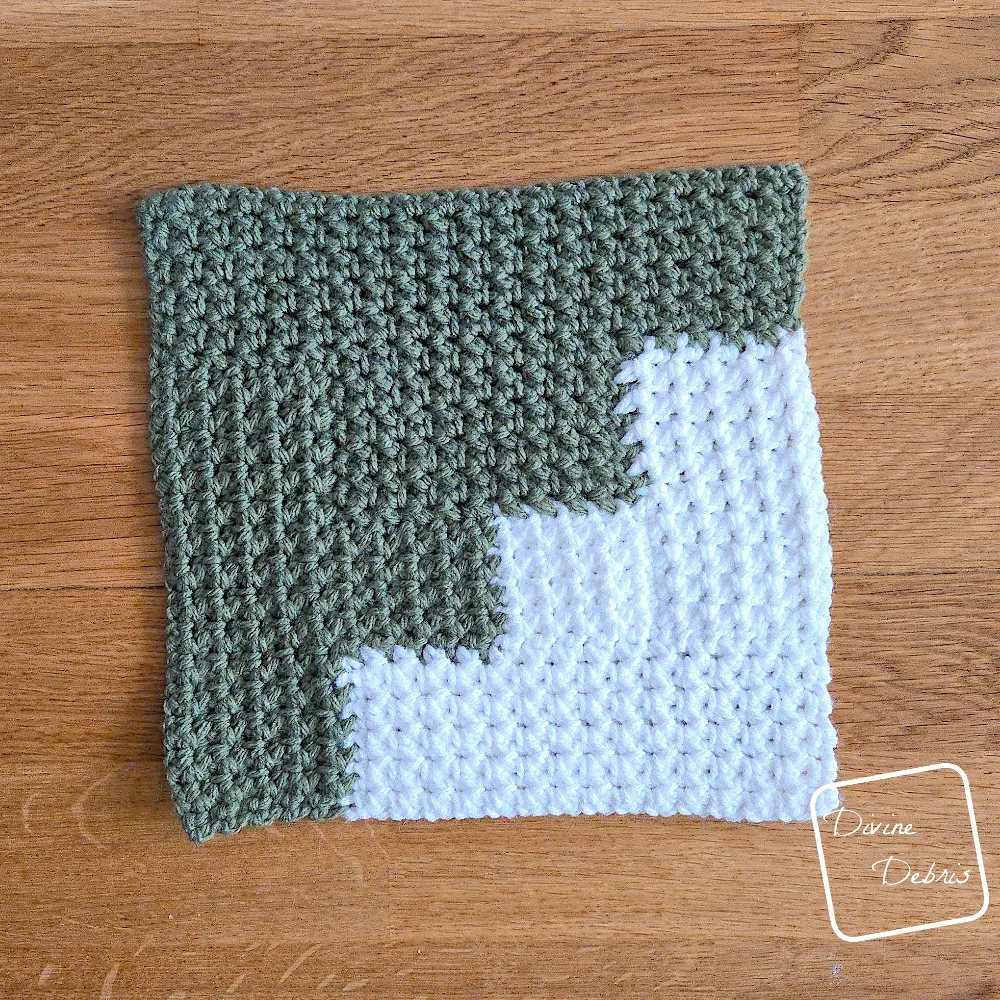
Section 4 (Color A)
With 5.00 mm hook
Note: Flip your previous work back to the RS and rotate the whole piece 90 degrees/ a quarter turn to the left. You will work into the other side of Row 1 of Section 1 and into the row ends of Section 3.
(RS) Row 1: Ch 1, sc into the first st, scc into each st of the other side of Row 1 of Section 1 and the row ends of Section 3 across until 1 row end remains, sc into the last row end – 2 sc, 9 scc
Rows 2 – 10: Ch 1, turn, sc into the first st, scc across until 1 st remains, sc into the last st – 2 sc, 9 scc
Fasten off, weave in your ends.
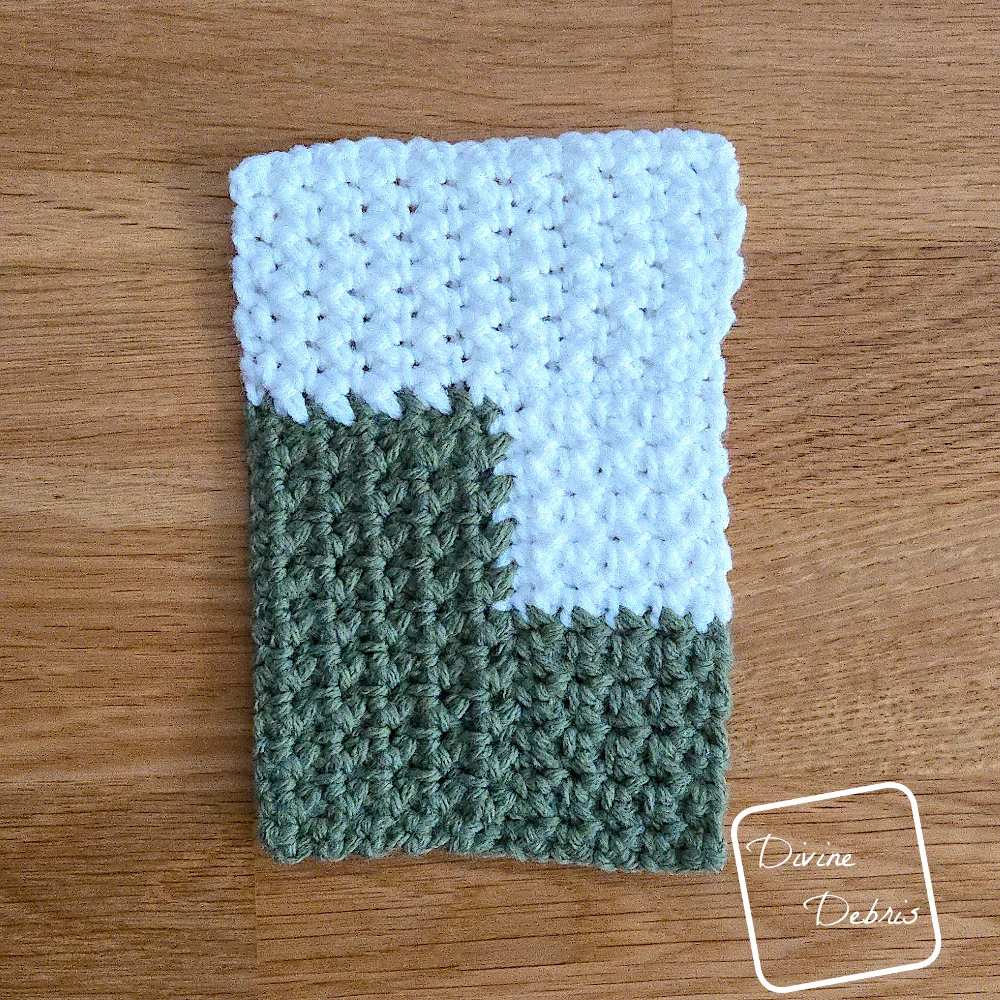
Section 5 (Color A)
With 5.00 mm hook
Note: Flip your previous work back to the RS and rotate the whole piece 90 degrees/ a quarter turn to the left. You will work into the row ends (in order) of Section 2, Section 1, and Section 3.
(RS) Row 1: Ch 1, sc into the first row end, scc the row ends of Section 2, Section 1, and Section 3 across until 1 row end remains, sc into the last row end – 2 sc, 14 scc
Rows 2 – 10: Ch 1, turn, sc into the first st, scc across until 1 st remains, sc into the last st – 2 sc, 14 scc
Fasten off, weave in all your ends.
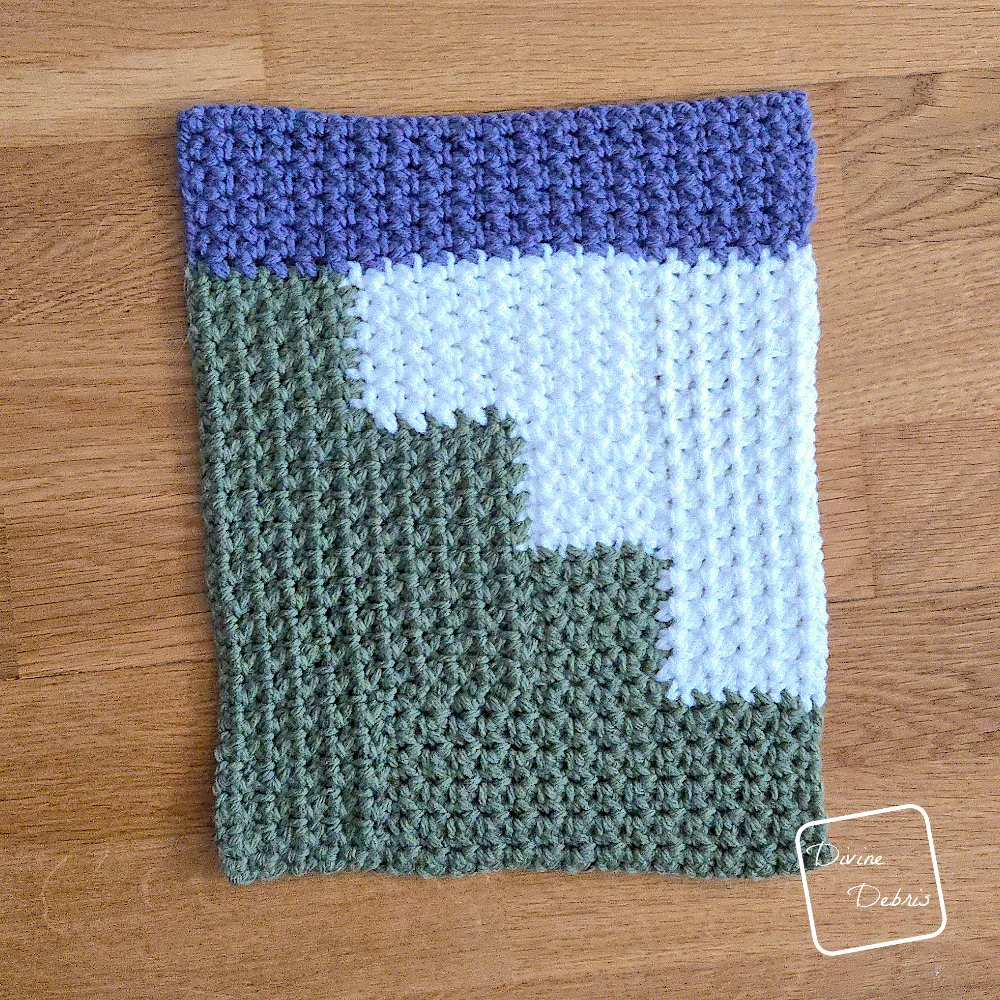
Section 6 (Color B)
With 5.00 mm hook
Note: Flip your previous work back to the RS and rotate the whole piece 90 degrees/ a quarter turn to the left. You will work into the row ends (in order) of Section 3, Row 10 of Section 2, and the row ends of Section 5.
(RS) Row 1: Ch 1, sc into the first row end, scc the row ends of Section 3, Row 10 of Section 2, and the row ends of Section 5 across until 1 row end remains, sc into the last row end – 2 sc, 14 scc
Rows 2 – 10: Ch 1, turn, sc into the first st, scc across until 1 st remains, sc into the last st – 2 sc, 14 scc
Fasten off, weave in all your ends.
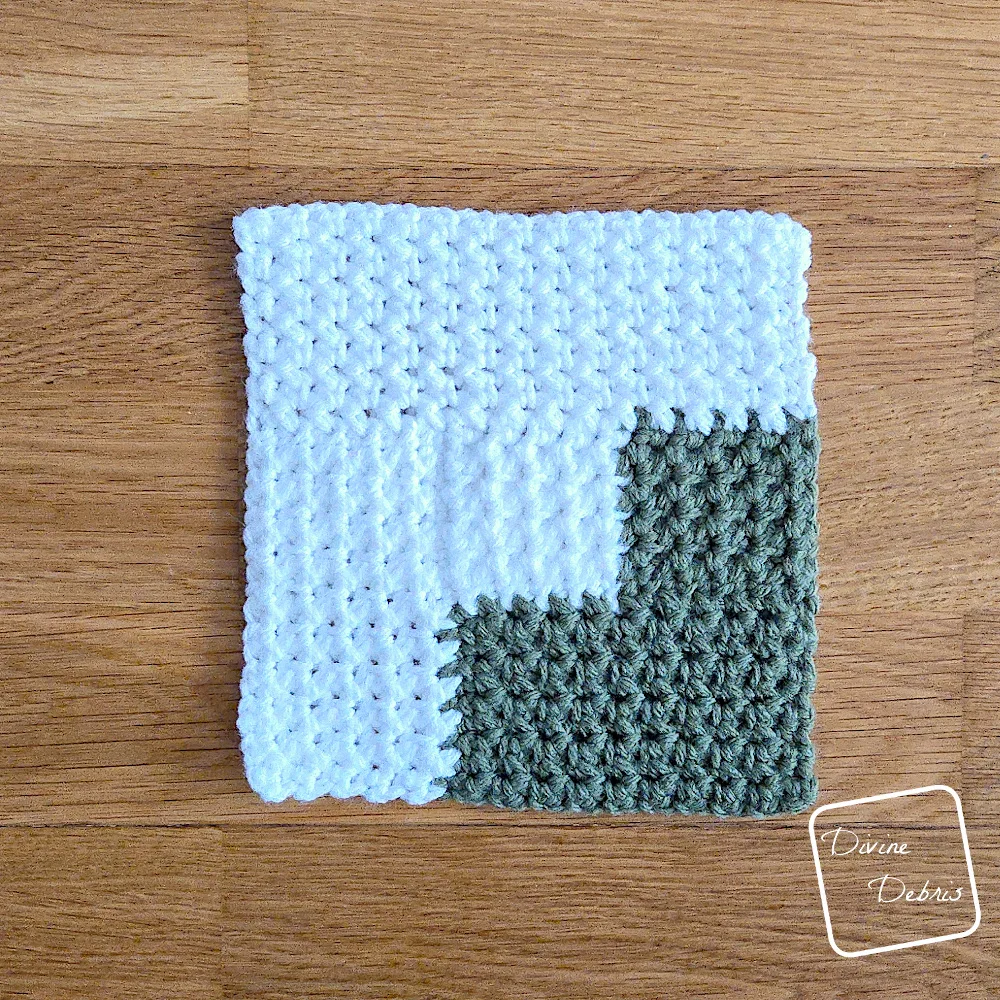
Section 7 (Color B)
With 5.00 mm hook
Note: Flip your previous work back to the RS and rotate the whole piece 90 degrees/ a quarter turn to the left. You will work into the row ends (in order) of Section 4, Row 10 of Section 3, and row ends of Section 6.
(RS) Row 1: Ch 1, sc into the first row end, scc the row ends of Section 4, Row 10 of Section 3, and row ends of Section 6 across until 1 row end remains, sc into the last row end – 2 sc, 19 scc
Rows 2 – 10: Ch 1, turn, sc into the first st, scc across until 1 st remains, sc into the last st – 2 sc, 19 scc
Fasten off, weave in all your ends.
Section 8 (Color C)
With 5.00 mm hook
Note: Flip your previous work back to the RS and rotate the whole piece 90 degrees/ a quarter turn to the left. You will work into the row ends (in order) of Section 5, Row 10 of Section 4, and row ends of Section 7.
(RS) Row 1: Ch 1, sc into the first row end, scc the row ends of Section 5, Row 10 of Section 4, and row ends of Section 7 across until 1 row end remains, sc into the last row end – 2 sc, 19 scc
Rows 2 – 10: Ch 1, turn, sc into the first st, scc across until 1 st remains, sc into the last st – 2 sc, 19 scc
Fasten off, weave in all your ends.
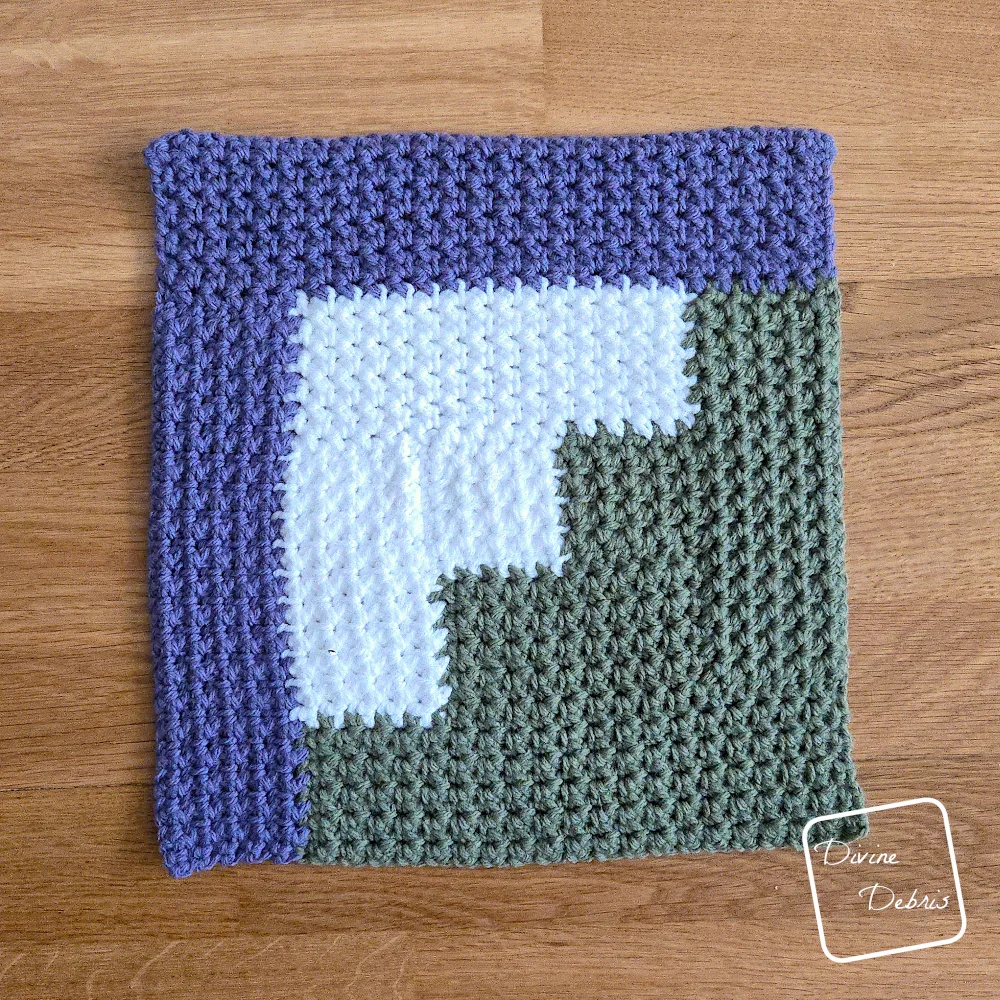
Section 9 (Color C)
With 5.00 mm hook
Note: Flip your previous work back to the RS and rotate the whole piece 90 degrees/ a quarter turn to the left. You will work into the row ends (in order) of Section 6, Row 10 of Section 5, and row ends of Section 8.
(RS) Row 1: Ch 1, sc into the first row end, scc the row ends of Section 6, Row 10 of Section 5, and row ends of Section 8 across until 1 row end remains, sc into the last row end – 2 sc, 24 scc
Rows 2 – 10: Ch 1, turn, sc into the first st, scc across until 1 st remains, sc into the last st – 2 sc, 24 scc
Fasten off, weave in all your ends.
Section 10 (Color B)
With 5.00 mm hook
Note: Flip your previous work back to the RS and rotate the whole piece 90 degrees/ a quarter turn to the left. You will work into the row ends (in order) of Section 7, Row 10 of Section 6, and row ends of Section 9.
(RS) Row 1: Ch 1, sc into the first row end, scc the row ends of Section 7, Row 10 of Section 6, and row ends of Section 9 across until 1 row end remains, sc into the last row end – 2 sc, 24 scc
Rows 2 – 10: Ch 1, turn, sc into the first st, scc across until 1 st remains, sc into the last st – 2 sc, 24 scc
Fasten off, weave in all your ends.
Section 11 (Color B)
With 5.00 mm hook
Note: Flip your previous work back to the RS and rotate the whole piece 90 degrees/ a quarter turn to the left. You will work into the row ends (in order) of Section 8, Row 10 of Section 7, and row ends of Section 10.
(RS) Row 1: Ch 1, sc into the first row end, scc the row ends of Section 8, Row 10 of Section 7, and row ends of Section 10 across until 1 row end remains, sc into the last row end – 2 sc, 29 scc
Rows 2 – 10: Ch 1, turn, sc into the first st, scc across until 1 st remains, sc into the last st – 2 sc, 29 scc
Fasten off, weave in all your ends.
Section 12 (Color A)
With 5.00 mm hook
Note: Flip your previous work back to the RS and rotate the whole piece 90 degrees/ a quarter turn to the left. You will work into the row ends (in order) of Section 9, Row 10 of Section 8, and row ends of Section 11.
(RS) Row 1: Ch 1, sc into the first row end, scc the row ends of Section 9, Row 10 of Section 8, and row ends of Section 11 across until 1 row end remains, sc into the last row end – 2 sc, 29 scc
Rows 2 – 10: Ch 1, turn, sc into the first st, scc across until 1 st remains, sc into the last st – 2 sc, 29 scc
Fasten off, weave in all your ends.
Section 13 (Color A)
With 5.00 mm hook
Note: Flip your previous work back to the RS and rotate the whole piece 90 degrees/ a quarter turn to the left. You will work into the row ends (in order) of Section 10, Row 10 of Section 9, and row ends of Section 12.
(RS) Row 1: Ch 1, sc into the first row end, scc the row ends of Section 10, Row 10 of Section 9, and row ends of Section 12 across until 1 row end remains, sc into the last row end – 2 sc, 34 scc
Rows 2 – 10: Ch 1, turn, sc into the first st, scc across until 1 st remains, sc into the last st – 2 sc, 34 scc
Fasten off, weave in all your ends.
Square Border
With 4.00 mm hook
Note: Join your yarn in any corner st or row end.
Row 1: Ch 1, sc into the first, sc across (69 sts), ch 2 at the corner and rotate your square 90 degrees/ a quarter turn to the right, sc across (70 sts), ch 2 at the corner and rotate your square 90 degrees/ a quarter turn to the right, sc across (70 sts), ch 2 at the corner and rotate your square 90 degrees/ a quarter turn to the right, sc across (70 sts), ch 2 at the corner, join with a slip st – 360 sc, 4 ch-2 spaces
Fasten off, weave in all your ends. Block your square if necessary.
Assembly
Once you have all 12 squares, arrange them in a 3 squares across x 4 squares high rectangle and use your preferred method of seaming to seam all the squares together. The sample used color C and slip stitching into the back loop only of the border of the squares to seam. Fee free to block the seam if it feels stiff.
Blanket Border
With 4.00 mm hook
Note: With color C, join your yarn in the top right-hand square corner ch-2 space. The border uses sc2tog at the point where the squares meet (the ch-2 spaces) to minimize rippling in the border by adding unnecessary stitches.
Row 1: Ch 1, sc into the ch 2 space, sc into the next 70 sts, *sc2tog the next 2 ch-2 spaces, sc into to the next 70 sts*, repeat from * to * once more, [sc, ch 2, sc] into the ch-2 space at the corner and rotate your blanket 90 degrees/ a quarter turn to the right, sc into the next 70 sts, repeat from * to * 3 more times, [sc, ch 2, sc] into the ch-2 space at the corner and rotate your blanket 90 degrees/ a quarter turn to the right, sc into the next 70 sts, repeat from * to * 2 more times, [sc, ch 2, sc] into the ch-2 space at the corner and rotate your blanket 90 degrees/ a quarter turn to the right, sc into the next 70 sts, repeat from * to * 3 more times, [sc, ch 2] into the ch-2 space where you began, join with a slip st – 998 sc (includes both sc and sc2tog)
Fasten off, weave in your ends. Block if necessary.
You can pick up the instructions for the Mountain Log Cabin Blanket crochet pattern in my Ravelry shop. The pdf includes the color photo tutorial you see here but also an easy-print version, with minimal photos and just the written instructions. You can also buy the kit from Lion Brand Yarn here.



![[Image description] Top down look of an unfinished Mountain Log Cabin Blanket crochet square with 3 skeins of yarn along the left side of the photo.](https://d3gel9wqxksnxm.cloudfront.net/wp-content/uploads/2025/01/Mountain-Log-Cabin-Blanket-crochet-pattern-908x1000-1.jpg.webp)
![[Image description] Close up of the Mountain Log Cabin Blanket square with stitch markers and arrows on where to place the stitch markers to make the pattern easier to work.](https://d3gel9wqxksnxm.cloudfront.net/wp-content/uploads/2025/01/Mountain-Log-Cabin-Blanket-Square-tip-1000x451-1.jpg.webp)
![[Image description] Close up of where to place the parts of the scc on the Mountain Log Cabin Blanket.](https://d3gel9wqxksnxm.cloudfront.net/wp-content/uploads/2025/01/Mountain-Log-Cabin-Blanket-crochet-pattern-1000x639-1.jpg.webp)
![[Image description] A white woman with purple hair stands against a white background holding the Mountain Log Cabin Blanket towards the camera.](https://d3gel9wqxksnxm.cloudfront.net/wp-content/uploads/2025/01/Mountain-Log-Cabin-Blanket-crochet-pattern-666x1000-1.jpg.webp)
![[Image description] Mountain Log Cabin Blanket laying on a wood grain floor at an angle, with a close up of a corner.](https://d3gel9wqxksnxm.cloudfront.net/wp-content/uploads/2025/01/Mountain-Log-Cabin-Blanket-crochet-pattern-1000x712-1.jpg.webp)

