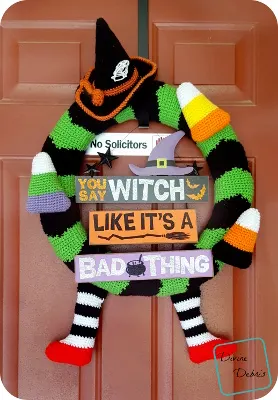
Hi there! So… seeing as how this is my last post of September, I thought I’d finish up with a bang! Who’s already decorating for Halloween? As you know, I’ve been pumping out Fall designs but this is fully fun, silly, and adorable Halloween (which is my favorite type of Halloween).
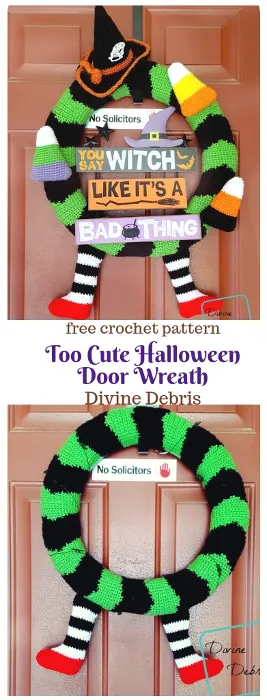
I was pretty inspired to make this by Sarah at Repeat Crafter Me and her adorable Halloween door wreath that I wanted to make my own. I think my favorite thing about this week’s pattern is that you get so many opportunities to customize the end result, make a billion candy corns, or give it 4 legs… you get to be as creative as you want. You could even make some wings from the Willa Owl-Bat pattern and add them, just to make it absolutely wild and weird. 😀
No matter how you design it, I’m sure your wreath will be the cutest on the block!
Thank you to all my Patreon supporters.
You can purchase an ad-free downloadable pdf for this pattern in my Ravelry shop.
Materials
- US G (4.00 mm) crochet hook
- US H (5.00 mm) crochet hook
- Aran/ medium/ size #4 weight yarn
- 6 (about)/ 313 yds (about)
- 3 + colors
- I used Red Heart Super Saver
- Yarn needle
- Ami stuffing
- 18″ wreath form
- Decorative sign (optional)
- Hot glue or straight pins
Terms/stitches used
- Ch: chain
- St: stitch
- Slip st: slip stitch
- Sc: single crochet
Notes
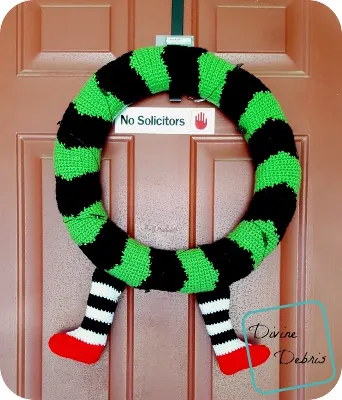
- This pattern is worked in 4 sections – the wreath, the legs, the hat, and the candy corns. The wreath section is worked flat, back and forth in rows, and then seamed together along the back around the wreath. The legs are worked in the round from the shoe up and then seamed closed after you stuff them with ami stuffing, then attached to the wreath. The candy corns are worked in the round with a slip st into the first st from the bottom up, the top is squeezed closed after you stuff it with ami stuffing. The hat is worked from the top down, in the round, with a slit into the first st.
- The hat pattern for this design is just the Winifred Hat pattern made as it’s written in the post.
- The oz and yards for the yarn are just estimates, you may need more or less for the whole design. I used about 3 oz for the wreath by itself.
- Color A is green, color B is black, color C is red, and color D is white. Colors E and F are just the first two colors of the candy corns, which I did in a variety of colors for fun.

Finished product dimensions
| Wreath Wide: 9.5” | Legs Feet: 5” wide | Candy Corn Width: 2” – 4” Height: 6” |
Halloween Wreath Crochet Pattern Instructions
– Wreath –
With H hook:
Note:
- Every stitch in the wreath portion of this pattern is a single crochet. The following directions will only tell you what color (ie: Color A, Color B, etc…) and the number in the parentheses tells you how many stitches to make.
- In the wreath example, the inactive yarn is carried behind the active. If this is confusing, you might want to check out this helpful Moogly video on tapestry.
Row 1: A: Ch 31, sc into the 2nd ch from the hook and across – 30 scs
Row 2: A: Ch 1, turn, (30) – 30 scs
Row 3: A: Ch 1, turn, (14), B: (2), A: (14) – 30 scs
Row 4: A: Ch 1, turn, (12), B: (6), A: (12) – 30 scs
Row 5: A: Ch 1, turn, (10), B: (10), A: (10) – 30 scs
Row 6: A: Ch 1, turn, (8), B: (14), A: (8) – 30 scs
Row 7: A: Ch 1, turn, (6), B: (18), A: (6) – 30 scs
Row 8: A: Ch 1, turn, (4), B: (22), A: (4) – 30 scs
Row 9: A: Ch 1, turn, (2), B: (26), A: (2) – 30 scs
Rows 10 – 13: B: Ch 1, turn, (30) – 30 scs
Row 14: B: Ch 1, turn, (14), A: (2), B: (14) – 30 scs
Row 15: B: Ch 1, turn, (12), A: (6), B: (12) – 30 scs
Row 16: B: Ch 1, turn, (10), A: (10), B: (10) – 30 scs
Row 17: B: Ch 1, turn, (8), A: (14), B: (8) – 30 scs
Row 18: B: Ch 1, turn, (6), A: (18), B: (6) – 30 scs
Row 19: B: Ch 1, turn, (4), A: (22), B: (4) – 30 scs
Row 20: B: Ch 1, turn, (2), A: (26), B: (2) – 30 scs
Rows 21 – 24: A: Ch 1, turn, (30) – 30 scs
Rows 25 – 200: Repeat rows 3 – 24, 8 more times,
Row 201: A: Ch 1, turn, (14), B: (2), A: (14) – 30 scs
Row 202: A: Ch 1, turn, (12), B: (6), A: (12) – 30 scs
Row 203: A: Ch 1, turn, (10), B: (10), A: (10) – 30 scs
Row 204: A: Ch 1, turn, (8), B: (14), A: (8) – 30 scs
Row 205: A: Ch 1, turn, (6), B: (18), A: (6) – 30 scs
Row 206: A: Ch 1, turn, (4), B: (22), A: (4) – 30 scs
Row 207: A: Ch 1, turn, (2), B: (26), A: (2) – 30 scs
Rows 208 – 211: B: Ch 1, turn, (30) – 30 scs
Row 212: B: Ch 1, turn, (14), A: (2), B: (14) – 30 scs
Row 213: B: Ch 1, turn, (12), A: (6), B: (12) – 30 scs
Row 214: B: Ch 1, turn, (10), A: (10), B: (10) – 30 scs
Row 215: B: Ch 1, turn, (8), A: (14), B: (8) – 30 scs
Row 216: B: Ch 1, turn, (6), A: (18), B: (6) – 30 scs
Row 217: B: Ch 1, turn, (4), A: (22), B: (4) – 30 scs
Row 218: B: Ch 1, turn, (2), A: (26), B: (2) – 30 scs
Fasten off color B.
Rows 219 – 220: A: Ch 1, turn, (30) – 30 scs
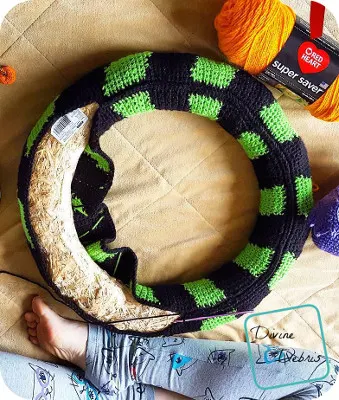
Fasten off color A leaving a long enough tail that you can use it to secure row 220 to row 1. Use your preferred method of seaming to secure the two rows together. Fasten off, weave in your ends.
– Securing to the wreath –
I did a sc row around the row ends on each side so that when I seamed seamed the two sides together it was easier (example photo above). If you want to do this, just make sure you have 220 scs on each side.
Either way, you can seam both sides with your preferred method of seaming or slip st the two sides together (which is how I did it and why I did the rows of sc).
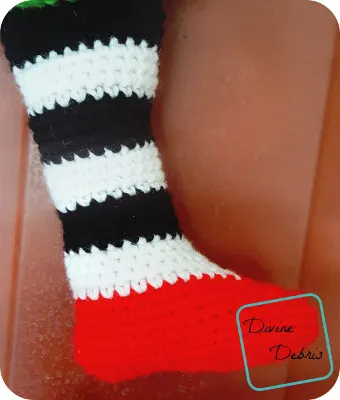
– Legs –
(make as many as you’d like)
With G hook:
Row 1: C: Ch 13, sc into the next 11 sts, sc 5 times into the last st, rotate the whole piece so you’re working along the other side of the ch row, sc into the next 10 sts, sc 4 times into the last st, slip st into the first st – 30 scs
Row 2: C: Ch 1, sc into the next 12 sts, sc twice into the next st, sc into the next st, sc twice into the next st, sc into the next 12 sts, sc twice into the next st, sc into the next st, sc twice, slip st into the first st – 34 scs
Row 3: C: Ch 1, sc into the next 14 sts, sc twice into the next st, sc into the next st, sc twice into the next st, sc into the next 14 sts, sc twice into the next st, sc into the next st, sc twice, slip st into the first st – 38 scs
Row 4: C: Ch 1, sc into the same st as join and into the next 37 sts, slip st into the first st – 38 scs
Row 5: C: Ch 1, sc into the BLO of the same st as join and into the BLO of the next 37 sts, slip st into the first st – 38 scs
Row 6: C: Ch 1, sc into the same st as join and into the next 37 sts, slip st into the first st – 38 scs
Row 7: C: Ch 1, sc into the same st as join and into the next 14 sts, sc3tog the next 3 sts, sc into the next 20 sts, slip st into the first st – 36 scs
Row 8: C: Ch 1, sc into the same st as join and into the next 12 sts, sc5tog the next 5 sts, sc into the next 18 sts, slip st into the first st – 32 scs
Row 9: C: Ch 1, sc into the same st as join and into the next 11 sts, sc3tog the next 3 sts, sc into the next 17 sts, slip st into the first st – 30 scs
Fasten off color C.
Row 10: D: Ch 1, sc into the same st as join and into the next 10 sts, sc3tog the next 3 sts, sc into the next 16 sts, slip st into the first st – 28 scs
Row 11: D: Ch 1, sc into the same st as join and into the next 9 sts, sc3tog the next 3 sts, sc into the next 15 sts, slip st into the first st – 26 scs
Row 12: D: Ch 1, sc into the same st as join and into the next 8 sts, sc3tog the next 3 sts, sc into the next 14 sts, slip st into the first st – 24 scs
Row 13: D: Ch 1, sc into the same st as join and into the next 7 sts, sc3tog the next 3 sts, sc into the next 13 sts, slip st into the first st – 22 scs
Rows 14 – 17: B: Ch 1, sc into the same st as join and into the next 21 sts, slip st into the first st – 22 scs
Rows 18 – 21: D: Ch 1, sc into the same st as join and into the next 21 sts, slip st into the first st – 22 scs
Rows 22 – 25: B: Ch 1, sc into the same st as join and into the next 21 sts, slip st into the first st – 22 scs
Rows 26 – 29: D: Ch 1, sc into the same st as join and into the next 21 sts, slip st into the first st – 22 scs
Rows 30 – 32: B: Ch 1, sc into the same st as join and into the next 21 sts, slip st into the first st – 22 scs
I suggest stuffing your legs with ami filling before you move onto the next row.
Row 33: B: Fold the top of the leg in half so that it is parallel to the sole of the shoe, sc into both sides of the opening – 11 scs
Fasten off leaving a long enough tail that you can use it to secure the leg to the wreath.
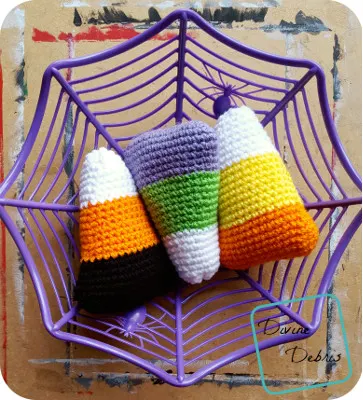
– Candy Corn –
(make as many as you’d like)
With G hook:
Row 1: E: Ch 13, sc into the next ch from the hook and 10 sts, sc 5 times into the last ch, rotate the whole piece and work down the other side of the original ch, sc into the next 10 sts, sc 4 times into the last ch, slip st into the first st – 30 scs
Row 2: E: Ch 1, sc into the same st as join and into the next 12 sts, sc 3 times into the next st, sc into the next 14 sts, sc 3 times into the next st, sc into the next st, slip st into the first st – 34 scs
Row 3: E: Ch 1, sc into the same st as join and into the next 13 sts, sc twice into the next st, sc into the next 16 sts, sc twice into the next st, sc into the next 2 sts – 36 scs
Rows 4 – 5: E: Ch 1, sc into the same st as join and into the next 35 sts, slip st into the first st – 36 scs
Row 6: E: Ch 1, sc into the same st as join and into the next 14 sts, sc2og the next 2 sts, sc into the next 16 sts, sc2tog, sc into the next st, slip st into the first st – 34 scs
Row 7: E: Ch 1, sc into the same st as join and into the next 33 sts, slip st into the first st – 34 scs
Row 8: E: Ch 1, sc into the same st as join and into the next 13 sts, sc2og the next 2 sts, sc into the next 15 sts, sc2tog, sc into the next st, slip st into the first st – 32 scs
Row 9: F: Ch 1, sc into the same st as join and into the next 31 sts, slip st into the first st – 32 scs
Row 10: F: Ch 1, sc into the same st as join and into the next 12 sts, sc2og the next 2 sts, sc into the next 14 sts, sc2tog, sc into the next st, slip st into the first st – 30 scs
Row 11: F: Ch 1, sc into the same st as join and into the next 29 sts, slip st into the first st – 30 scs
Row 12: F: Ch 1, sc into the same st as join and into the next 11 sts, sc2og the next 2 sts, sc into the next 13 sts, sc2tog, sc into the next st, slip st into the first st – 28 scs
Row 13: F: Ch 1, sc into the same st as join and into the next 27 sts, slip st into the first st – 28 scs
Row 14: F: Ch 1, sc into the same st as join and into the next 10 sts, sc2og the next 2 sts, sc into the next 12 sts, sc2tog, sc into the next st, slip st into the first st – 26 scs
Row 15: F: Ch 1, sc into the same st as join and into the next 25 sts, slip st into the first st – 26 scs
Row 16: F: Ch 1, sc into the same st as join and into the next 9 sts, sc2og the next 2 sts, sc into the next 11 sts, sc2tog, sc into the next st, slip st into the first st – 24 scs
Row 17: D: Ch 1, sc into the same st as join and into the next 23 sts, slip st into the first st – 24 scs
Row 18: D: Ch 1, sc into the same st as join and into the next 8 sts, sc2og the next 2 sts, sc into the next 10 sts, sc2tog, sc into the next st, slip st into the first st – 22 scs
Row 19: D: Ch 1, sc into the same st as join and into the next 21 sts, slip st into the first st – 22 scs
Row 20: D: Ch 1, sc into the same st as join and into the next 7 sts, sc2og the next 2 sts, sc into the next 9 sts, sc2tog, sc into the next st, slip st into the first st – 20 scs
Row 21: D: Ch 1, sc into the same st as join and into the next 19 sts, slip st into the first st – 20 scs
Row 22: D: Ch 1, sc into the same st as join and into the next 6 sts, sc3tog the next 3 sts, sc into the next 7 sts, sc3tog the next 3 sts – 16 scs
Row 23: D: Ch 1, sc into the same st as join and into the next 15 sts, slip st into the first st – 16 scs
Row 24: D: Ch 1, sc into the same st as join and into the next 4 sts, sc3tog the next 3 sts, sc into the next 5 sts, sc3tog the next 3 sts – 12 scs
Leave a long tail after fastening off row 24, with your yarn needle, weave back and forth through the scs from row 24 until you get back to where you started, pull the yarn until you close the hole at the top of your candy corn. Weave your needle back and forth through the stitches as many times as you need to make sure row 24 is secure.
– Finishing –
Attach the legs, hat, and candy corn to your wreath with glue, pins, or sew them to the wreath with your yarn tails (which I did with the legs) as you would like. I actually pinned mine so I can disassemble it later. I added a cute little sign I got from Michael’s just for an extra bit of personality. 😀 I think some lights will look cute wrapped around it too.
Tada! There’s the long awaited (for me to post at least) Halloween wreath I’ve been working on for a couple weeks. I hope you like it and take this opportunity to get creative!
This post is linked to Hookin’ on Hump Day #152.


Dora Does
Thursday 5th of October 2017
What a super fun pattern!!
Divine Debris
Thursday 5th of October 2017
Thank you. :D