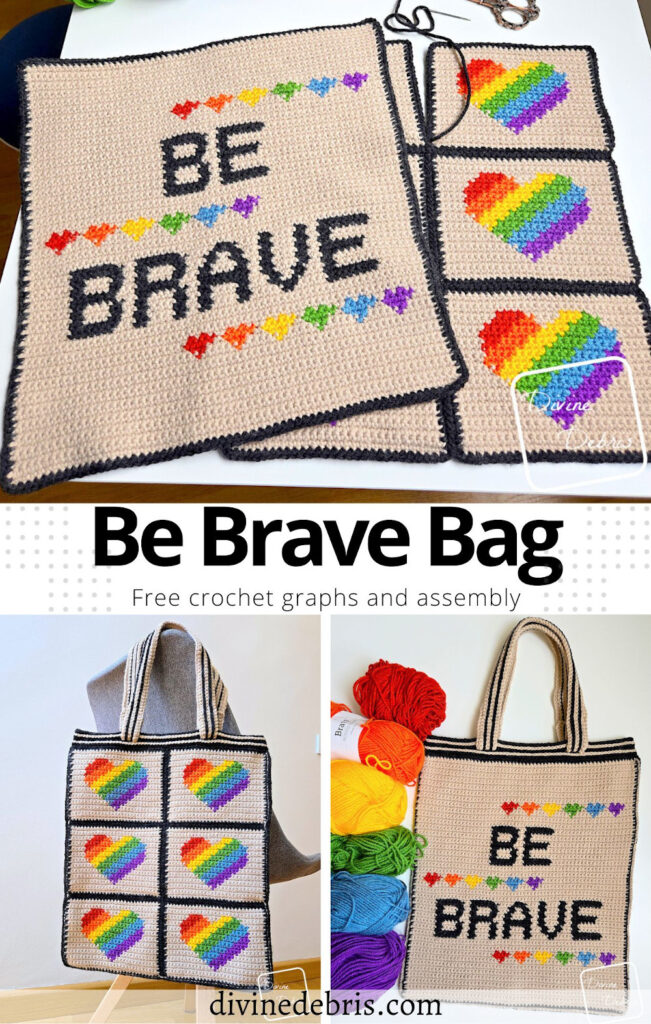
Hi again everyone! Two posts in one week, who am I? 😉 I’m must someone who wanted to have both of these posts done yesterday but didn’t have enough time to finish it. But with the release of the Be Brave Poster it’s now time for everyone to make what something colorful – the Be Brave Bag crochet pattern.
For this design I tried to get away from a the cute 13 square design bag I’ve been really loving lately. You know how creativity is, sometimes you love it sometimes you need to do something else or you feel a little crazy. But for this bag, I decided to make it asymmetrical with a back panel full of the Rainbow Heart Coaster (6 coasters total) and a front panel of the Be Brave Poster.
Like my wall hangings, the front and back panels of this bag are worked from the bottom up in rows. I used the intarisa or bobbin method for these because I love a cleaner look to the RS. Feel free to make them however you’d like though. That’s the beauty of crochet, you get to be the master of how you want to make something, it’s all about where your creativity leads you. Mine lead me to this bag and I hope you like it. Be sure to check out the Rainbow Heart Coaster for notes on how I used bobbins/ intarsia.
While I’ve included the graphs below for the Rainbow Heart Coaster and the Be Brave Poster, this post is mostly about assembly instructions for the bag – and they’re really simple. Once your two panels are done, you seam them along 3 sides (leaving the top open for the bag) in your preferred method of seaming, you add the Top section to the open top of the bag, and then create the Straps separately and sew them to the bag. Boom, done. That easy 😀
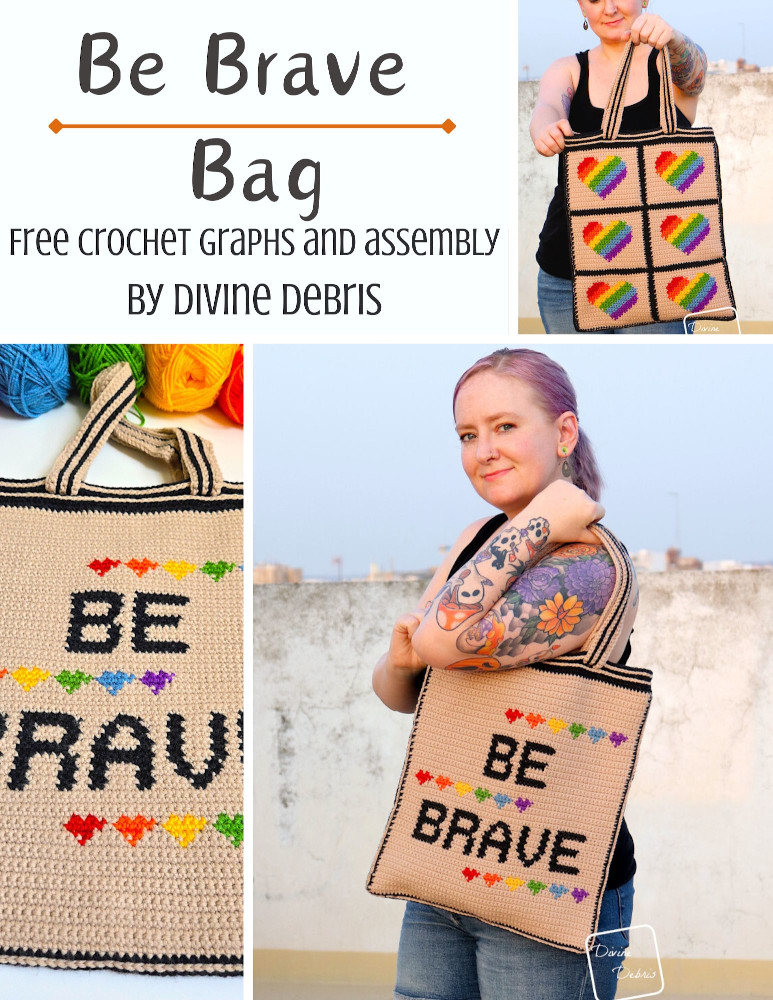
If you’d like, you can pick up the ad-free pdf for this bag in my Ravelry shop. As I said on the Be Brave Poster post, the I use the proceeds from purchases of any Pride/ Rainbow patterns and ad revenue to donate to The Trevor Project and Trans Lifeline. We need to remember that Pride started as a riot and continues to be a fight to this day. <3 <3 Take care of yourselves friends and have a wonderful Pride month. All my Pride/ Rainbow makes are on sale on Ravelry for 50% this month of June only.
Please note: I was provided the yarn for this pattern by We Crochet and Lion Brand Yarn for other personal projects, just to make something fun and without compensation. I wasn’t provided the yarn with the expectations of positive or negative reviews but I’ve used both yarns many times over the years and they’re fantastic. A great worsted weight yarns, I’ll probably keep using them for years to come. This post contains affiliate links. If you purchase yarn through any of the links in this post, I may be compensated. Do not make videos from my pattern, you don’t have permission even if this pattern is free.
Copyright @ Divine Debris 2025. No part of this document may be reproduced or transmitted in any form by any means, electronic, mechanical, photocopying, or otherwise, without prior written permission from the author. Sales of finished products are permitted, but the designer requests that you link back to the pattern and credit Divine Debris with the original design under the Creative Commons Attribution-Share Alike license. If you have any questions, comments or concerns please contact info@divinedebris.com. Do not make videos from my patterns.
(this post contains affiliate links)

If you appreciate my patterns I hope you’d consider purchasing an ad-free pdf of this pattern in my Ravelry shop and Lovecrafts shop (coming soon)!
Where to purchase the Be Brave Bag crochet pattern


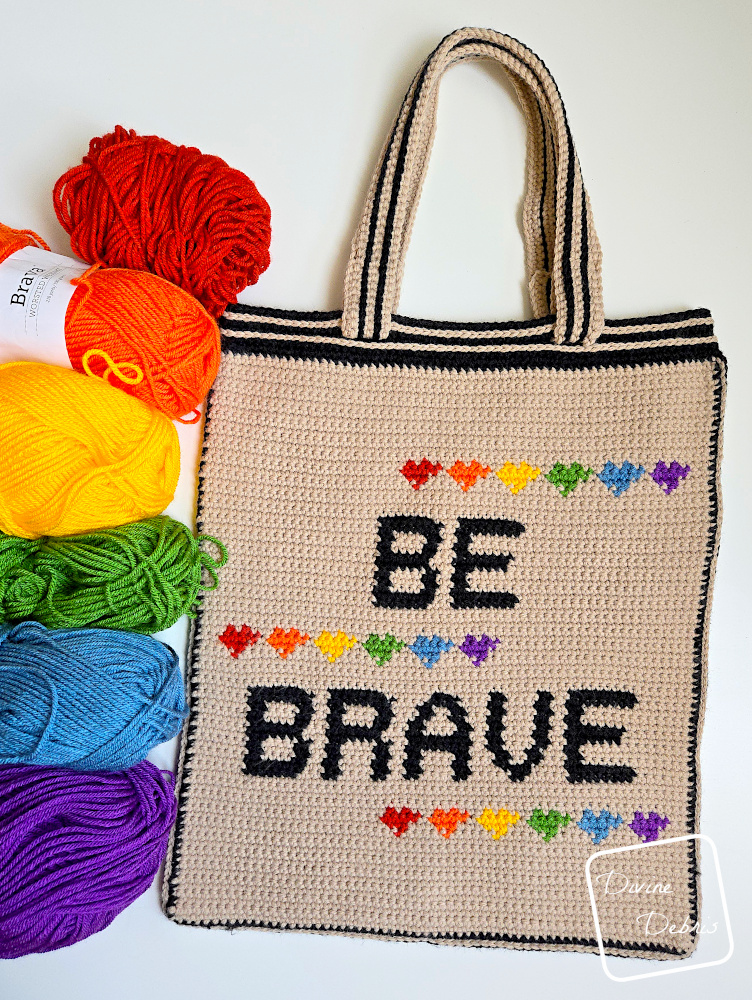
![[Image description] A top down look at the Be Brave Bag crochet pattern front and back panels, unseamed and laying on a white background with skeins of yarn along the top of the photo.](https://d3gel9wqxksnxm.cloudfront.net/wp-content/uploads/2025/06/Be-Brave-Poster-1000x986-1.jpg)
Language
American English
Level
Intermediate (need to know how to read a graph and do color work)
Materials
- US G (4.00 mm) crochet hook
- Worsted weight/ size #4 yarn
- 8 colors
- A: 4 oz/ 255 yds (approx)
- H: 3 oz/ 191 yds (approx)
- Others: less than 1 oz/ 62 yds of ea.
- I used Brava Worsted and Pound of Love for this
- See Notes section for colors
- Notions: scissors, measuring tape, yarn needle
Gauge
- 18 sc x 21 rows = 4” (blocked)
Terms/ Stitches used
- St: Stitch
- Ch: Chain
- RS: Right side
- Sc: Single crochet
- Join: Join the round with as slip st
Notes
- As is industry standard, this pattern is just a free graph and not written instructions but you can purchase the pattern for a fee in my Ravelry shop.
- If you’d like just the Rainbow Heart Coaster, it’s available in my Ravelry shop or has it’s own blog post.
- If you’d like just the Be Brave Poster, it’s available in my Ravelry shop or it has it’s own blog post.
- This pattern is worked in 4 sections: Front Panel, Back Panel, Top, and Straps. The Front Panel is made in one piece from the bottom up in rows. The Back Panel is made in 6 individual rectangles, seamed together. The Top is added after the two panels are seamed. And the Straps are worked separately and sewn to the bag.
- The Be Brave Poster begins with a ch 61 in color A, turn, and start in the 2nd ch from the hook. The poster is worked from the bottom up in rows, each row begins with a “ch 1, turn,” and all st counts are 60 sc. The odd rows are the RS.
- The Rainbow Heart Coaster begins with a ch 30 in color A, turn, and start in the 2nd ch from the hook. Each coaster is worked from the bottom up in rows, each row begins with a “ch 1, turn,” and all st counts are 29 sc. The odd rows are the RS.
- The ch 1 at the beginning of the rows does not count as a stitch.
- This pattern doesn’t require you to carry the yarn, unless you’d like to. I just used bobbins where necessary and changed colors on the last pull through of the sc.
- Blocking is suggested for this pattern.
- In the photos: Color A is tan, color B is purple, color C is blue, color D is green, color E is yellow, color F is orange, color G is red, and color H is dark gray. Pound of Love was used for colors A and H and Brava Worsted was used for all others.
Blocked Be Brave Bag crochet pattern Finished Product Details (including border but not the Straps)
| Height | Width |
| 15.8” | 13.8” |
Be Brave Bag crochet pattern
Be Brave Poster Crochet Pattern Graph
Key: Color A is grey, color B is brown, color C is teal, and color D is green. Brava Worsted was used in the sample.
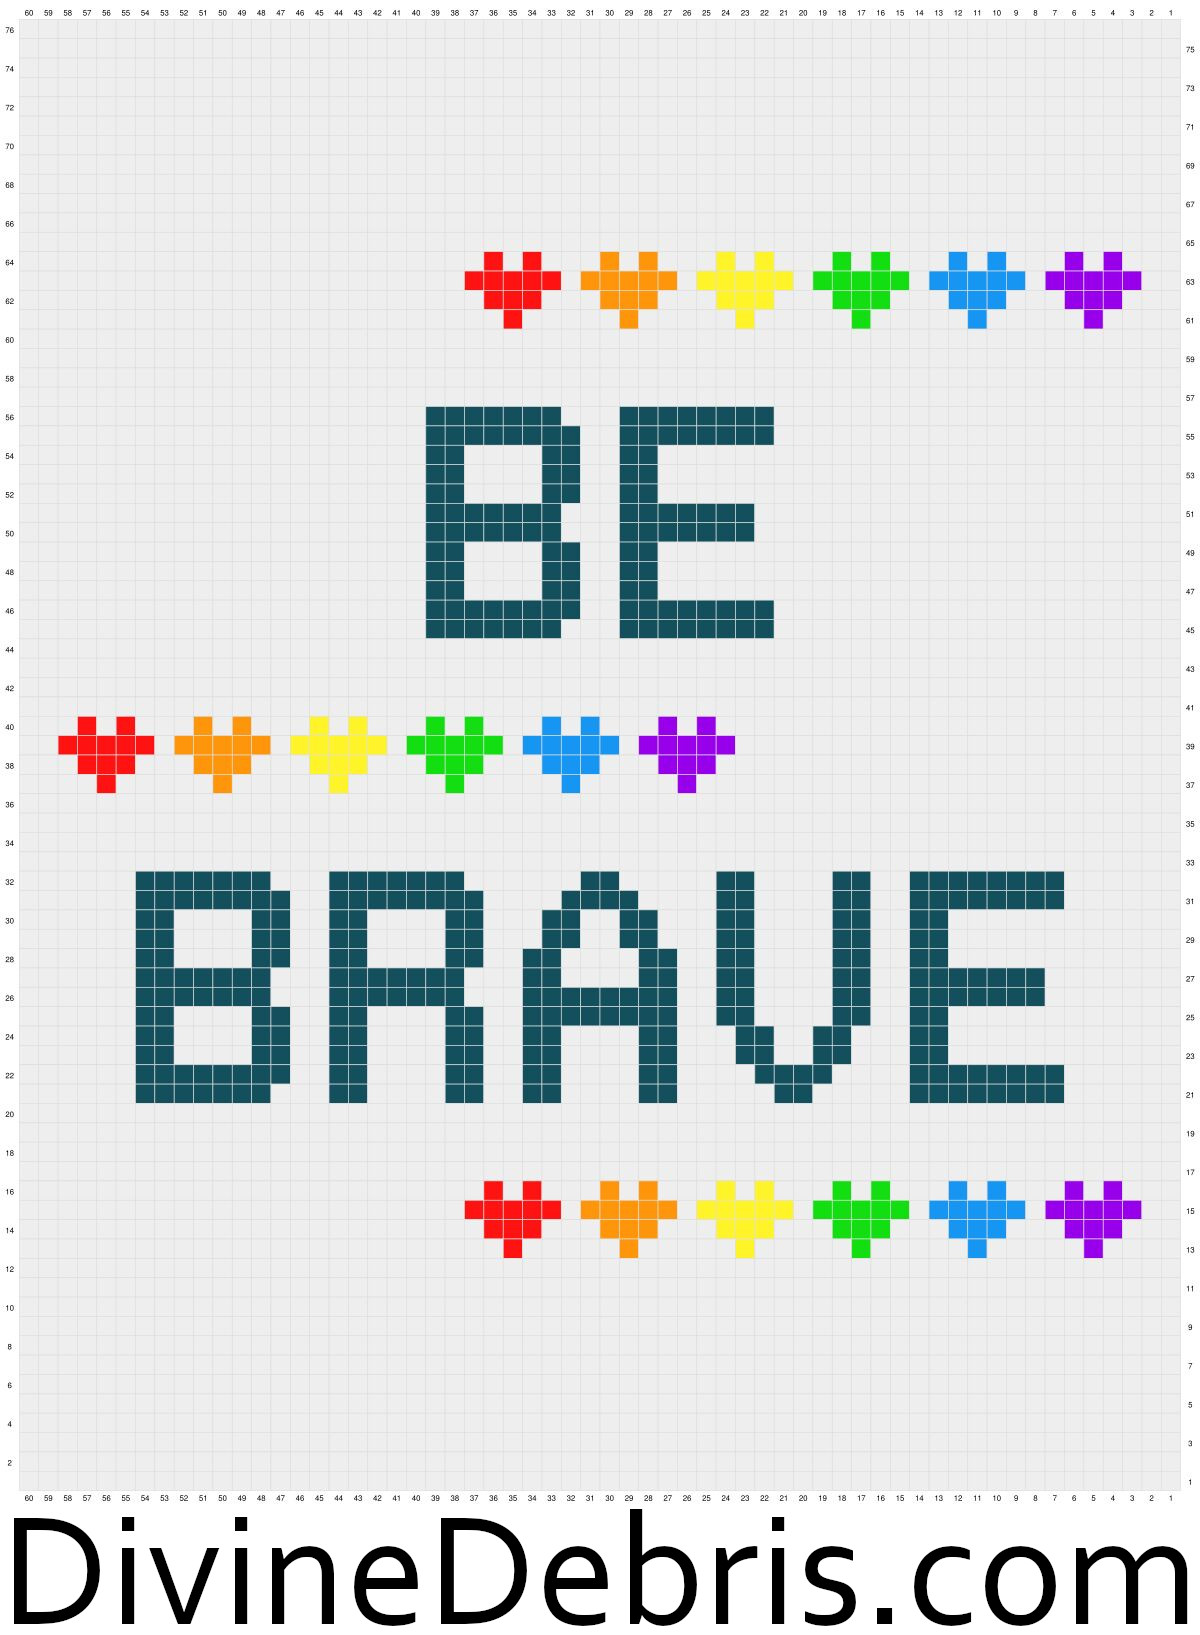
Begin with a ch 61 in color A, turn, and start in the 2nd ch from the hook. Each row begins with a “ch 1, turn” and all st counts are 62 sc.
Border
With the RS facing you, join color H in the first st on the other side of Row 1 of the poster.
Row 1: H: Ch 1, sc into the next 60 sts, ch 1 at the corner and rotate a quarter turn, sc into the next 76 row ends, ch 1 at the corner and rotate a quarter turn, sc into the next 60 sts of Row 76, ch 1 at the corner and rotate a quarter turn, sc down the next 76 row ends, ch 1 at the corner, join with a slip st – 272 sc, 4 ch-1 spaces
Fasten off, weave in your ends. Block the poster so it measures 13.8” x 14.5”.
![[Image description] Top down view of the Back Panel of the Be Brave Bag on a white background with a rainbow of skeins of yarn along the left side of the photo.](https://d3gel9wqxksnxm.cloudfront.net/wp-content/uploads/2025/06/Be-Brave-Bag-715x1000-1.jpg)
Rainbow Heart Coaster Crochet Graph
Make 6 for this pattern
Graph Key: Color A is tan, color B is purple, color C is blue, color D is green, color E is yellow, color F is orange, and color G is red. I used Brava Wosted by We Crochet colors B – G and Pound of Love was used for color A.
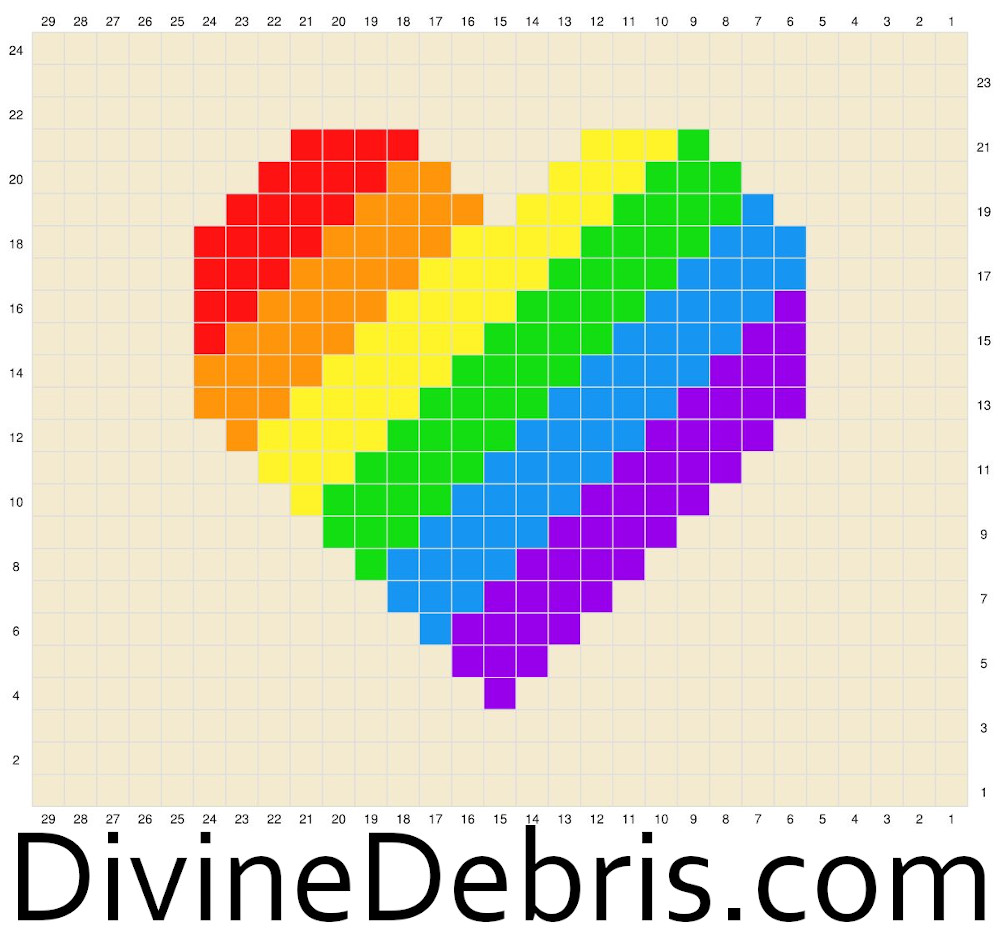
For the squares: begin with a ch 30 in color A, turn, and start in the 2nd ch from the hook. Each row begins with a “ch 1, turn” and all st counts are 29 sc.
Border
With the RS facing you, join color H in the first st on the other side of Row 1 of the coaster.
Row 1: H: Ch 1, sc into the next 29 sts, ch 1 at the corner and rotate a quarter turn, sc into the next 24 row ends, ch 1 at the corner and rotate a quarter turn, sc into the next 29 sts of Row 24, ch 1 at the corner and rotate a quarter turn, sc down the next 24 row ends, ch 1 at the corner, join with a slip st – 106 sc, 4 ch-1 spaces
Fasten off, weave in your ends. Block the coaster so it measures 4.9” x 6.8”.
![[Image description] Both the Front and Back Panels for the Be Brave Bag crochet pattern, side by side before being seamed together.](https://d3gel9wqxksnxm.cloudfront.net/wp-content/uploads/2025/06/Be-Brave-Poster-1000x758-1.jpg)
Be Brave Bag Assembly
For the Back Panel, assemble 6 of the Rainbow Heart Coasters in 2 columns in 3 rows in your
preferred method of seaming. I just used the whip stitch. Be sure to block both the assembled
Back Panel and finished Front Panel.
Line up the the Front and Back Panels so that their wrong sides are touching and in your
preferred method of seaming, seam along the left side, bottom, and right side of the panels to
create the bag shape, leaving the top edge open to be to the top of your bag.
![[Image description] The unfinished Be Brave Bag crochet pattern lays flat on a white background, with a skein of yarn on the top, a tail of yarn creating a heart, and a crochet hook attached.](https://d3gel9wqxksnxm.cloudfront.net/wp-content/uploads/2025/06/Be-Brave-Bag-773x1000-1.jpg)
Be Brave Bag Top
With the Front Panel RS facing you, pull up a loop in the ch-1 space on the corner of that panel
with color H.
(RS) Rnd 1: H: Ch 1, sc into the next 62 sts of the Front Panel (the 60 sc and the 2 ch-1 spaces at the corner), move to the Back Panel and sc into the next 62 sts (the 29 sts and 2 ch-2 spaces on each of the coasters), join with a slip st – 124 sc
Rnd 2: Ch 1, turn, sc around, join – 124 sc
Rnd 3: Ch 1, turn, sc into the next 16 sts, ch 5 sk the next 5 sts, sc into the next 20 sts, ch 5, sk
the next 5 sts, sc into the next 32 sts, ch 5, sk the next 5 sts, sc into the next 20 sts, ch 5, sk 5
sts, sc into the next 16 sts, join – 104 sc, 4 ch-5 spaces
Rnd 4: Ch 1, turn, sc around (includes the sc and ch sts from the previous rnd), join – 124 sc
Rnd 5: Ch 1, turn, sc around, join – 124 sc
Fasten off, weave in your ends. Block this section if you’d like.
Optional: Add a rnd of slip sts on the RS on Rnds 2 and 4, this adds strength and looks fun.
Be Brave Bag Straps
Row 1: A: Ch 101, sc into the 2nd ch from the hook and across – 100 sc
Rows 2 – 5: Ch 1, turn, sc across – 100 sc
Fasten off, block if necessary.
Optional: Add a row of slip sts to the Rows 2 and 4 of both Straps for added strength and
design.
![[Image description] Close up of the Be Brave Bag crochet pattern left-hand side attachment of the Straps.](https://d3gel9wqxksnxm.cloudfront.net/wp-content/uploads/2025/06/Be-Brave-Bag-960x1000-1.jpg)
![[Image description] Close up of the Be Brave Bag crochet pattern right-hand side attachment of the Straps.](https://d3gel9wqxksnxm.cloudfront.net/wp-content/uploads/2025/06/Be-Brave-Bag-960x1001-1.jpg)
Straps Assembly
Take one of your straps and mark 20 sts in on both ends with your stitch markers. Next, with the RS facing you, position your bag so that 2 of the ch 5 spaces from Rnd 3 of the Top are facing you. With the Strap you marked with your stitch markers, pull your strap through the right ch 5 space, so that the end of the strap is on the inside of the bag, and fold the 20 st section in half, lining the end sts of the strap with the stitch markers. Sew the end of the strap to the sts you marked with your stitch markers. Repeat this process with the left ch 5 space and the other side of the same strap. Flip your whole bag around and use your other strap and the other 2 ch 5 spaces to attach your second strap.
You can pick up written instructions for the Be Brave Bag crochet pattern in my Ravelry shop.