Hello! How’s your Spring going so far? Or, are you having a Spring? Where I live it went
from being 30-40 degrees a week ago to this week we’re getting 70-80 degree weather. Whoa! That’s whiplash fast, in my opinion. I am not ready for it to be 70 degrees when I wake up in the morning. Not working for me, I needed a Spring, it was a long winter. Ugh!
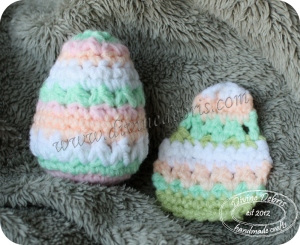
So I was looking at my Easter egg earring pattern I posted last year and noticed… it wasn’t good. Well, it wasn’t bad but I need to clean up the pattern and make sure it reads better. In fact, I decided to update the pattern and even make a new egg.
For either of these projects you will need four colors of Worsted Weight yarn and a US G (4.25MM) crochet hook.
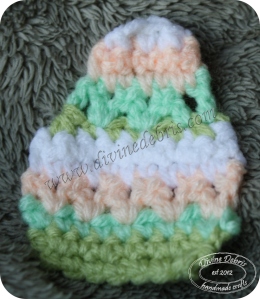
For the applique:
(First color)Row 1: Ch 8, sc into second ch from the hook and across (7 scs)
(First color)Row 2: turn, ch 2, sc twice into the first st, sc across, sc twice into the last st (9 scs)
(Second color)Row 3: turn, ch 2, sc twice into the first st, sc across, sc twice into the last st (11 scs)
(Third color)Row 4: turn, ch 2, skip st, dc into next st, *ch 1, dc2tog w/ first leg(dc) of the st in the same st as the last dc then skip a st and place the next leg (dc) into the next st, * repeat from * to * 3 more times, ch 1, dc into last st (4 dc2tog, 2 dc)
(Fourth color)Row 5: turn, ch 1, sc across (11 scs)
(Fourth color)Row 6: turn, ch 1, sc2tog into the first 2 sts, sc across, sc2tog into the last 2 sts (9 scs)
(First color) Row 7: turn, ch 1, sc2tog into the first 2 sts, sc across, sc2tog into the last 2 sts (7 scs)
(Second color)Row 8: turn, ch 2, skip st, dc into next st, *ch 1, dc2tog w/ first leg(dc) of the st in the same st as the last dc then skip a st and place the next leg (dc) into the next st, * repeat from * to * 1 more time, ch 1, dc into last st (2 dc2tog, 2 dc)
(Third color)Row 9: turn, ch 1, sc across (7 scs)
(Third color)Row 10: turn, ch 1, sc2tog into the first 2 sts, sc across, sc2tog into the last 2 sts (5 scs)
(Fourth color)Row 11: turn, ch 1, sc2tog into the first 2 sts, sc across, sc2tog into the last 2 sts ( 3 scs)
Now I fasten off after row 11 but if you would like, you could go another row and just sc across. This will make the top appear more finished.
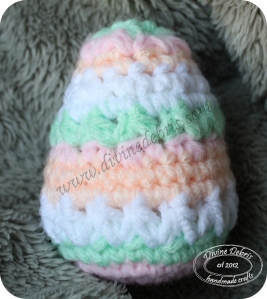
For the egg ami:
Row 1: Color A: Magic circle, sc 8 times into circle, slip st into the first st – 8 scs
Row 2: Ch 1, sc twice into each st, slip st into the first st – 16 scs
Row 3: Color B: Ch 1, *sc, sc twice* repeat from * to * the rest of the way around, slip st into the first st – 24 scs
Row 4: ch 1, *sc, sc, sc twice* repeat from * to * the rest of the way around, slip st into the first st – 32 scs
Row 5: Color C: Ch 1, sc around, slip st into the first st – 32 scs
Row 6: Color D: Ch 1, hdc2tog with first leg (hdc) in the same st as join, then skip a st and place the second leg (hdc) into the next st) ch 1,* hdc2tog with the first leg (hdc) in the same st as the last hdc, skip a st, and the place the next leg (hdc) into the next st, ch 1, * repeat from * to * 14 more times, hdc2tog with one leg (hdc) in the same st as the last hdc, ch 1, skip over next st and where you joined row 5, place next leg (hdc) into the same st as the first hdc2tog, slip st into the first st -16 hdc2tog
Row 7: Color A: Ch 1, sc around, slip st into the first st – 32 scs
Row 8: Ch 1, sc around, slip st into the first st – 32 scs
Row 9: Color B: Ch 1, *sc, sc, sc2tog* repeat from * to * the rest of the way around, slip st into the first st – 24 scs
Row 10: Color C: ch 1, hdc2tog with first leg (hdc) in the same st as join, then skip a st and place the second leg (hdc) into the next st) ch 1,* hdc2tog with the first leg (hdc) in the same st as the last hdc, skip a st, and the place the next leg (hdc) into the next st, ch 1, * repeat from * to * 14 more times, hdc2tog with one leg (hdc) in the same st as the last hdc, ch 1, skip over next st and where you joined row 5, place next leg (hdc) into the same st as the first hdc2tog, slip st into the first st – 12 hdc2tog
Row 11: Color D: Ch 1 sc around, slip st into the first st -24 scs
Row 12: Ch 1, *sc, sc2tog,* repeat from * to * the rest of the way around, slip st into the first st – 16 scs
Row 13: Color A: Ch 1, sc around, slip st into the first st – 16 scs
Row 14: Color B: Ch 1, sc2tog, in each 2 sts around, slip st into the first st – 8 scs
Row 15: Color C: ch 1, sc2tog, in each 2 sts around, slip st into the first st – 4 scs
Fasten off,
Finishing: You will probably want to stuff your ami before row 14, only because the hole gets much smaller after that and it is very difficult to get the stuffing in. I know this because I tried it and had to take it apart a row before I could stuff the rest of the egg. 😀 Fasten off after row 15 and leave a nice long tail.
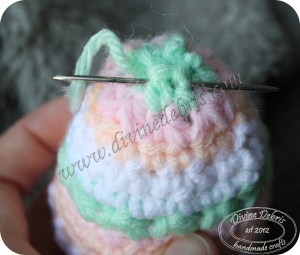
To close the top of the egg, weave your tapestry needle and the yarn tail you left up and down over the four scs (under the first one, over the second, under the third, over the fourth). Pull the yarn tight until the hole begins to close. Weave the tail over the stitches as many times as you need for the hole to close. I only did it 3 times but I being cautious.
Well, I hope you all like the eggs and find that the patterns work out for you. 😀 I also hope for Spring! But I’m sure we’re fully into Summer here.


rondita
Saturday 3rd of May 2014
Wow, these eggs are way too cute!!! :) Makes me wanna knit :) (or maybe it's easier to just ask my mom to do it... ;) )
Amylee Handmade
Monday 28th of April 2014
wow how lovely it would be to receive a wooly Easter egg, did you know that if you keep a vanilla pod in amongst your eggs they will have a slight take of vanilla?
knitnrun4sanity
Tuesday 8th of April 2014
That is a quick transition!