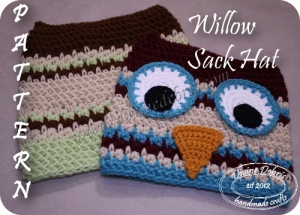
Do you like sack hats? They’re kinda cute, if you ask me. I’ve worked on a variation of the Willow hat pattern, but as a sack. I actually
posted this pattern on my website, Divine Debris, some time ago but I didn’t update it here. I’m not really sure, to be honest with you, as to why I didn’t update it here. Laziness, probably. I’ve been in a real funky mood these last couple of weeks- just listless and without motivation to do anything. I’ve got a decent amount of homework due next week and, well, I’ve barely begun to work on it. Alas… it will get done. 🙂 You can add the Willow Sack Hat to your Ravelry que here. You can download a pdf here and the website features a nice, printer friendly, version for you.
So, do you want the pattern?
Type: Slouch hat
Size: Child, Adult/ teen
Skill level: Easy/ slightly advanced easy
Pattern is in US crochet terms
Materials:
.5 oz 3 colors of WW yarn
US J (6 mm) crochet hook
Tapestry needle
Terms/stitches used:
slip st: slip stitch
ch: chain
fsc: foundation single crochet
sc: single crochet
sc2tog: single crochet 2 sts together
spike sc: spike single crochet
HBhdc: herringbone half double crochet
Notes:
The spike sc is also known as a long sc crochet.
The hat is worked row by row with a slip st into first st to secure the row before moving onto the next row.
Adult/teen:
Width: 9.25” – 9.5”
Length: 9.5”
Child ages 3 – 10:
Width: 8.75” – 9”
Length: 8”
Pattern Instructions:
Sizing follows child (adult/teen)
Row 1: Leave a long tail before beginning this row. Fsc 48 (52), slip st into first st to secure.
Notes: Use the tail to secure the other side of this row, opposite the side that you slip sted.
Rows 2 – 5: Ch 1, HBhdc into same st as join and all the way around, slip st into first HBhdc to secure – 48 (52) Hbhdc
Row 6: Ch 1, sc around – 48 (52) scs
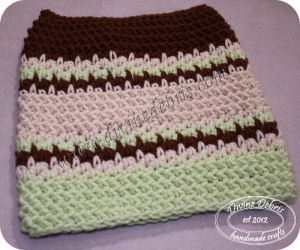
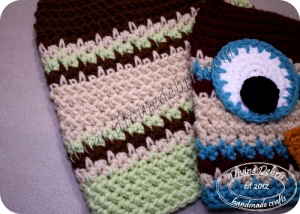
Change colors: Row 7: Ch 1, sc into same st as join, spike sc into next st, *sc into next st, spike sc into next st* repeat from * to * the rest of the way around – 24 (26) scs, 24 (26) spike scs
Row 8: Ch 1, spike sc into same st as join, sc into next st, *spike sc into next st, sc into next st* repeat from * to * the rest of the way around – 24 (26) scs, 24 (26) spike scs
Change colors: Row 9: Ch 1, sc into same st as join, spike sc into next st, *sc into next st, spike sc into next st* repeat from * to * the rest of the way around – 24 (26) scs, 24 (26) spike scs
Row 10: Ch 1, spike sc into same st as join, sc into next st, *spike sc into next st, sc into next st* repeat from * to * the rest of the way around – 24 (26) scs, 24 (26) spike scs
Change colors: Row 11: Ch 1, sc into same st as join, spike sc into next st, *sc into next st, spike sc into next st* repeat from * to * the rest of the way around – 24 (26) scs, 24 (26) spike scs
Row 12: Ch 1, spike sc into same st as join, sc into next st, *spike sc into next st, sc into next st* repeat from * to * the rest of the way around – 24 (26) scs, 24 (26) spike scs
Change colors: Row 13: Ch 1, sc into same st as join, spike sc into next st, *sc into next st, spike sc into next st* repeat from * to * the rest of the way around – 24 (26) scs, 24 (26) spike scs
For child size: rows 14 – 25: repeat rows 3 – 13
For adult size: rows 14 – 25: repeat rows 2 – 13
Rows 26 – 29: repeat rows 2 – 5
Fasten off. Weave in ends.
With H hook:
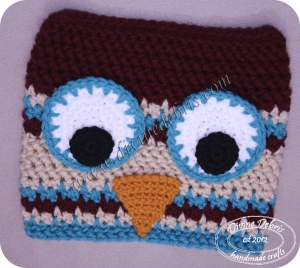
For eyes:
Magic circle: ch 2, sc 8 times into circle, slip st into first sc to secure- 8 scs
Row 2: Ch 1, sc twice into all sts around, slip st into first sc to secure – 16 scs
Row 3: Ch 1, sc twice into first st, sc into second st, *sc twice into next st, sc into next st, * repeat from * to * 7 more times – 24 scs
Row 4: Ch 1, sc twice into first st, sc into next two sts, *sc twice into next st, sc into next two sts, * repeat from * to * 6 more times – 32 scs
Row 5: Ch 1, sc all the way around – 32 scs
With a different color: Row 6: Ch 1, spike sc into first st, sc into second st, *spike sc into next st, sc into next st* repeat from * to * 14 more times, slip st into first spike sc to secure- 16 spike scs, 16 scs
Fasten off. Weave in ends.
Pupil:
Magic circle: ch 2, sc 8 times into circle, slip st into first sc to secure- 8 scs
Row 2: Ch 1, sc twice into all sts around, slip st into first sc to secure – 16 scs
Fasten off. Weave in ends.
Beak:
Row 1: ch 10, sc into second st from the hook and across – 9 scs
Row 2: Turn, ch 1, sc across – 9 scs
Row 3: Turn, ch 1, sc2tog, sc into the next 5 sts, sc2tog – 7 scs
Row 4: Turn, ch 1, sc across – 7 scs
Row 5: Turn, ch 1, sc2tog, sc into next 3 sts, sc2tog – 5 scsRow 6: Turn, ch 1, sc across – 5 scs
Row 7: Turn, ch 1, sc2tog, sc, sc2tog – 3 scs
Row 8: Turn, ch 1, sc across – 3 scs
Row 9: Turn, ch 1, sc2tog, sc – 2 scs
Row 10: Turn, ch 1, sc across – 2 scs
Row 11: Turn, ch 1, sc2tog – 1 sc
Row 12: Turn, ch 1, sc – 1 sc
Fasten off. Weave in ends.
Finishing: Fold the hat in half, with the seam running down the back. Sc across the other side of the fsc row, this will secure the end of the hat. If you would like, you could add pom-poms or fringe at the corners to add some personality.
Fasten eyes and beak (if using) onto the side of the hat that’s opposite the seam.
Well, I hope you like the pattern! As always, you can find me on Facebook at Divine Debris. Also, the Roxanne hat pattern is now
released and you can purchase it for $3.99, you can get it on my website or Craftsy, if you would prefer.


