Hi everyone!
Happy September!! Now, I know a lot of people will say that Fall doesn’t officially start until the end of September but I’m hear to tell you those people are mean and you don’t need to talk to them. If you’re like me and you think that Fall has started at 12:01am on September first, then you live that truth. You get your pumpkin spice latte and burn your apple cider candle and just know that I’m doing the same.
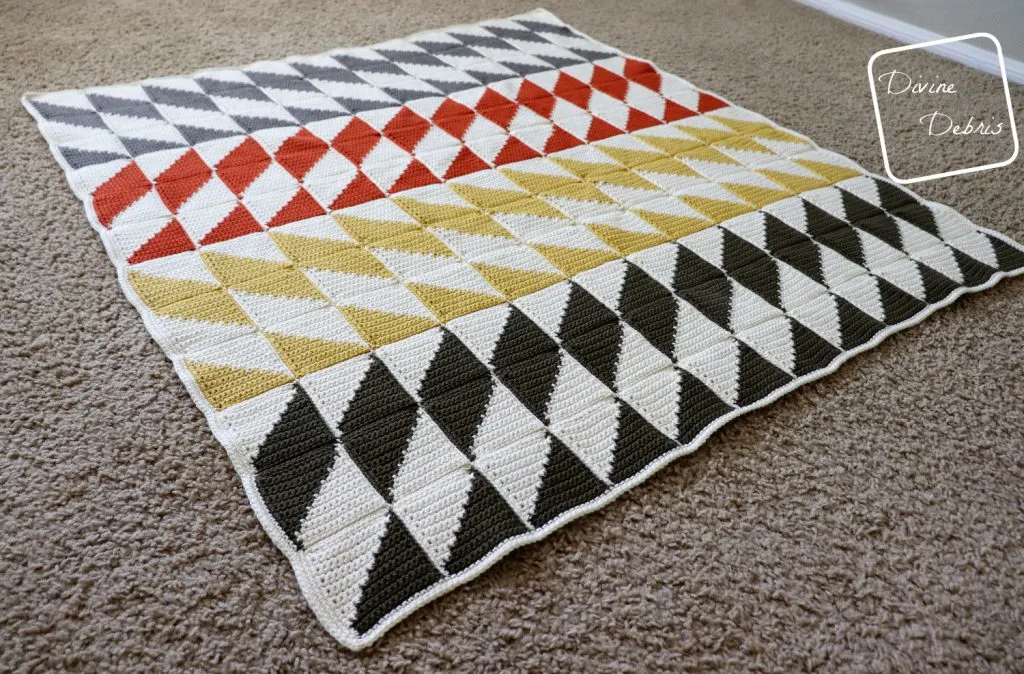
Ok! Phew, now that I got that out of the way, I am so exited to finally get this pattern published! I’ve lived this pattern for almost a month and I love it but I’m also so, so over seeing it 😉
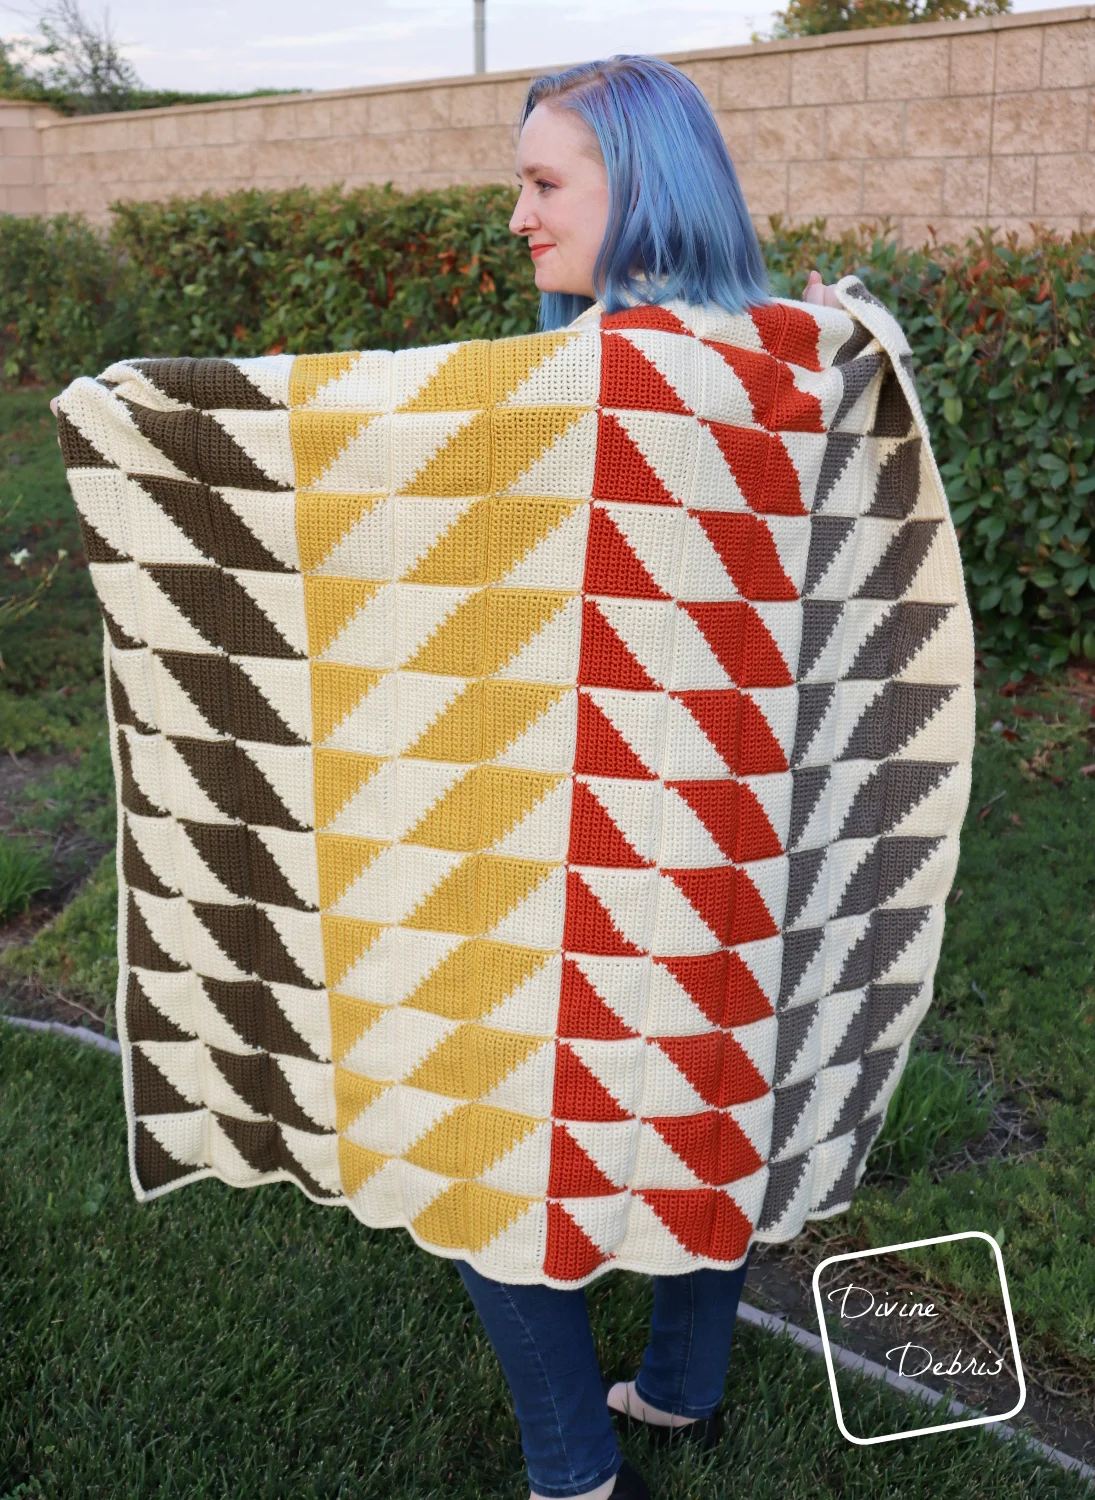
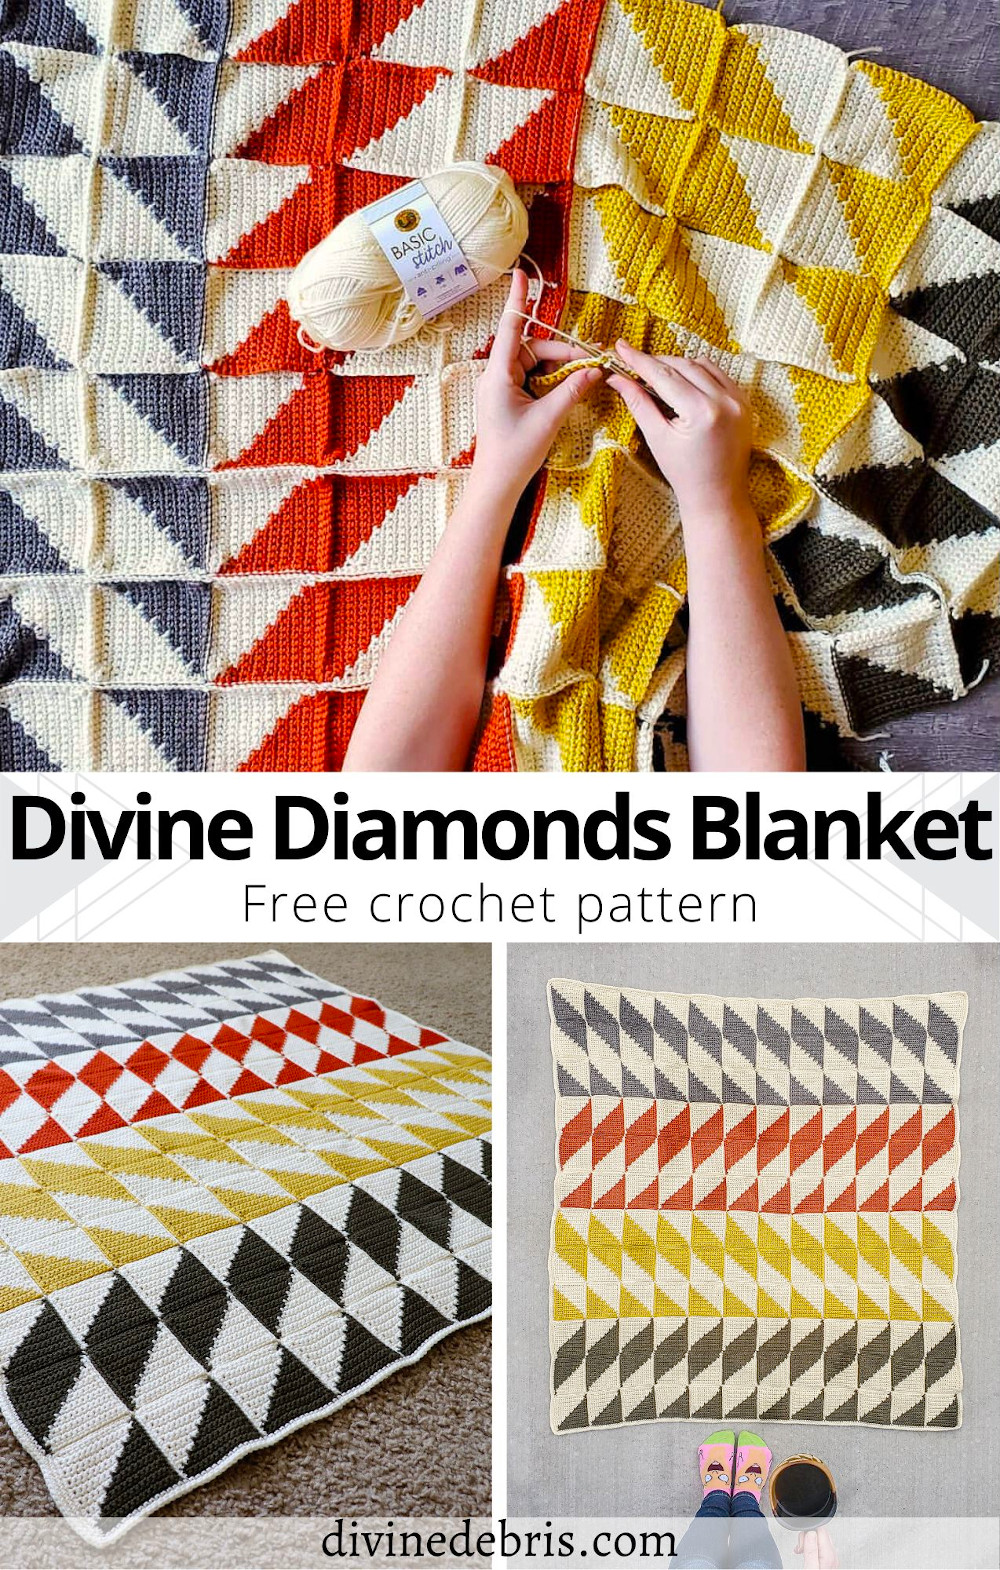
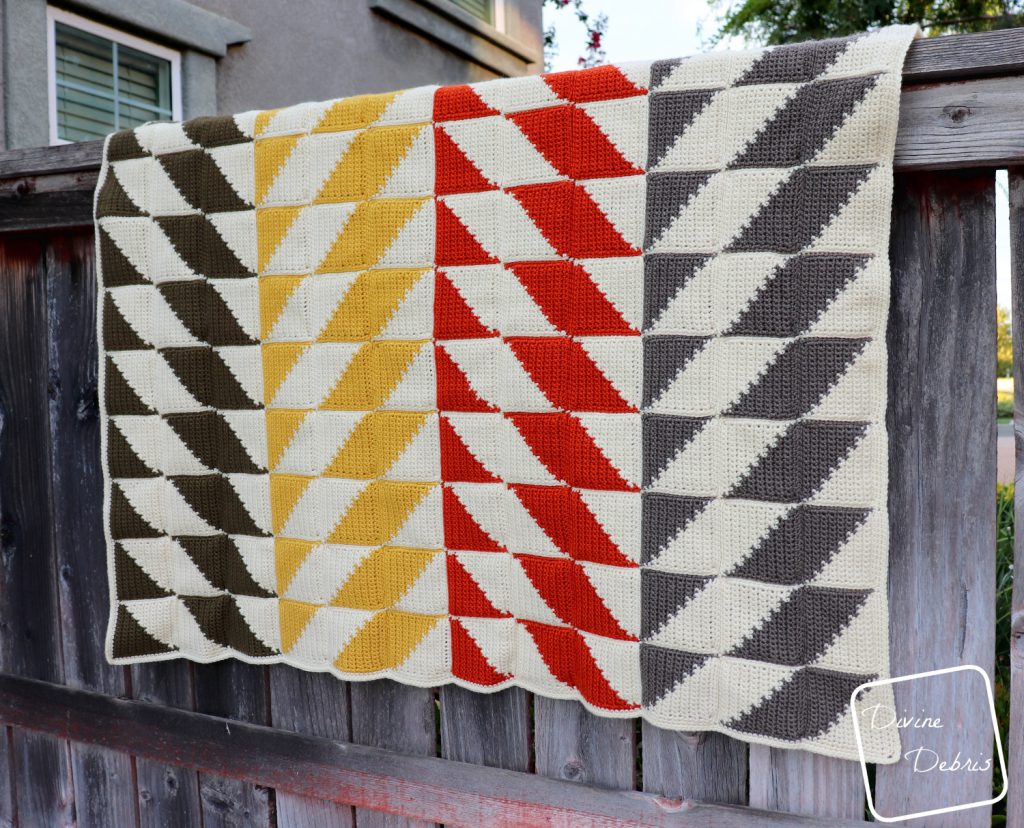
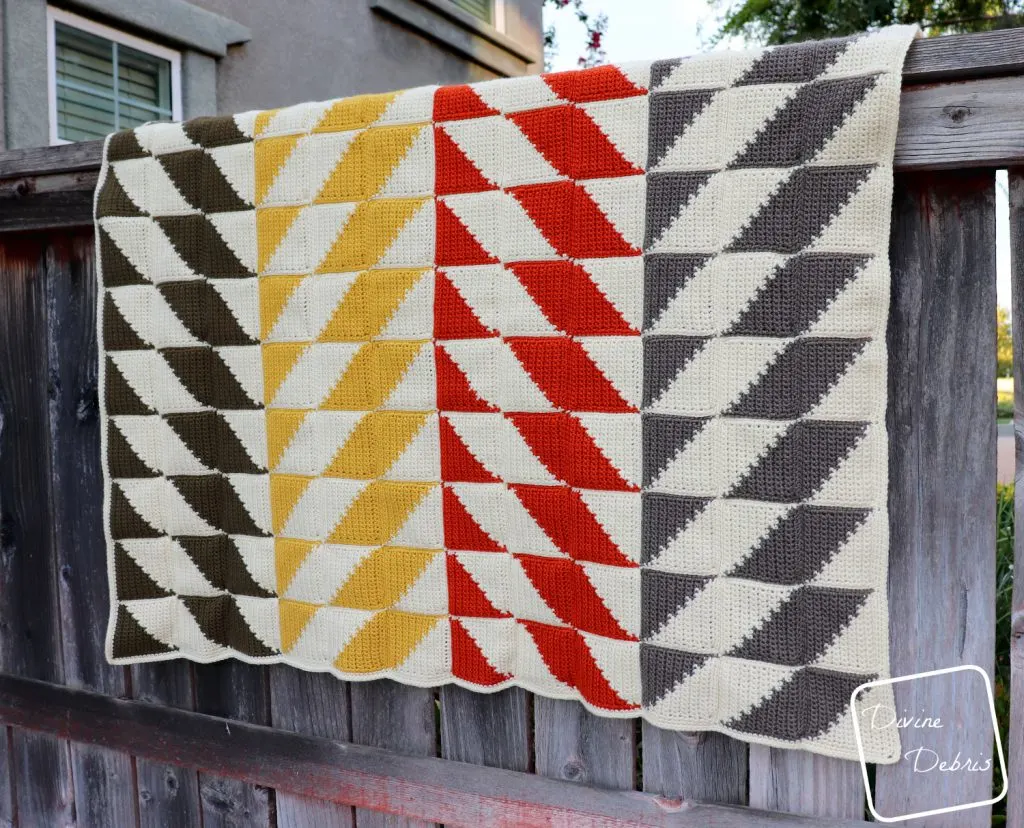
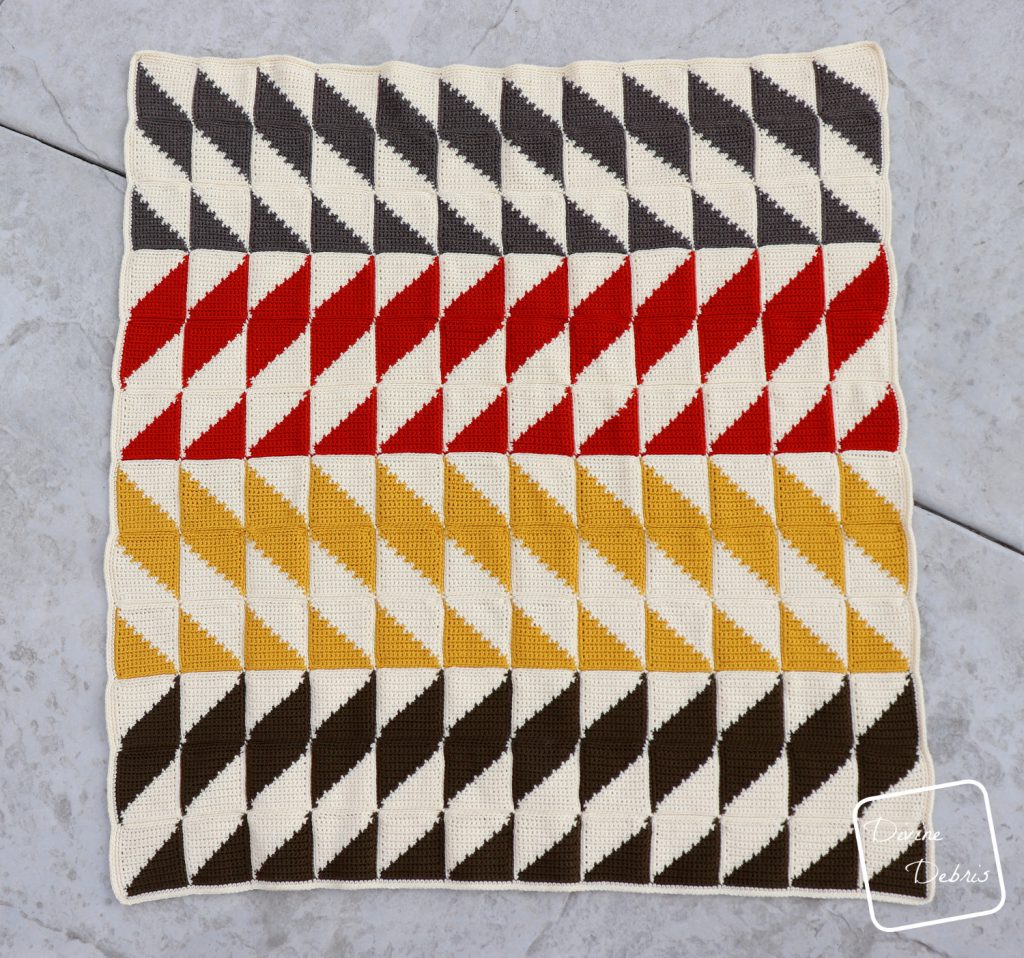
I got the idea for this throw blanket when I saw a photo of a quilt. I love quilts, my mother has made quilts. Quilts are pretty awesome. So when I was looking at that photo I thought about how I could make a similar item in crochet. There was yarn and hook thoughts, gauge swatches, and lots of frogging but it eventually worked out. And if you’ve been following the saga on my Instgram (where I definitely documented every little thing I did in my stories and on my grid) you know how much work as gone into this. 144 squares! I started out making 10 a day and then some days did 4 and some days did nearly 18… it just depended upon my mental health. Ha!
But I do very much love how this turned out and I think at some point I’m going to revisit the design, maybe make a matching pillow cover or something.
What I like the most about this is that it’s very easy to customize. I think this would make an amazing scrapgahan. You could make so many different colored squares with whatever yarn you have laying around. Really lean into “ugly,” ya know what I mean? Or you could make it with lovely yarn and have a gorgeous gift for yourself or someone else. It’s also super easy to customize. I made a square but you could make a huge one by just adding more squares – so easy!
Anyway, I hope you like this pattern and give it a try. It’s super easy to customize and make your own. And I know the pattern here looks very daunting but I just wanted to give you all the information I have so that you can succeed!
See ya next week
I hope you check out more Falloween patterns here.
This post is linked to Hookin’ on Hump Day #198
(this post may contain affiliate links)

If you appreciate my weekly patterns I hope you’d consider purchasing an ad-free pdf of this pattern in my Ravelry shop.
Thank you Karen for becoming my newest patron on Patreon!


Materials
- US H (5.00 mm) crochet hook
- Worsted/ medium/ size #4 weight yarn
- 2 – 5 colors
- I used Lion Brand Basic Stitch
- Approx 52 oz/ 2770 yds
- Needle to weave in your ends
Gauge
- 18 rows x 16 sc = 4” (blocked)


Terms/ Stitches used
- RS: right side
- Ch: chain
- St: stitch
- Slip st: slip stitch
- Sc: single crochet
- BLO: back loop only
- Invisible join (explained below)
- Msc (explained below)
Notes
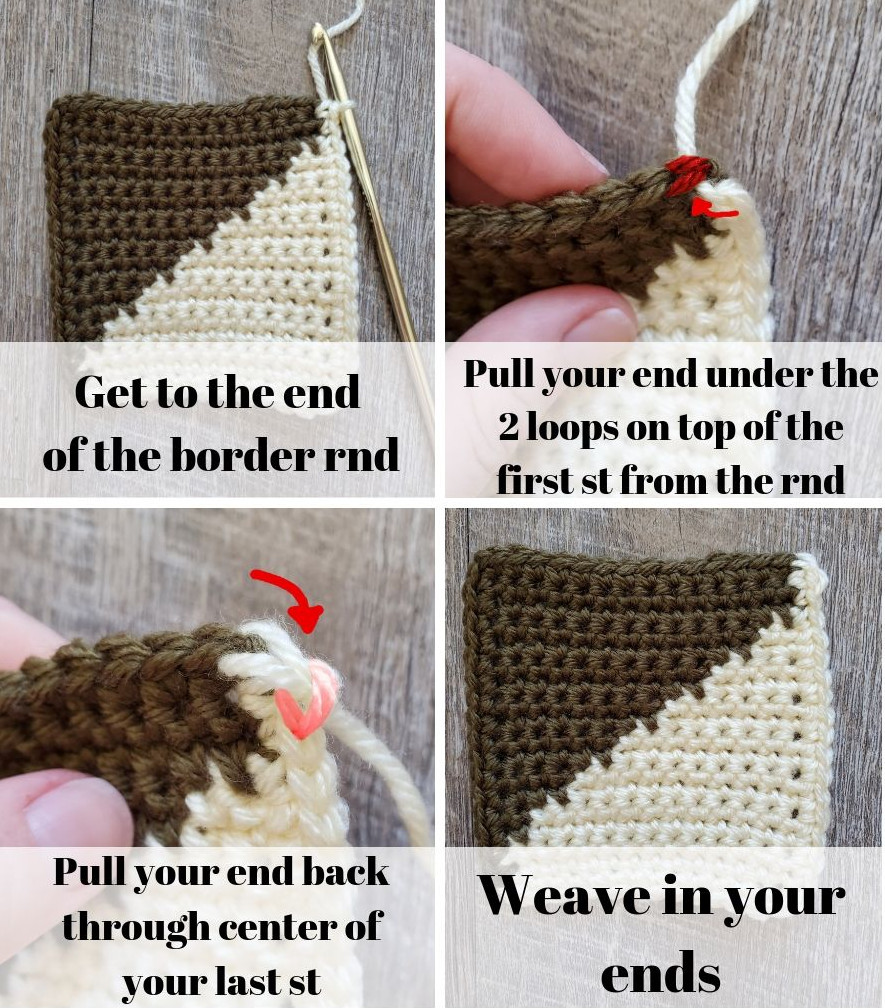
- Invisible Join: Use your needle to weave your end around the V on the top of your first st of your rnd and back through the center of the V on the top of your last st. This will act as at ch-1 without the knot at the end of the rnd.
- Msc (modified sc): insert your hook into the BLO of the ch-1 at the corner of the square you’re currently working and insert your hook into the BLO of the ch-1 at the corner of the next square, yarn over, pull up a loop, yarn over, pull through the 2 loops on your hook. This will only be used on the Border section and it’s to eliminate any gaps that might happen where the squares meet the border.
- Below the instructions will explain the individual squares first, then tell you how many to make and how to arrange them, then assembly, and last the border.
- You’re going to need to know how to create a slip knot on your hook for this pattern.
- The ch-1 at the beginning of the rows does not count as a stitch.
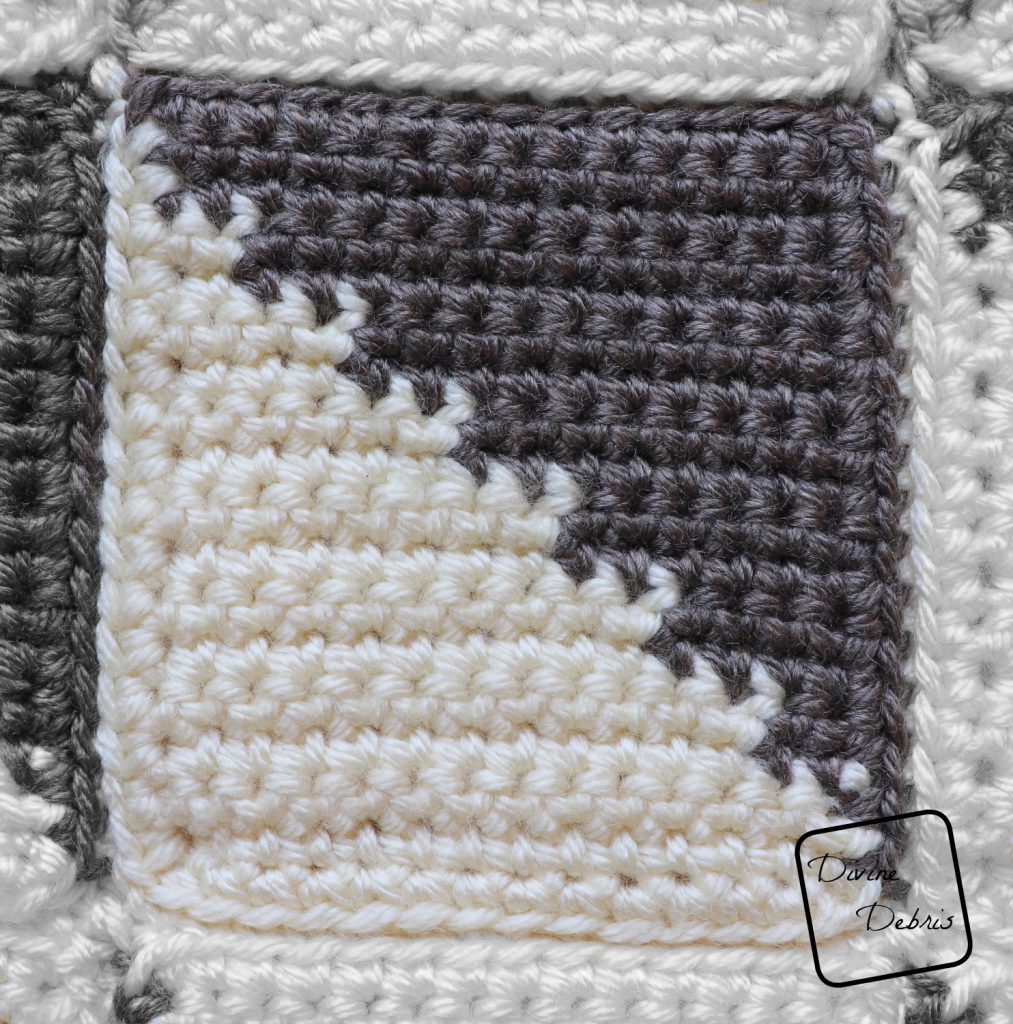
- These squares are worked individually and the seamed up to create the blanket.
- There are 4 different square instructions in this pattern. They differ in direction the diagonal is going and which color is on top and which is on the bottom.
- The individual squares measure 4″ x 4″, you can adjust this pattern as you’d like to make a larger or smaller afghan.
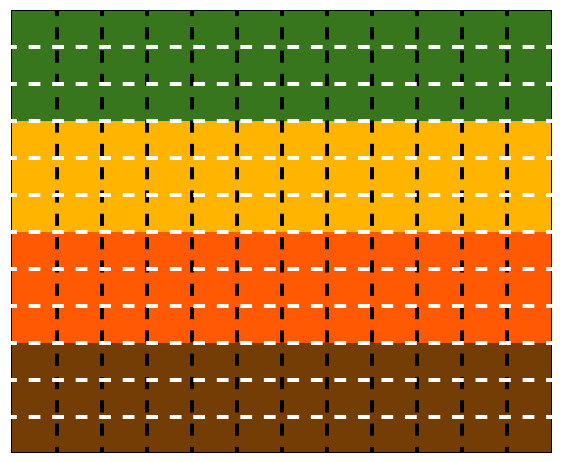
- Color A is always cream in the example and color B changes depending upon the section you’re working. There’s a graph below explaining this.
- In the photos: cream is Basic Stitch in Ecru (7 skeins, 24.5 oz/ 1295 yds), yellow is Basic Stitch in Mustard (2 skeins, 7 oz/ 370 yds), orange is Basic Stitch in Pumpkin (2 skeins, 7 oz/ 370 yds), green is Basic Stitch in Olive (2 skeins, 7 oz/ 370 yds), and brown is Basic Stitch in Taupe Heather (2 skeins, 7 oz/ 370 yds).
Invisible Join help

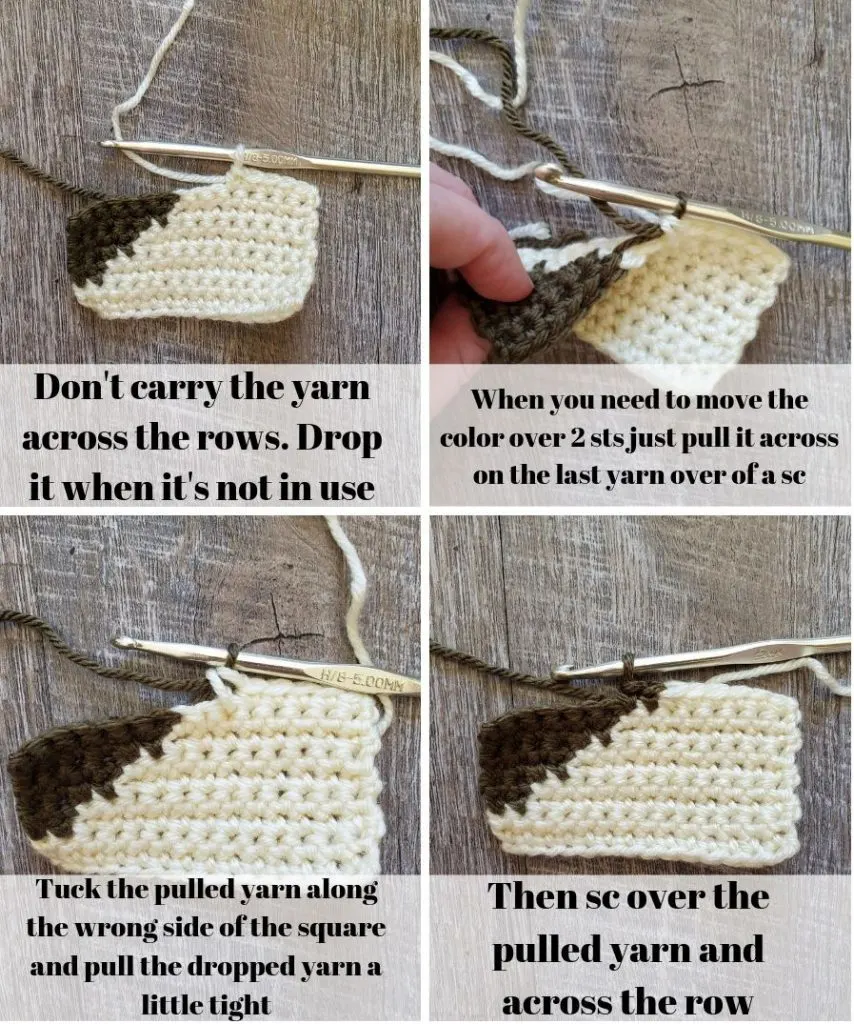
Changing colors in the row

Finished product dimensions (measurements may vary by gauge and yarn used)
Approx 49″ – 50″ x 49″ – 50″
Divine Diamonds Throw Blanket pattern instructions
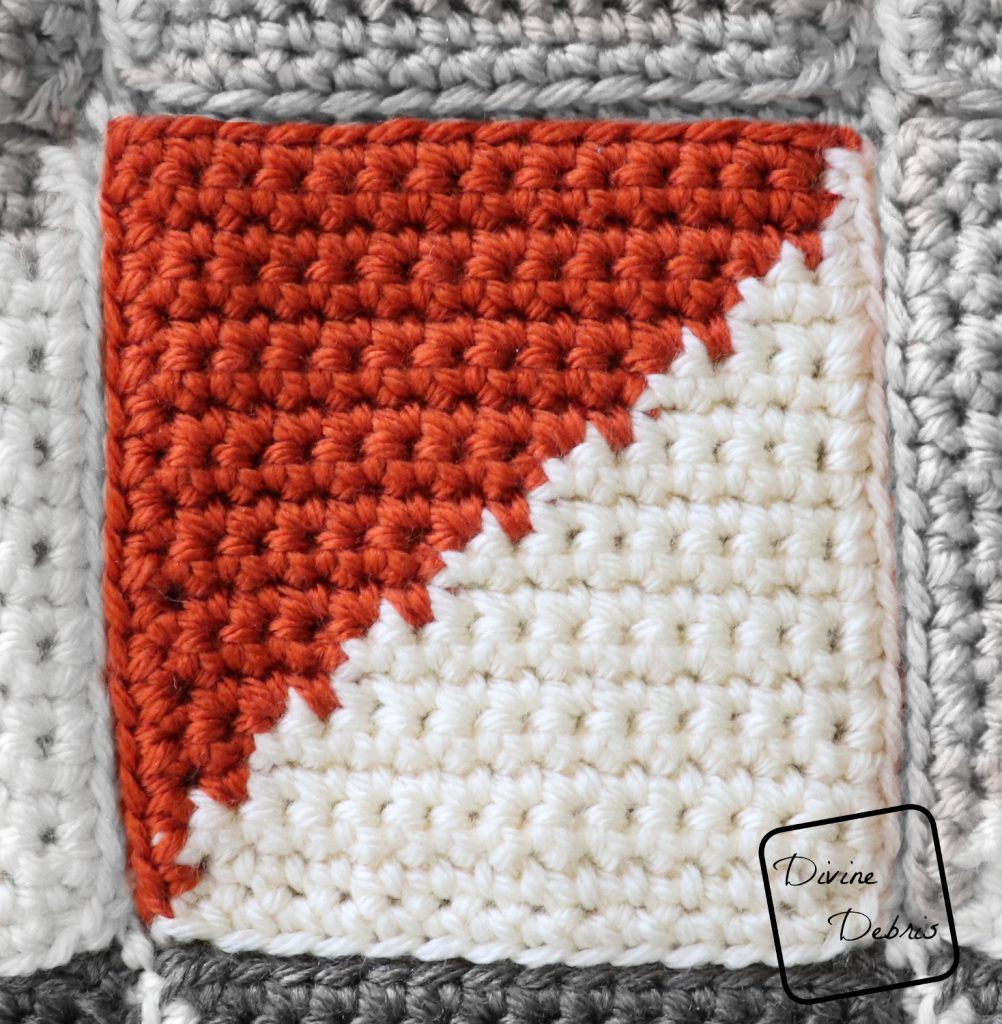
Square 1

(RS) Row 1: A: Ch 15, sc into the second ch from the hook and into the next 13 sts — 14 sc
Note:
- The following directions will only tell you what color (ie: Color A, Color B, etc…) and the number in the parentheses tells you how many single crochets to make.
Row 2: A: Ch 1, turn, (14) — 14 sc
Row 3: B: Ch 1, turn, (2), A: (12) — 14 sc
Row 4: A: Ch 1, turn, (12), B: (2) — 14 sc
Row 5: B: Ch 1, turn, (4), A: (10) — 14 sc
Row 6: A: Ch 1, turn, (10), B: (4) — 14 sc
Row 7: B: Ch 1, turn, (6), A: (8) — 14 sc
Row 8: A: Ch 1, turn, (8), B: (6) — 14 sc
Row 9: B: Ch 1, turn, (8), A: (6) — 14 sc
Row 10: A: Ch 1, turn, (6), B: (8) — 14 sc
Row 11: B: Ch 1, turn, (10), A: (4) — 14 sc
Row 12: A: Ch 1, turn, (4), B: (10) — 14 sc
Row 13: B: Ch 1, turn, (12), A: (2) — 14 sc
Row 14: A: Ch 1, turn, (2), B: (12) — 14 sc
Fasten off color A.
Rows 15 – 16: B: Ch 1, turn, (14) — 14 sc
Fasten off color B.
Border
Rnd 1: A: Create a slipknot on your hook and with the right side facing you, begin in the top left-hand corner of your square, sc into the next 16 row ends, ch 1 at the corner and rotate your square, sc into the 14 sts (this will be the other side of your chain row), ch 1 at the corner while switching to color B and rotate your square, with B sc into the next 16 row ends, ch 1 at the corner and rotate your square, sc into the next 14 sts — 60 sc, 3 ch-1
Fasten off leaving a tail long enough to create an invisible join in the corner where you just ended (you could slip st into the first st if you’d prefer but this will create a more uniform look in your squares and eliminate a knot in one corner). Weave in all your ends.
Square 2
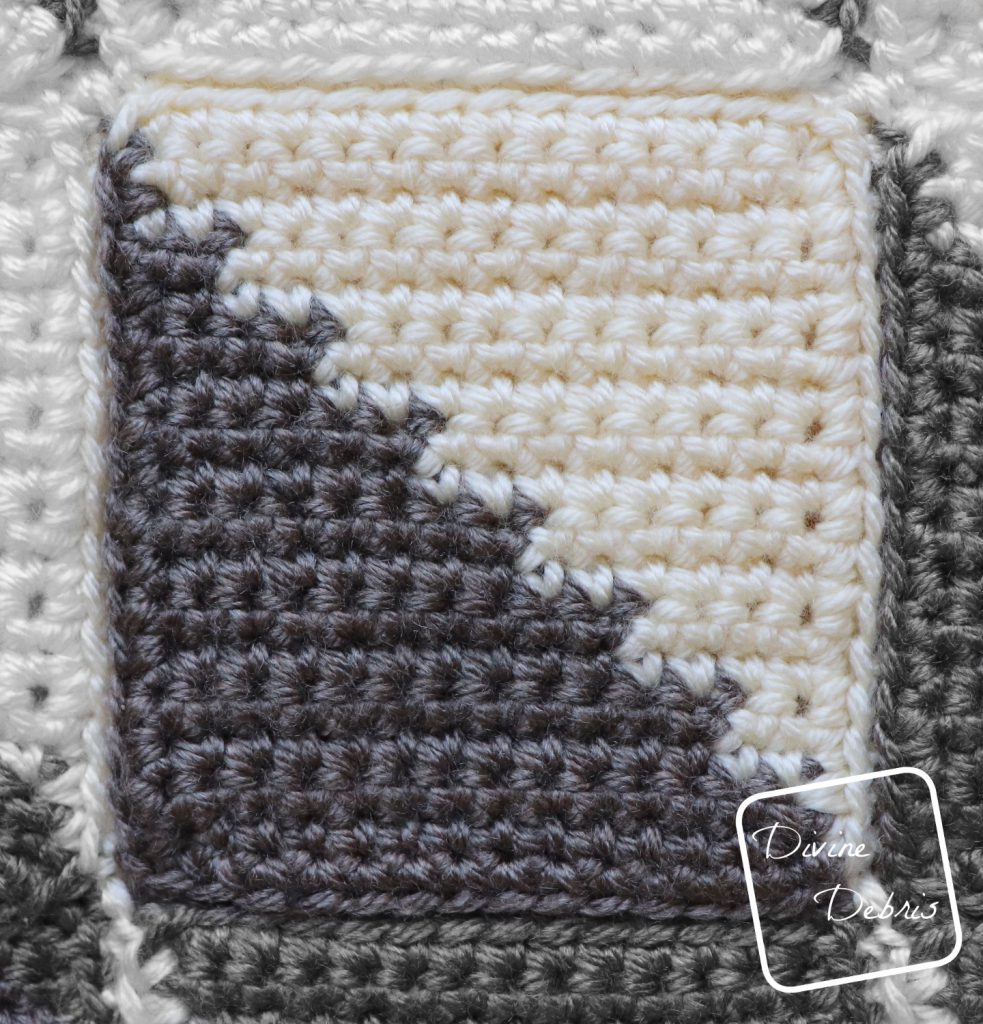

(RS) Row 1: B: Ch 15, sc into the second ch from the hook and into the next 13 sts — 14 sc
Note:
- The following directions will only tell you what color (ie: Color A, Color B, etc…) and the number in the parentheses tells you how many stitches to make.
Row 2: B: Ch 1, turn, (14) — 14 sc
Row 3: A: Ch 1, turn, (2), B: (12) — 14 sc
Row 4: B: Ch 1, turn, (12), A: (2) — 14 sc
Row 5: A: Ch 1, turn, (4), B: (10) — 14 sc
Row 6: B: Ch 1, turn, (10), A: (4) — 14 sc
Row 7: A: Ch 1, turn, (6), B: (8) — 14 sc
Row 8: B: Ch 1, turn, (8), A: (6) — 14 sc
Row 9: A: Ch 1, turn, (8), B: (6) — 14 sc
Row 10: B: Ch 1, turn, (6), A: (8) — 14 sc
Row 11: A: Ch 1, turn, (10), B: (4) — 14 sc
Row 12: B: Ch 1, turn, (4), A: (10) — 14 sc
Row 13: A: Ch 1, turn, (12), B: (2) — 14 sc
Row 14: B: Ch 1, turn, (2), A: (12) — 14 sc
Fasten off color B.
Rows 15 – 16: A: Ch 1, turn, (14) — 14 sc
Do not fasten off color A.
Border
Rnd 1: A: Create a slipknot on your hook and with the right side facing you, begin in the top left-hand corner of your square, sc into the next 16 row ends, ch 1 at the corner and rotate your square, sc into the 14 sts (this will be the other side of your chain row), ch 1 at the corner while switching to color B and rotate your square, with B sc into the next 16 row ends, ch 1 at the corner and rotate your square, sc into the next 14 sts — 60 sc, 3 ch-1
Fasten off leaving a tail long enough to create an invisible join in the corner where you just ended (you could slip st into the first st if you’d prefer but this will create a more uniform look in your squares and eliminate a knot in one corner). Weave in all your ends.
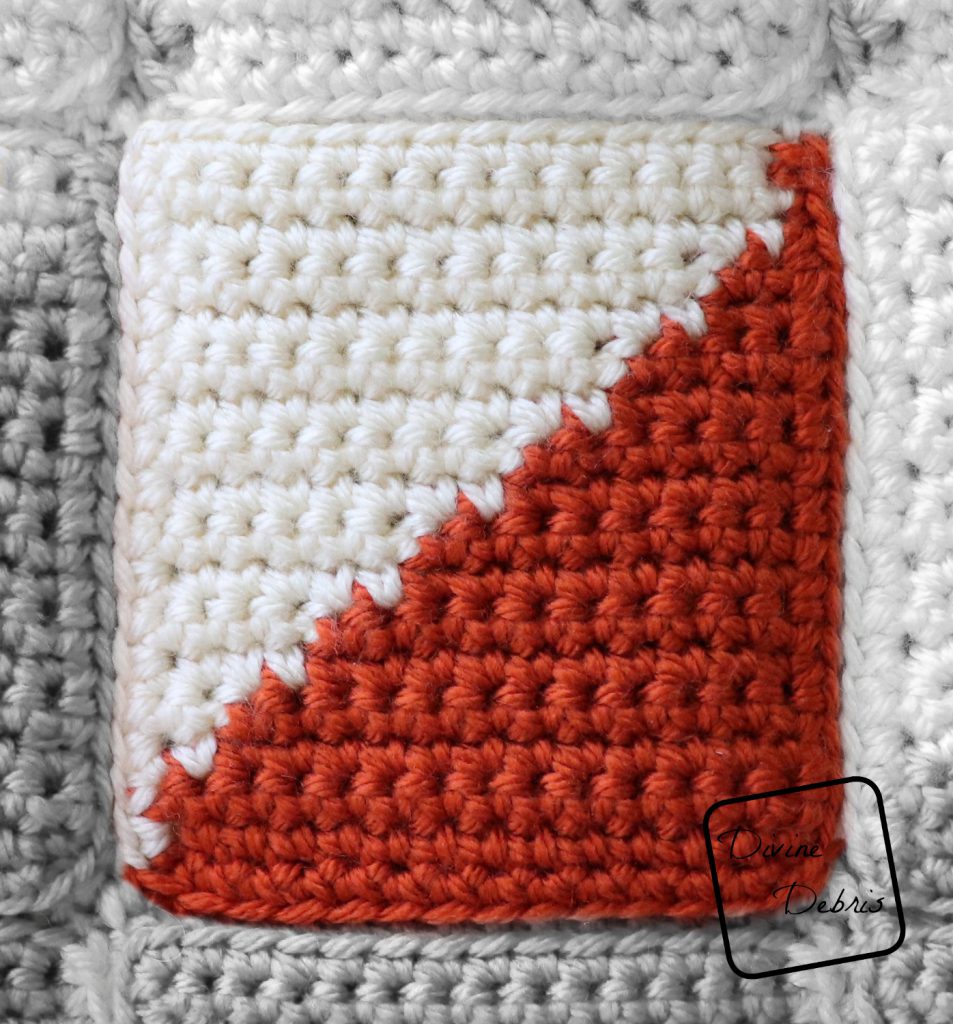
Square 3

(RS) Row 1: A: Ch 15, sc into the second ch from the hook and into the next 13 sts — 14 sc
Note:
- The following directions will only tell you what color (ie: Color A, Color B, etc…) and the number in the parentheses tells you how many stitches to make.
Row 2: A: Ch 1, turn, (14) — 14 sc
Row 3: A: Ch 1, turn, (12), B: (2) — 14 sc
Row 4: B: Ch 1, turn, (2), A: (12) — 14 sc
Row 5: A: Ch 1, turn, (10), B: (4) — 14 sc
Row 6: B: Ch 1, turn, (4), A: (10) — 14 sc
Row 7: A: Ch 1, turn, (8), B: (6) — 14 sc
Row 8: B: Ch 1, turn, (6), A: (8) — 14 sc
Row 9: A: Ch 1, turn, (6), B: (8) — 14 sc
Row 10: B: Ch 1, turn, (8), A: (6) — 14 sc
Row 11: A: Ch 1, turn, (4), B: (10) — 14 sc
Row 12: B: Ch 1, turn, (10), A: (4) — 14 sc
Row 13: A: Ch 1, turn, (2), B: (12) — 14 sc
Row 14: B: Ch 1, turn, (12), A: (2) — 14 sc
Fasten off color A.
Rows 15 – 16: B: Ch 1, turn, (14) — 14 sc
Do not fasten off color B.
Border
Rnd 1: B: Ch 1, sc into the next 14 sts, ch 1 at the corner and rotate your whole piece, sc into the next 16 row ends, ch 1 at the corner and rotate your whole piece, switch to color A, sc into the next 14 sts (this will be the other side of your chain row), ch 1 at the corner and rotate your whole piece, sc into the next 16 row ends — 60 sc, 3 ch-1
Fasten off leaving a tail long enough to create an invisible join in the corner where you just ended (you could slip st into the first st if you’d prefer but this will create a more uniform look in your squares and eliminate a knot in one corner). Weave in all your ends.
Square 4

(RS) Row 1: B: Ch 15, sc into the second ch from the hook and into the next 13 sts — 14 sc
Note:
- The following directions will only tell you what color (ie: Color A, Color B, etc…) and the number in the parentheses tells you how many stitches to make.
Row 2: B: Ch 1, turn, (14) — 14 sc
Row 3: B: Ch 1, turn, (12), A: (2) — 14 sc
Row 4: A: Ch 1, turn, (2), B: (12) — 14 sc
Row 5: B: Ch 1, turn, (10), A: (4) — 14 sc
Row 6: A: Ch 1, turn, (4), B: (10) — 14 sc
Row 7: B: Ch 1, turn, (8), A: (6) — 14 sc
Row 8: A: Ch 1, turn, (6), B: (8) — 14 sc
Row 9: B: Ch 1, turn, (6), A: (8) — 14 sc
Row 10: A: Ch 1, turn, (8), B: (6) — 14 sc
Row 11: B: Ch 1, turn, (4), A: (10) — 14 sc
Row 12: A: Ch 1, turn, (10), B: (4) — 14 sc
Row 13: B: Ch 1, turn, (2), A: (12) — 14 sc
Row 14: A: Ch 1, turn, (12), B: (2) — 14 sc
Fasten off color B.
Rows 15 – 16: A: Ch 1, turn, (14) — 14 sc
Do not fasten off color A.
Border
Rnd 1: A: Ch 1, sc into the next 14 sts, ch 1 at the corner and rotate your whole piece, sc into the next 16 row ends, ch 1 at the corner and rotate your whole piece, switch to color B, sc into the next 14 sts (this will be the other side of your chain row), ch 1 at the corner and rotate your whole piece, sc into the next 16 row ends — 60 sc, 3 ch-1
Fasten off leaving a tail long enough to create an invisible join in the corner where you just ended (you could slip st into the first st if you’d prefer but this will create a more uniform look in your squares and eliminate a knot in one corner). Weave in all your ends.
What to make
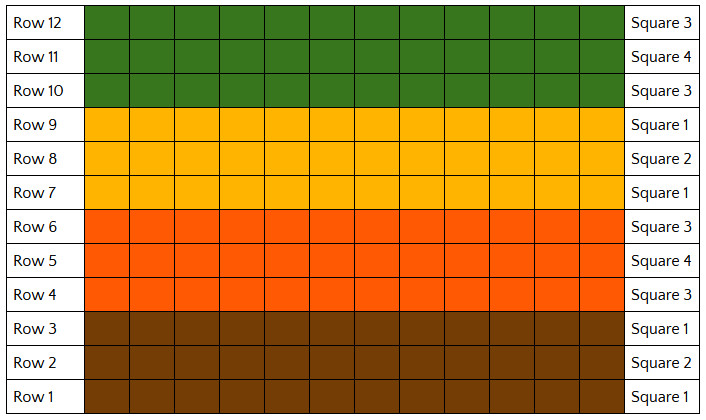
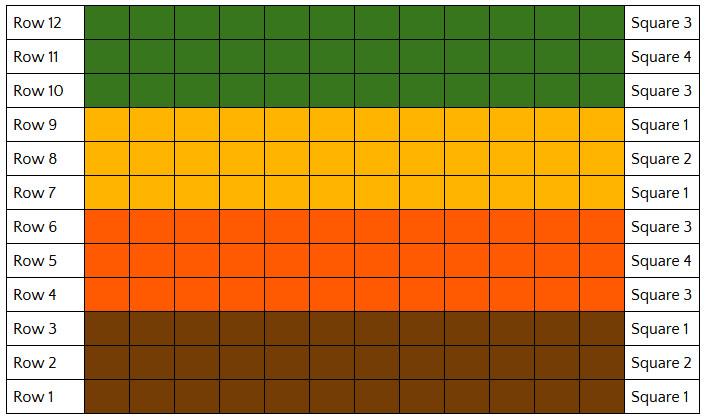
The graph above is a visual of how the squares are arranged in the throw. Rows 1 and 3 are square 1 with color B in brown and row 2 is square 2 with color B in brown. Rows 4 and 6 are square 3 with color B in orange and row 5 is square 4 with color B in orange. Below are the individual square instructions.
How many squares
24 of Square 1 with color A in cream and color B in brown.
12 of Square 2 with color A in cream and color B in brown.
24 of Square 3 with color A in cream and color B in orange.
12 of Square 4 with color A in cream and color B in orange.
24 of Square 1 with color A in cream and color B in yellow.
12 of Square 2 with color A in cream and color B in yellow.
24 of Square 3 with color A in cream and color B in green.
12 of Square 4 with color A in cream and color B in green.
When you have all 144 squares you can block them as you’d like so they’re approximately the same size. This will help with seaming.
Assembly
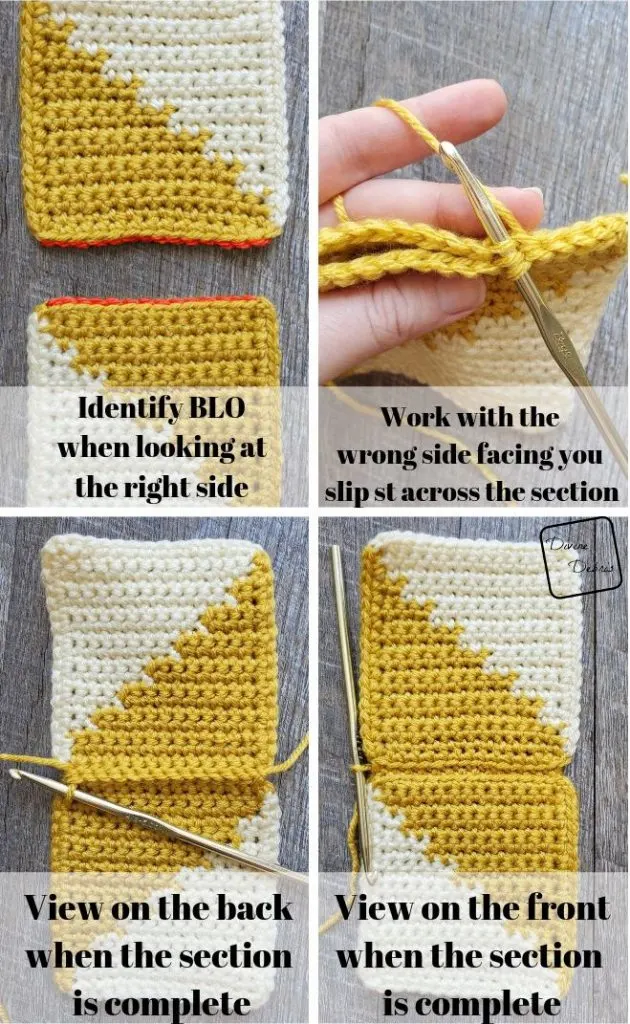
You can seam the blanket together as you’d like (such as using the mattress stitch) but I slip stitched them together using the BLO from the border rounds. Below is a tutorial of the seaming process I used.
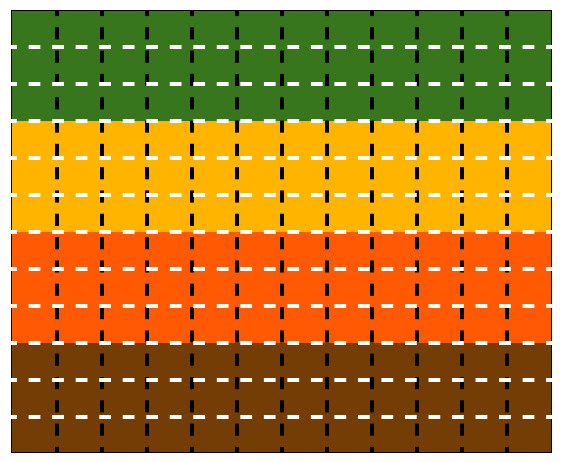
Arrange the squares so that they look like they do in the graph above. Starting with rows 1 and 2 and work from right to left (the white dashed line above), hold 2 squares together so that their right sides (RS) are touching, skip the ch-1 at the corner, slip st into the BLO of the next 14 stitches of the border, skip the ch-1 at the corner,*ch 1 between squares, skip the ch-1 at the corner, hold together 2 more squares and slip st across the BLO of the next 14 sts, skip the ch-1 at the corner, * until you’ve across the 12 sets of squares. Repeat this seaming for all 12 rows. You can use any color to seam but if color A is touching color A, it’s best to use that color to seam (as in the photos below with the yellow color).
Repeat the process of seaming going top to bottom on the blanket (the black dashed line in the above graph) using the 16 sts on the sides of the squares and slip st around the ch-1 between the squares (be sure to skip the ch-1 at the corners as you did before).


Border
Note:
For this section you will need to do a modified sc (abbreviated as msc below) to single crochet together the ch-1 spaces at the corners of the squares (this will help eliminate gaps at the your border): insert your hook into the BLO of the ch-1 at the corner of the square you’re currently working and insert your hook into the BLO of the ch-1 at the corner of the next square, yarn over, pull up a loop, yarn over, pull through the 2 loops on your hook.
Rnd 1: Create a slipknot on your hook and start in the top right-hand corner, sc into the next 14 sts of the first square, *msc the ch-1s, skip to the next square and sc into the next 14 sts,* repeat from * to * 10 more times, ch 2 at the corner and rotate your blanket, sc into the next 16 sts, *msc the ch-1s, skip to the next square and sc into the next 16 sts,* repeat from * to * 10 more times, ch 2 at the corner and rotate your blanket, sc into the next 14 sts, *msc the ch-1s, skip to the next square and sc into the next 14 sts,* repeat from * to * 10 more times, ch 2 at the corner and rotate your blanket, sc into the next 16 sts, *msc the ch-1s, skip to the next square and sc into the next 16 sts,* repeat from * to * 10 more times, ch 2 at the corner and rotate your blanket, slip st into the first st — 764 sc, 4 ch-2 spaces
Rnd 2: Ch 1, sc into the same st as join and into the next 177 sts, (sc, ch 2, sc) into the next ch-2 space, sc into the next 203 sts (sc, ch 2, sc) into the next ch-2 space, sc into the next 178 sts, (sc, ch 2, sc) into the next ch-2 space, sc into the next 203 sts (sc, ch 2, sc) into the next ch-2 space, slip st into the first st or use invisible join method to finish — 772 sc, 4 ch-2 spaces
Fasten off, weave in your ends.