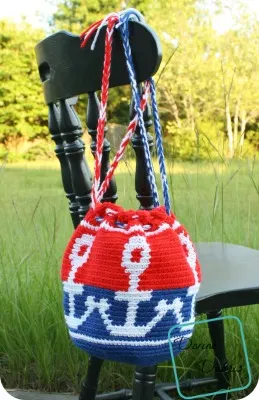
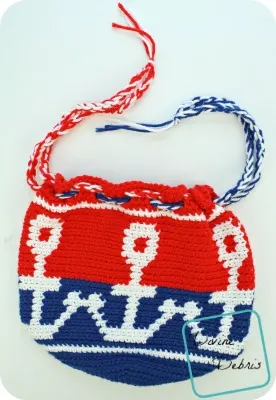
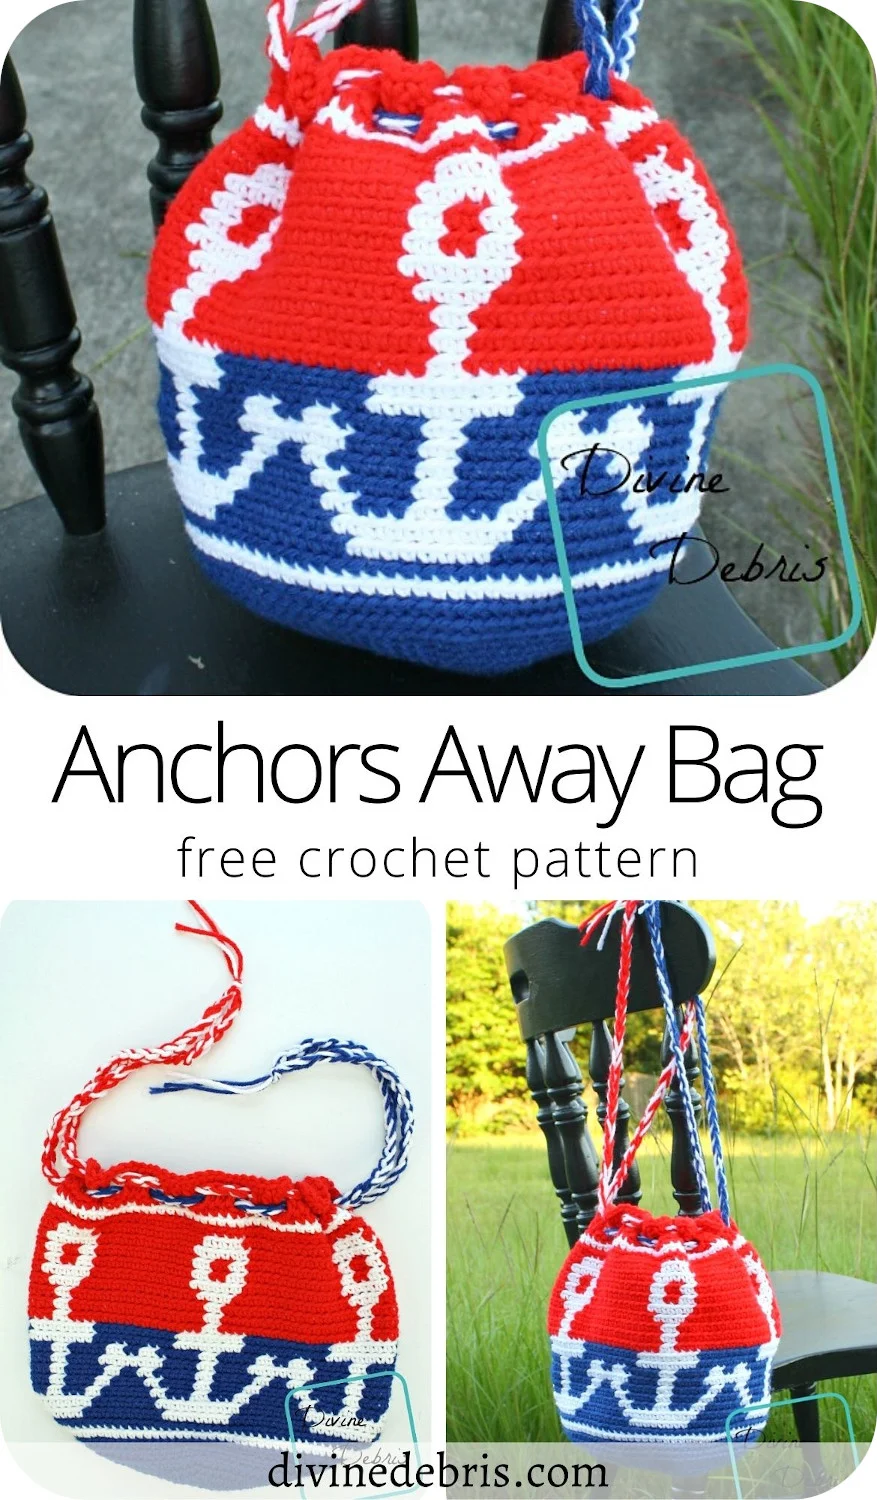
Happy Tuesday! How are you this fine week? Me? Oh, I’m just trying to get things done and have some good yarny fun. This week I designed something that would be great for the Forth of July coming up here in the US or at least I think it would. That’s why I used the colors I did, red, white and blue, but you can do as many or as few colors as you’d like. This would also be a great bag for those friends of yours, or yourself, who love nautical themed designs. Either way, I hope you like it!
If you appreciate my weekly patterns, please consider purchasing the Anchors Away Bag pdf in my Ravelry shop to help me bring more patterns to my blog.
Thank you to all my Patreon supporters.
Materials:
- US G (4.00 mm) crochet hook
- US M (9.00 mm) crochet hook (optional)
- Worsted/ medium/ size #4 weight yarn
- 4 oz/ 368 yards total
- I used 3 different colors
- In Red Heart Super Saver and Bernat Super Value
- Yarn needle
Gauge:
- 4.5” x 4.5” = 19 dcs x 9 rows
Terms/ stitches used:
- Magic circle
- Ch: chain
- St: stitch
- Slip st: slip stitch
- Sc: single crochet
- Double crochet
Notes:
- This bag is worked in the round, with a slip st into the first st from the last st.
- The ch 1 at the beginning of the rows does not count as a stitch.
- This pattern is worked from the bottom up, the base is worked flat, the sides are then added (working into the back loop only) and then cinching top part. You then make the cords to weave through the cinching portion.
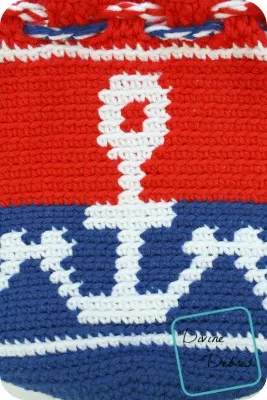
- All of the stitches in this pattern as single crochets, because of this the sides portion (where all the color changes are) only tells you how many stitches to do in what color, this is what the number in the parentheses means.
- Rather than changing, cutting, and weaving in the ends of all the colors, the yarn is carried through the bags in the photos. Here’s a great tutorial on color changes. In this pattern, the active yarn is worked over the inactive.
- Also check out this post about tapestry crochet from Moogly, it’s helpful.
- You will need to know how to work into the back loop only for this pattern, the sides are worked into the back loop only.
- This wouldn’t be that hard to adapt, the multiple for the anchor is 18. If you want to make it larger, just keep adding rows on the base and make sure your last row is a multiple of 18, such as 108 or 126.
- Color A is blue, Color B is white and Color C is red in the photos here.
Finished measurements:
- Height: 8.25″ (top of bag to base)
- Diameter: 11″ (laid flat)
Pattern instructions
Base:
Row 1: Color A: Create a magic circle, ch 1, sc 6 times into the circle, slip st into the first st to secure – 6 scs
Row 2: Ch 1, sc twice into the same st as join, *sc twice into the next st,* repeat from * to * 4 more times, slip st into the first st to secure – 12 scs
Row 3: Ch 1, sc once into the same st as join, sc twice into the next st, *sc once into the next st, sc twice into the next st,* repeat from * to * 4 more times, slip st into the first st to secure – 18 scs
Row 4: Ch 1, sc once into the same st as join, sc once into the next st, sc twice into the next st, *sc once into the next 2 sts, sc twice into the next st,* repeat from * to * 4 more times, slip st into the first st to secure – 24 scs
Row 5: Ch 1, sc once into the same st as join, sc once into the next 2 sts, sc twice into the next st, *sc once into the next 3 sts, sc twice into the next st,* repeat from * to * 4 more times, slip st into the first st to secure – 30 scs
Row 6: Ch 1, sc once into the same st as join, sc once into the next 3 sts, sc twice into the next st, *sc once into the next 4 sts, sc twice into the next st,* repeat from * to * 4 more times, slip st into the first st to secure – 36 scs
Row 7: Ch 1, sc once into the same st as join, sc once into the next 4 sts, sc twice into the next st, *sc once into the next 5 sts, sc twice into the next st,* repeat from * to * 4 more times, slip st into the first st to secure – 42 scs
Row 8: Ch 1, sc once into the same st as join, sc once into the next 5 sts, sc twice into the next st, *sc once into the next 6 sts, sc twice into the next st,* repeat from * to * 4 more times, slip st into the first st to secure – 48 scs
Row 9: Ch 1, sc once into the same st as join, sc once into the next 6 sts, sc twice into the next st, *sc once into the next 7 sts, sc twice into the next st,* repeat from * to * 4 more times, slip st into the first st to secure – 54 scs
Row 10: Ch 1, sc once into the same st as join, sc once into the next 7 sts, sc twice into the next st, *sc once into the next 8 sts, sc twice into the next st,* repeat from * to * 4 more times, slip st into the first st to secure – 60 scs
Row 11: Ch 1, sc once into the same st as join, sc once into the next 8 sts, sc twice into the next st, *sc once into the next 9 sts, sc twice into the next st,* repeat from * to * 4 more times, slip st into the first st to secure – 66 scs
Row 12: Ch 1, sc once into the same st as join, sc once into the next 9 sts, sc twice into the next st, *sc once into the next 10 sts, sc twice into the next st,* repeat from * to * 4 more times, slip st into the first st to secure – 72 scs
Row 13: Ch 1, sc once into the same st as join, sc once into the next 10 sts, sc twice into the next st, *sc once into the next 11 sts, sc twice into the next st,* repeat from * to * 4 more times, slip st into the first st to secure – 78 scs
Row 14: Ch 1, sc once into the same st as join, sc once into the next 11 sts, sc twice into the next st, *sc once into the next 12 sts, sc twice into the next st,* repeat from * to * 4 more times, slip st into the first st to secure – 84 scs
Row 15: Ch 1, sc once into the same st as join, sc once into the next 12 sts, sc twice into the next st, *sc once into the next 13 sts, sc twice into the next st,* repeat from * to * 4 more times, slip st into the first st to secure – 90 scs
Row 16: Ch 1, sc into the same st as join and into the next 89 sts, slip st into the first st to secure – 90 scs
From this point on:
- All the stitches in the side will be worked into the back loop only.
- All of the stitches in the sides portion only tell you how many stitches to do in what color, this is what the number in the parenthesis means.
- The first st is worked into the same st as join.
Rows 17 – 18: Color A: Ch 1, sc into the same st as join and into the next 89 sts, slip st into the first st to secure – 90 scs
Row 19: Color B: Ch 1, sc into the same st as join and into the next 89 sts, slip st into the first st to secure – 90 scs
Row 20: Color A: Ch 1, sc into the same st as join and into the next 89 sts, slip st into the first st to secure – 90 scs
Row 21: Color A: Ch 1, (5), Color B: (8), *Color A: (10), Color B: (8),* repeat from * to * 3 more times, Color A: (5), slip st into the first st to secure – 90 scs
Row 22: Color A: Ch 1, (4), Color B: (10), *Color A: (8), Color B: (10),* repeat from * to * 3 more times, Color A: (4), slip st into the first st to secure – 90 scs
Row 23: Color A: Ch 1, (3), Color B: (2), Color A: (3), Color B: (2), Color A: (3), Color B: (2), *Color A: (6), Color B: (2), Color A: (3), Color B: (2), Color A: (3), Color B: (2),* repeat from * to * 3 more times, Color A: (3), slip st into the first st to secure – 90 scs
Row 24: Color A: Ch 1, (2), Color B: (2), Color A: (4), Color B: (2), Color A: (4), Color B: (2), *Color A: (4), Color B: (2), Color A: (4), Color B: (2), Color A: (4), Color B: (2),* repeat from * to * 3 more times, Color A: (2), slip st into the first st to secure – 90 scs
Row 25: Color A: Ch 1, (1), Color B: (2), Color A: (5), Color B: (2), Color A: (5), Color B: (2), *Color A: (2), Color B: (2), Color A: (5), Color B: (2), Color A: (5), Color B: (2),* repeat from * to * 3 more times, Color A: (1), slip st into the first st to secure – 90 scs
Row 26: Color B: Ch 1, (4), Color A: (4), Color B: (2), Color A: (4), *Color B: (8), Color A: (4), Color B: (2), Color A: (4),* repeat from * to * 3 more times, Color B: (4), slip st into the first st to secure – 90 scs
Row 27: Color A: Ch 1, (1), Color B: (2), Color A: (5), Color B: (2), Color A: (5), Color B: (2), *Color A: (2), Color B: (2), Color A: (5), Color B: (2), Color A: (5), Color B: (2),* repeat from * to * 3 more times, Color A: (1), slip st into the first st to secure – 90 scs
Rows 28 – 29: Color A: Ch 1, (5) Color B: (8), *Color A: (10), Color B: (8),* repeat form * to * 3 more times, Color A: (5), slip st into the first st to secure – 90 scs
Fasten off Color A.
Rows 30 – 32: Color C: Ch 1, (8), Color B: (2), *Color C: (16), Color B: (2),* repeat from * to * 3 more times, Color C: (8), slip st into the first st to secure – 90 scs
Row 33: Color C: Ch 1, (7), Color B: (4), *Color C: (14), Color B: (4),* repeat from * to * 3 more times, Color C: (7), slip st into the first st to secure – 90 scs
Row 34: Color C: Ch 1, (6), Color B: (6), *Color C: (12), Color B: (6),* repeat from * to * 3 more times, Color C: (6), slip st into the first st to secure – 90 scs
Rows 35 – 36: Color C: Ch 1, (6), Color B: (2), Color C: (2), Color B: (2), *Color C: (12), Color B: (2), Color C: (2), Color B: (2),* repeat from * to * 3 more times, Color C: (6), slip st into the first st to secure – 90 scs
Row 37: Color C: Ch 1, (6), Color B: (6), *Color C: (12), Color B: (6),* repeat from * to * 3 more times, Color C: (6), slip st into the first st to secure – 90 scs
Row 38: Color C: Ch 1, (7), Color B: (4), *Color C: (14), Color B: (4),* repeat from * to * 3 more times, Color C: (7), slip st into the first st to secure – 90 scs
Row 39: Color C: Ch 1, sc into the same st as join and into the next 89 sts, slip st into the first st to secure – 90 scs
Row 40: Color B: Ch 1, sc into the same st as join and into the next 89 sts, slip st into the first st to secure – 90 scs
Row 41: Color C: Ch 1, sc into the same st as join and into the next 89 sts, slip st into the first st to secure – 90 scs
Row 42: Color C: Ch 3 (counts as a dc), dc into the next 2 sts, ch 2, skip the next 2 sts, *dc into the next 3 sts, ch 2, skp the next 2 sts,* repeat from * to * 16 more times, slip st into the top of the ch 3 to secure – 54 dcs
Row 43: Color C: Ch 1, sc into the same st as join and into the next 89 sts (this includes dcs and ch spaces), slip st into the first st to secure – 90 scs
Fasten off Colors B and C, weave in all your ends.
Cords:
The cords for this bag are super simple, they’re just two strands of yarn and a ch row. I used a M (9.00) mm crochet hook and chained 75 chs, which came out to 41″ (which includes the ends too, which I made long for this bag so they will look like tassels). Make two cords in the manner just described.
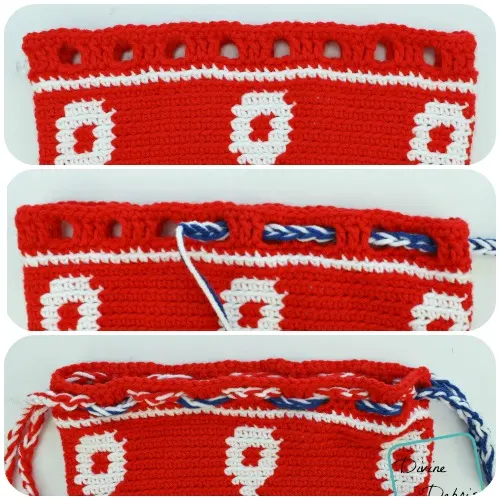
Just weave your cords through the ch spaces in row 42, as demonstrated on the photo above.
So that’s it! I hope you like this bag. See ya next week.
This post is linked to Hookin’ on Hump Day #121 and Linky Ladies Community Link Party #57.



Shelly White
Wednesday 22nd of March 2017
I love this bag. My daughter's birthday is July 4th so I love everything red, white, and blue. Plus her's, her dad's, and my birthstones are ruby, diamond, and sapphire.
Free Anchor Bag Tote Pattern – Crochet
Wednesday 7th of September 2016
[…] Here is the free pattern. […]
Stephanie
Monday 8th of August 2016
Hello, I am fairly new at crocheting. Can you explain the last half of the pattern starting at color B and how to put the anchors on? Thank you
Divine Debris
Monday 8th of August 2016
Hi! This pattern is an intermediate pattern, which involves knowing how to do tapestry crochet. The notes section has some links and info on tapestry crochet, which is how the anchors are created.
teri lucas
Sunday 3rd of July 2016
I am having an issue on row 25, I checked my count, re-checked it and had someone else check it.. but I am still off on something, I had to slightly add a sc in every space between the anchors in order to keep them from not lining up. Was just wondering if maybe I missed something somewhere, Thank you so much, this has been a super fun project!!
Divine Debris
Friday 8th of July 2016
Teri, Hi! Sorry about that. The repeat should have been the first Color A (1), not (2). I've fixed that and checked over the rest of the pattern to make sure it's ok too. Let me know if you have any more troubles. Sorry about the delay on the reply.
paula gaumer tooke
Tuesday 21st of June 2016
I have wanted to learn how to make bags like this forever. Thank you SO MUCH for making it a free pattern . . . just iin case I can't do it :(