Wow, can you believe that today is Christmas? I didn’t even realize that my final pattern of 2018 would fall on Christmas but it kinda makes this design awesome-er. Right?
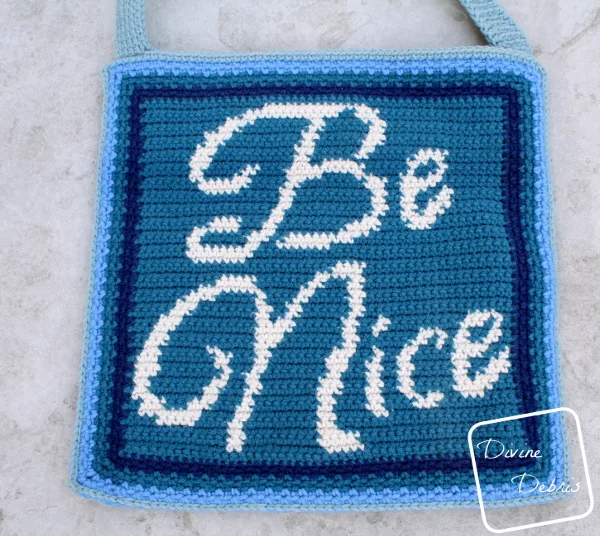
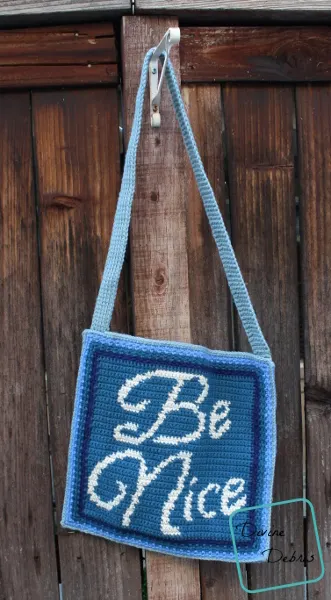
Be nice, get on the nice list, nice… nice… nice… Doesn’t it feel like you hear the nice word so much this time of year? It should be more common all times of year though. I made this design to take with me out into the world to remind myself (and others) that being nice shouldn’t be just so you get presents from Santa, you should be nice because other people matter regardless. Being nice takes you no extra energy. Doing nice things for others, like saying thank you to people who bring your food to you, or holding a door for a stranger is so simple but can change someone’s day.
Alright, enough of my soap boxing. I really think about those things though, ya know? I work retail and this time of year has everyone very stressed out and it always upsets me when I see or hear from people I work with the abuse that is thrown at them from customers. I know that it’s hard for everyone out there but being nice or kind isn’t much work. And, I’m not a very good people-person, I kinda prefer to stay home and crochet than to go out and talk to people, but that doesn’t mean I’m not nice when I can be. I hope you take the time to be nice when you can and as crocheters, we know how much work goes into something that others might not appreciate. Ever given a handmade gift to a family member who just shrugs it off? Ouch, right? Just think about how you’d want to be treated and see the humanity in someone else.
Ok, now I’m done soap boxing.
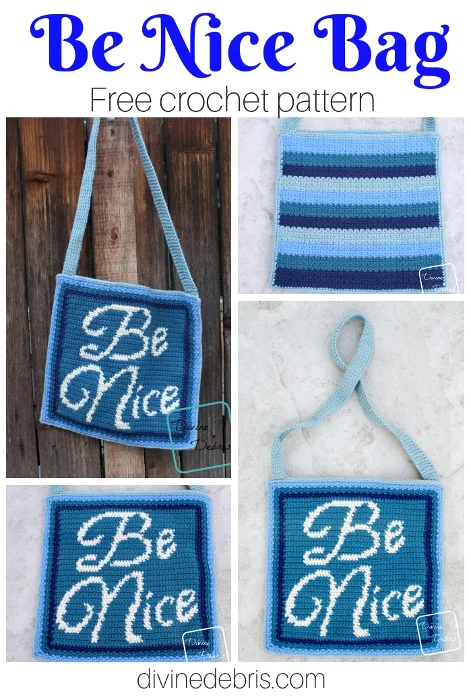
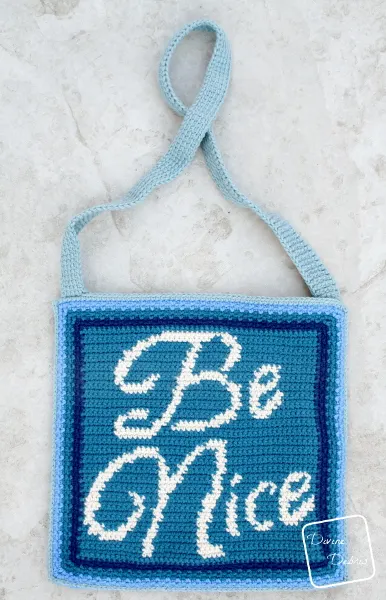
When I was working up this pattern I wasn’t sure if I wanted it to be a bag like my Drink Coffee Bag or a Pillow like my Craft Pillow – I opted for the bag in this case but I think it’d make such a great pillow that I included the instructions for a pillow below. It’s really not that hard to make this from a bag to a pillow but I think it’s nice to include options (I’m always into changing things up and putting my own spin on them anyway).
I really hope you like this design and share the link with your friends. Don’t forget to use the hashtag #DivineDebris or tag me in the photo when you share your projects <3
(This post may contain affiliate links)
If you appreciate my weekly patterns I hope you’d consider purchasing an ad-free pdf of this pattern in my Ravelry shop.

A HUGE thank you to all my patrons on Patreon!
Learn how you can get 4 patterns a month and become a patron here for as low as $2.50 a month.
Materials
- US G (4.00 mm) crochet hook
- Worsted/ medium/ size #4 weight yarn
- 2 – 5 colors
- I used Caron One Pound and misc stash colors
- Yarn needle
Gauge
- 19 rows x 18 sts = 4″
Terms/stitches used
- Rnd: round
- RS: right side
- BLO/FLO: Back loop/front loop only
- Ch: chain
- St: stitch
- Slip st: slip stitch
- Sc: single crochet
Notes
- This pattern is worked in 4 sections: the Front Piece, the Back Piece, Securing, and the Strap. The Front and Back are worked back and forth in rows, with a turn at the beginning/ end of the row. The Securing goes around 3 of the 4 edges to secure the Front and Back Pieces together and then the a strap is added to the open side.
- The ch 1 at the beginning of the row does not count as a stitch.
- If you’re working this as a pillow, you’ll need Polyfill to fill your pillow (it’s not in the materials above).
- You’re going to need to know how to create a slipknot on your hook for this pattern.
- All of the stitches on the Front Piece of this pattern are single crochets. The directions will only tell you what color (ie: Color A, Color B, etc…) and the number in the parentheses will tell you how many single crochets to make.
- In the example, the inactive yarn is carried behind the active. If this is confusing, you might want to check out the helpful Moogly video on tapestry.
- The Strap section uses Tunisian crochet stitches: FP: forward pass, RP: return pass, and TSS: Tunisian simple st.
- For the Front Piece: color A is blue (Caron One Pound in Ocean) and color B is off-white (Caron One Pound in Off-White), color C is dark blue (Caron One Pound in Midnight Blue), color D is light blue (Caron One Pound in Pale Royal Blue), and color E is gray blue (Caron One Pound in Azure).
Finished product dimensions (approx)
Height 13.75″
Width 13.75″
Pattern instructions:
– Front Piece –
Row 1: A: Ch 50, sc into the second ch from the hook and into the next 48 sts – 49 sc
Note:
- The following directions will only tell you what color (ie: Color A, Color B, etc…) and the number in the parentheses tells you how many stitches to make.
(RS) Row 2: A: Ch 1, turn, (19), B: (5), A: (10), B: (2), A: (13) – 49 sc
Row 3: A: Ch 1, turn, (13), B: (2), A: (9), B: (5), A: (20) – 49 sc
Row 4: A: Ch 1, turn, (22), B: (3), A: (9), B: (2), A: (13) – 49 sc
Row 5: A: Ch 1, turn, (4), B: (5), A: (4), B: (2), A: (9), B: (2), A: (23) – 49 sc
Row 6: A: Ch 1, turn, (16), B: (2), A: (5), B: (2), A: (8), B: (2), A: (4), B: (8), A: (2) – 49 sc
Row 7: A: Ch 1, turn, (2), B: (3), A: (3), B: (3), A: (3), B: (2), A: (8), B: (2), A: (4), B: (2), A: (4), B: (3), A: (10) – 49 sc
Row 8: A: Ch 1, turn, (4), B: (3), A: (2), B: (2), A: (1), B: (2), A: (3), B: (2), A: (4), B: (2), A: (8), B: (1), A: (3), B: (2), A: (6), B: (3), A: (1) – 49 sc
Row 9: A: Ch 1, turn, (1), B: (2), A: (7), B: (2), A: (3), B: (2), A: (7), B: (3), A: (3), B: (2), A: (2), B: (2), A: (5), B: (5), A: (3) – 49 sc
Row 10: A: Ch 1, turn, (2), B: (3), A: (1), B: (2), A: (5), B: (2), A: (2), B: (2), A: (3), B: (3), A: (7), B: (2), A: (2), B: (2), A: (8), B: (2), A: (1) – 49 sc
Row 11: A: Ch 1, turn, (1), B: (3), A: (8), B: (1), A: (2), B: (2), A: (8), B: (2), A: (3), B: (2), A: (2), B: (2), A: (5), B: (2), A: (2), B: (3), A: (1) – 49 sc
Row 12: A: Ch 1, turn, (1), B: (2), A: (3), B: (2), A: (5), B: (2), A: (2), B: (2), A: (2), B: (3), A: (7), B: (2), A: (3), B: (2), A: (7), B: (3), A: (1) – 49 sc
Row 13: A: Ch 1, turn, (1), B: (3), A: (7), B: (2), A: (3), B: (2), A: (7), B: (3), A: (3), B: (1), A: (2), B: (2), A: (5), B: (4), A: (2), B: (1), A: (1) – 49 sc
Row 14: A: Ch 1, turn, (3), B: (5), A: (1), B: (1), A: (2), B: (2), A: (3), B: (1), A: (2), B: (3), A: (8), B: (2), A: (4), B: (2), A: (6), B: (2), A: (2) – 49 sc
Row 15: A: Ch 1, turn, (2), B: (3), A: (11), B: (3), A: (8), B: (2), A: (7), B: (2), A: (1), B: (1), A: (1), B: (2), A: (2), B: (2), A: (2) – 49 sc
Row 16: A: Ch 1, turn, (2), B: (1), A: (3), B: (1), A: (2), B: (3), A: (5), B: (1), A: (2), B: (2), A: (7), B: (4), A: (11), B: (2), A: (3) – 49 sc
Row 17: A: Ch 1, turn, (3), B: (3), A: (10), B: (5), A: (6), B: (2), A: (2), B: (2), A: (9), B: (3), A: (1), B: (1), A: (2) – 49 sc
Row 18: A: Ch 1, turn, (2), B: (4), A: (10), B: (1), A: (3), B: (2), A: (6), B: (2), A: (1), B: (2), A: (9), B: (3), A: (4) – 49 sc
Row 19: A: Ch 1, turn, (5), B: (3), A: (8), B: (2), A: (2), B: (2), A: (6), B: (2), A: (19) – 49 sc
Row 20: A: Ch 1, turn, (19), B: (2), A: (6), B: (2), A: (2), B: (2), A: (7), B: (3), A: (6) – 49 sc
Row 21: A: Ch 1, turn, (7), B: (4), A: (5), B: (1), A: (4), B: (2), A: (5), B: (2), A: (19) – 49 sc
Row 22: A: Ch 1, turn, (19), B: (2), A: (4), B: (2), A: (5), B: (8), A: (9) – 49 sc
Row 23: A: Ch 1, turn, (11), B: (5), A: (7), B: (2), A: (3), B: (2), A: (19) – 49 sc
Row 24: A: Ch 1, turn, (19), B: (6), A: (24) – 49 sc
Row 25: A: Ch 1, turn, (26), B: (4), A: (19) – 49 sc
Row 26: A: Ch 1, turn, (34), B: (7), A: (8) – 49 sc
Row 27: A: Ch 1, turn, (7), B: (9), A: (33) – 49 sc
Row 28: A: Ch 1, turn, (23), B: (7), A: (2), B: (2), A: (6), B: (2), A: (7) – 49 sc
Row 29: A: Ch 1, turn, (7), B: (2), A: (6), B: (3), A: (2), B: (9), A: (20) – 49 sc
Row 30: A: Ch 1, turn, (18), B: (4), A: (8), B: (2), A: (3), B: (6), A: (8) – 49 sc
Row 31: A: Ch 1, turn, (10), B: (4), A: (3), B: (2), A: (9), B: (4), A: (4), B: (3), A: (10) – 49 sc
Row 32: A: Ch 1, turn, (9), B: (5), A: (3), B: (2), A: (10), B: (2), A: (18) – 49 sc
Row 33: A: Ch 1, turn, (18), B: (2), A: (11), B: (2), A: (2), B: (2), A: (1), B: (3), A: (8) – 49 sc
Row 34: A: Ch 1, turn, (7), B: (3), A: (2), B: (2), A: (2), B: (2), A: (10), B: (2), A: (19) – 49 sc
Row 35: A: Ch 1, turn, (19), B: (2), A: (10), B: (2), A: (2), B: (2), A: (3), B: (2), A: (7) – 49 sc
Row 36: A: Ch 1, turn, (7), B: (1), A: (2), B: (4), A: (2), B: (2), A: (10), B: (2), A: (5), B: (5), A: (9) – 49 sc
Row 37: A: Ch 1, turn, (8), B: (7), A: (5), B: (2), A: (8), B: (3), A: (2), B: (5), A: (9) – 49 sc
Row 38: A: Ch 1, turn, (8), B: (2), A: (2), B: (2), A: (3), B: (3), A: (4), B: (5), A: (5), B: (2), A: (4), B: (2), A: (7) – 49 sc
Row 39: A: Ch 1, turn, (7), B: (2), A: (5), B: (2), A: (4), B: (10), A: (6), B: (1), A: (3), B: (1), A: (8) – 49 sc
Row 40: A: Ch 1, turn, (8), B: (1), A: (1), B: (3), A: (7), B: (4), A: (2), B: (2), A: (11), B: (3), A: (7) – 49 sc
Row 41: A: Ch 1, turn, (7), B: (3), A: (11), B: (2), A: (6), B :(2), A: (6), B: (4), A: (8) – 49 sc
Row 42: A: Ch 1, turn, (17), B: (2), A: (6), B: (3), A: (10), B: (3), A: (8) – 49 sc
Row 43: A: Ch 1, turn, (9), B: (3), A: (10), B: (2), A: (6), B: (3), A: (16) – 49 sc
Row 44: A: Ch 1, turn, (16), B: (2), A: (7), B: (2), A: (9), B: (4), A: (9) – 49 sc
Row 45: A: Ch 1, turn, (11), B: (3), A: (9), B: (2), A: (6), B: (2), A: (16) – 49 sc
Row 46: A: Ch 1, turn, (16), B: (3), A: (5), B: (2), A: (7), B: (4), A: (12) – 49 sc
Row 47: A: Ch 1, turn, (14), B: (13), A: (2), B: (3), A: (17) – 49 sc
Row 48: A: Ch 1, turn, (18), B: (14), A: (17) – 49 sc
Fasten off color B.
Row 49: A: Ch 1, turn, (49) – 49 sc
Fasten off, weave in all your ends.
Border
Create a slipknot on your hook with color C and with the right side facing you, being in the lower left-hand corner.
(RS) Rnd 1: C: Sc into the next 49 sts (this is the other side of the original chain row), ch 2 at the corner, rotate your whole piece, sc into the next 49 row ends, ch 2 at the corner, rotate your whole piece, sc into the next 49 sts (of row 49), ch 2 at the corner, rotate your whole piece, sc into the next 49 row ends, ch 2 at the corner, rotate your whole piece, slip st into the first st – 196 sc, 4 ch-2 spaces
Rnd 2: C: Ch 1, sc into the same st as join, *BLO sc into the next st, sc into the next st,* repeat from * to * 23 more times, [sc, ch 2, sc] into the ch-2 space, rotate your whole piece, sc into the next st, *BLO sc into the next st, sc into the next st,* repeat from * to * 23 more times, [sc, ch 2, sc] into the ch-2 space, rotate your whole piece, sc into the next st, *BLO sc into the next st, sc into the next st,* repeat from * to * 23 more times, [sc, ch 2, sc] into the ch-2 space, rotate your whole piece, sc into the next st, *BLO sc into the next st, sc into the next st,* repeat from * to * 23 more times, [sc, ch 2, sc] into the ch-2 space, rotate your whole piece, slip st into the first st – 204 sc, 4 ch-2 spaces
Fasten off color C.
Rnd 3: A: Ch 1, sc into the same st as join, BLO sc into the next st, *sc into the next st, BLO sc into the next st,* repeat from * to * 23 more times, [sc, ch 2, sc] into the ch-2 space, rotate your whole piece, BLO sc into the next st, *sc into the next st, BLO sc into the next st,* repeat from * to * 24 more times, [sc, ch 2, sc] into the ch-2 space, rotate your whole piece, BLO sc into the next st, *sc into the next st, BLO sc into the next st,* repeat from * to * 24 more times, [sc, ch 2, sc] into the ch-2 space, rotate your whole piece, BLO sc into the next st, *sc into the next st, BLO sc into the next st,* repeat from * to * 24 more times, [sc, ch 2, sc] into the ch-2 space, rotate your whole piece, sc BLO into the next st, slip st into the first st – 212 sc, 4 ch-2 spaces
Rnd 4: A: Ch 1, sc into the same st as join, *BLO sc into the next st, sc into the next st,* repeat from * to * 24 more times, [sc, ch 2, sc] into the ch-2 space, rotate your whole piece, sc into the next st, *BLO sc into the next st, sc into the next st,* repeat from * to * 25 more times, [sc, ch 2, sc] into the ch-2 space, rotate your whole piece, sc into the next st, *BLO sc into the next st, sc into the next st,* repeat from * to * 25 more times, [sc, ch 2, sc] into the ch-2 space, rotate your whole piece, sc into the next st, *BLO sc into the next st, sc into the next st,* repeat from * to * 25 more times, [sc, ch 2, sc] into the ch-2 space, rotate your whole piece, sc into the next st, sc BLO into the next st, slip st into the first st – 220 sc, 4 ch-2 spaces
Fasten off color A.
Rnd 5: D: Ch 1, sc into the same st as join, BLO sc into the next st, *sc into the next st, BLO sc into the next st,* repeat from * to * 24 more times, [sc, ch 2, sc] into the ch-2 space, rotate your whole piece, BLO sc into the next st, *sc into the next st, BLO sc into the next st,* repeat from * to * 26 more times, [sc, ch 2, sc] into the ch-2 space, rotate your whole piece, rotate your whole piece, BLO sc into the next st, *sc into the next st, BLO sc into the next st,* repeat from * to * 26 more times, [sc, ch 2, sc] into the ch-2 space, rotate your whole piece, rotate your whole piece, BLO sc into the next st, *sc into the next st, BLO sc into the next st,* repeat from * to * 26 more times, [sc, ch 2, sc] into the ch-2 space, rotate your whole piece, sc BLO into the next st, sc into the next st, sc BLO into the next st, slip st into the first st – 228 sc, 4 ch-2 spaces
Rnd 6: D: Ch 1, sc into the same st as join, *BLO sc into the next st, sc into the next st,* repeat from * to * 25 more times, [sc, ch 1, sc] into the ch-2 space, sc into the next st, *BLO sc into the next st, sc into the next st,* repeat from * to * 27 more times, [sc, ch 1, sc] into the ch-2 space, rotate your whole piece, sc into the next st, *BLO sc into the next st, sc into the next st,* repeat from * to * 27 more times, [sc, ch 1, sc] into the ch-2 space, rotate your whole piece, sc into the next st, *BLO sc into the next st, sc into the next st,* repeat from * to * 27 more times, [sc, ch 1, sc] into the ch-2 space, rotate your whole piece, sc into the next st, sc BLO into the next st, sc into the next st, sc BLO into the next st, slip st into the first st – 236 sc, 4 ch-1 spaces
Fasten off, weave in your ends.
– Back Piece –
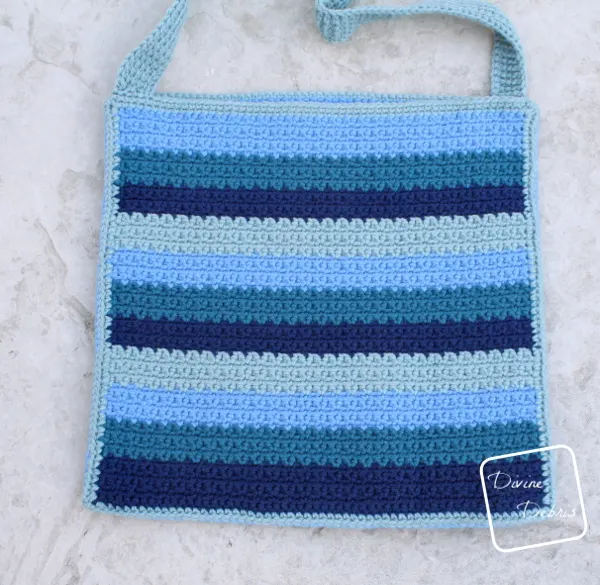
Note: you can make this in any color combination you’d like or you could use it as a stash buster like I did on my Smiling Pumpkins Pillow. If you want to follow the color pattern I did: rows 1 – 6 color C, rows 7 – 11 color A, rows 12 – 16 color D, rows 17 – 21 color E, rows 22 – 26 color C, rows 27 – 31 color A, rows 32 – 36 color D, rows 37 – 41 color E, rows 42 – 46 color C, rows 47 – 51 color A, and rows 52 – 57 color D.
Row 1: Ch 58, sc into the second ch from the hook and into the next 56 sts – 57 sc
(RS) Row 2: Ch 1, turn, sc into the first st, *sc BLO into the next st, sc into the next st,* repeat from * to * 27 more times – 57 sc
Row 3: Ch 1, turn, sc into the first st, *sc FLO into the next st, sc into the next st,* repeat from * to * 27 more times – 57 sc
Rows 4 – 57: repeat rows 2 – 3, 27 times
Fasten off, weave in your ends.
Border
Create a slipknot on your hook with color E and with the right side facing you, being in the lower left-hand corner.
(RS) Rnd 1: E: Sc twice into the first st, into the next 55 sts, sc twice into the last st, (this is the other side of the original chain row), ch 1 at the corner, rotate your whole piece, sc twice into the first row end, sc into the next 55 row ends, sc twice into the last row end, ch 1 at the corner, rotate your whole piece, sc twice into the first st, sc into the next 55 sts (of row 57), ch 1 at the corner, rotate your whole piece, sc twice into the first row end, sc into the next 55 row ends, sc twice into the last row end, ch 1 at the corner, rotate your whole piece, slip st into the first st – 236 sc, 4 ch-1 spaces
Fasten off, weave in your end
– Securing –
For a pillow
Lay the wrong side of both of your piece against each other so that the corners line up and begin in the bottom left-hand corner. You will be working into both pieces. Create a slipknot on your hook with color E.
Rnd 1: E: *Slip st the next 59 sts, sc twice into the ch-1 space, rotate your whole piece,* repeat from * to * 3 more times, slip st into the first st. Fasten off, weave in your ends.
For a purse
Lay the wrong side of both of your piece against each other so that the corners line up and begin in the top left-hand corner ch-1 space. You will be working into both pieces. Create a slipknot on your hook with color E.
Rnd 1: E: Sc twice into the first ch-1 space, *slip st the next 59 sts, sc twice into the ch-1 space, rotate your whole piece,* repeat from * to * 2 more times, slip st into the first st. Fasten off, weave in your ends.
Rnd 2: Create a slipknot on your hook with color E, start in the first unworked sc of rnd 1 of the Border on the Back piece, sc into the next 59 sts, flip your piece so you’re working along the unworked sts of rnd 6 of the Border on the Front piece, sc into the next 59 sts, slip st into the first st – 118 sc
Fasten off, weave in your ends.
– Strap –
For this portion I used Tunisian crochet, feel free to just make sc or any other strap methods you’d like. Create a slipknot on your hook with color E and skip 5 sts back from where you fastened off Rnd 2 of the Securing instructions.
(FP) Row 1: Pull up a loop in the next 5 sts (6 loops on hook)
(RP) Row 1: Ch 1, *yarn over, pull through 2 loops* repeat from * to * 4 times
(FP) Row 2: TSS into the next 4 sts, insert hook in last st under two outer vertical bars, pull up a loop (6 loops on hook)
(RP) Row 2: Ch 1, *yarn over, pull through 2 loops* repeat from * to * 4 times
Rows 3 – 137 (or until desired length): repeat row 2
Fasten off leaving a long tail. Use the tail to secure the other side of your strap to the last 5 sts of the Back piece from rnd 2 of the Securing instructions.
Tada! There it is. I hope you like this bag (or pillow if you make one)! Don’t forget to share your photos on IG with hashtag #DivineDebris!



Debbie McIntosh Diplock
Monday 30th of December 2019
I love this bag and would love to make it but I can't read a pattern, is there a tutorial for this bag please
Divine Debris
Tuesday 31st of December 2019
Hi! Outside of the pattern written here, there is no other tutorial :)
Christine
Friday 16th of August 2019
I love this bag. However, I would love to make one that say's "Be Kind" as well. Would you have a simple way to do that?
Thank you for all of your fun patterns.
Divine Debris
Friday 16th of August 2019
Hi! You could make the Be Kind Wall Hanging twice and sew it together to make a bag and add a strap like the one on this bag http://18.116.24.40/kindness-costs-you-nothing/
I hope that helps!