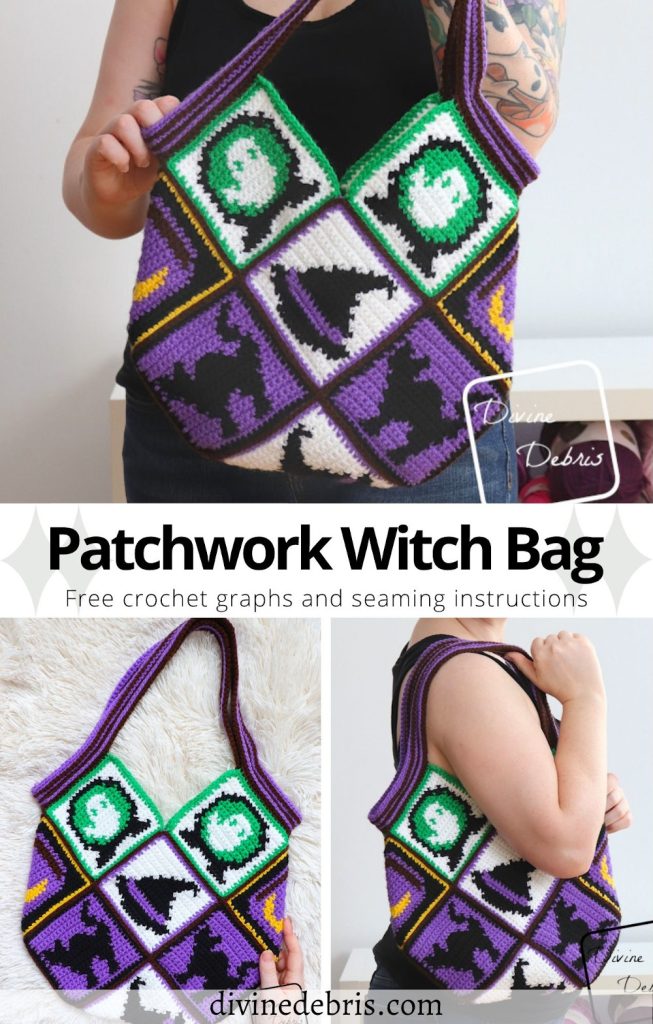
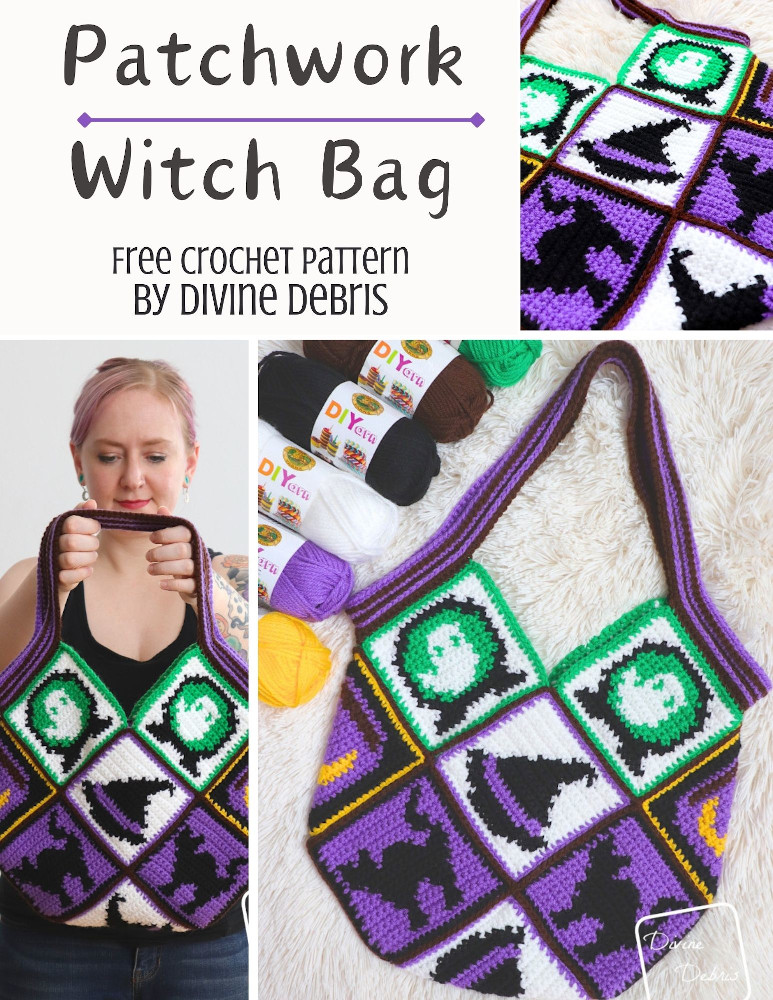
I love Halloween, as many of you know. I spend months thinking about what to make for Halloween and then the entire season I regret how fast it goes by. One of these days I may just skip the non-Halloween parts of the year and commit full-time to Halloween. Or maybe not, that might be too much. Until that time comes (or not) September is Halloween season and that means a new design, like this week’s Patchwork Witch Bag crochet pattern!
Like many of my other bags of the last couple of years, this one features 13 individually worked squares. It is really so amazing to me how one style can make a variety of cute designs! It’s all about how creative you want to be… and in this instance I want to be super Halloween creative 😀
Like I said above, this bag is worked in 13 individual squares (in rows of single crochet stitches from the bottom up). When you’re done with your 13 squares, you seam them up in to an almost hour glass shape and then you fold that in half and seam up the sides to make your new bag. A set of straps are added, worked in the round directly onto the bag, to finish your design. It’s truly fabulous construction method and allows for a lot of fun customization (if you want).
Below you’re going to find some photos of the Spell Book Square (RS and WS) so you can see how I worked them. You don’t have to do exactly as I do when working these squares, these are just for a bit more insight (and people always ask to see the WS of squares). For this bag I primarily used intarsia and didn’t work over carried yarn in the squares as I don’t like that look and think it bulks up the ends. But do believe in doing what works for you and what you’re most comfortable using. And as always, blocking can help even out the imperfections in the squares as well as anything that could go all weird in the straps and seaming sections.
Anyway, I hope you like this new pattern and it gets you all excited for Halloween. I can’t wait to make more Halloween patterns this season, I have so many ideas 😀 Speaking of which, next week the B-sides for this bag will be released with some squares that didn’t make the cute for the design but I still love.
Thank you, as always, for your support and I hope you like this new bag. If you’d like to buy the pdf for this pattern, it’s available now on Ravelry.
Please note: I was provided the yarn for this pattern by Lion Brand Yarn for the purposes of designing the Patchwork Witch Bag crochet pattern, with compensation. I wasn’t provided the yarn with the expectations of positive or negative reviews but I’ve used DIYarn so many ties and I really enjoyed it, it’s a great worsted weight yarn and feels very durable. And you can purchase this pattern as a kit from Lion Brand Yarn here.
This post contains affiliate links. If you purchase yarn through any of the links in this post, I may be compensated. This post contains affiliate links. If you purchase yarn through any of the links in this post, I may be compensated. And do not make videos using my patterns.
Copyright @ Divine Debris 2026. No part of this document may be reproduced or transmitted in any form by any means, electronic, mechanical, photocopying, or otherwise, without prior written permission from the author. Sales of finished products are permitted, but the designer requests that you link back to the pattern and credit Divine Debris with the original design under the Creative Commons Attribution-Share Alike license. If you have any questions, comments or concerns please contact info@divinedebris.com.
(this post contains affiliate links)
If you appreciate my patterns I hope you’d consider purchasing an ad-free pdf of this pattern in my Ravelry shop and Lovecrafts shop!
Where to purchase the Patchwork Witch Bag crochet pattern



![[Image description] Top down look at a selection of the squares from the Patchwork Witch Bag on a white background with a white woman's hands working on a square and skeins of yarn in the top right corner of the photo.](https://d3gel9wqxksnxm.cloudfront.net/wp-content/uploads/2026/09/Witch-Bag-964x756-1.jpg)
Level
Intermediate (need to know how to read a graph and do color work)
Materials
- US G (4.00 mm) crochet hook
- 6 colors worsted weight/ size #4 yarn
- Color A (purple): 2 oz/ 130 yds
- Color B (black): 2 oz/ 130 yds
- Color C (white): 2 oz/ 130 yds
- Color D (green): 1 oz/ 65 yds
- Color E (brown): <1 oz/ <65 yds
- Color F (yellow): <1 oz/ <65 yds
- I used DIYarn by Lion Brand Yarn for this pattern
- Notions: scissors, measuring tape, yarn needle
Gauge
- 19 sc x 19 rows = 4” (blocked)
Terms/ Stitches used
- St: Stitch
- Ch: Chain
- Rnd: Round
- Slip st: Slip Stitch
- Sc: Single crochet
- RS: Right Side/ WS: Wrong Side
Notes
- You can purchase the easy to print version of this pattern for a fee in my Ravelry shop.
- This pattern is worked in 3 sections: the Squares, the Assembly (where the seaming is), and the Straps.
- There are 4 different squares used in the pattern and 13 squares are used in total.
- For the squares: begin with a ch 20 in your first color, turn, and start in the 2nd ch from the hook. Each row begins with a “ch 1, turn” and all st counts are 19 sc.
- The odd rows are the RS.
- The squares are worked from the bottom up in rows, with turns at the beginning of the rows.
- Each square has a Border, which you add once the square is done, and you use the Border to seam.
- The ch 1 at the beginning of the rows does not count as a stitch.
- To conserve yarn, the main color is not used throughout each square, instead all colors are used only where required and dropped down the WS when not in use. See blow for further information.
- Your squares may not be perfectly square when you’re done, but the Border and blocking (which is highly suggested) can help this. The seaming can also even out some size inconsistency
- Blocking is suggested for this pattern.
- In the photos: Color A is purple, color B is black, color C is white, color D is green, color E is brown, and color F is yellow and DIYarn by Lion Brand Yarn was used for all colors. Buy the kit for this pattern on Lion Brand’s website here.
Blocked Patchwork Witch Bag Crochet Pattern Finished Product Details (approx)
| Squares (including border) | Bag |
| 4.4” across 4.4” high | 13” across (at widest) 13” high (not including straps) |

Notes on carrying yarn on the Patchwork Witch Bag crochet pattern
For yarn conservation and clarity purposes, none of the colors used in the squares were carried/ crocheted over. Instead I used “bobbins” or individual stands of color for the other color or colors for all the squares.
Below are 2 close up photos of the Spell Book Square showing the 4 colors of the square being used at the same time. Each color is attached to a separate skein of yarn and used only where the colors are called for as you work across the square, dropping the yarn when not in use down the WS. Just drop the color and pick it back up as you work back and forth across the squares (just change colors on the final pull through of the sc).
![[Image description] Up-close photo of the right side Spell Book Square from the Patchwork Witch Bag.](https://d3gel9wqxksnxm.cloudfront.net/wp-content/uploads/2026/09/Witch-Bag-1000x786-1.jpg)
![[Image description] Up-close photo of the wrong side Spell Book Square from the Patchwork Witch Bag.](https://d3gel9wqxksnxm.cloudfront.net/wp-content/uploads/2026/09/Witch-Bag-1000x787-1.jpg)
When carrying the inactive yarn with the RS facing, make sure it’s behind the previous row’s stitches. And when carrying the inactive yarn with the WS facing, make sure it’s in front of the previous row’s stitches.
Don’t pull the carried yarn too tight or let it hang loose (try to keep it even with the stitches), as it can distort your square’s final look. Blocking may help even out some distortion or bulkiness of the center that may occur.
Remember: Your squares may not be perfectly square when you’re done, but the border and blocking (which is highly suggested) can help this. The seaming can also even out some size inconsistency.
Patchwork Witch Bag Crochet Pattern
![[Image description] The Patchwork Witch Bag on a white fuzzy background and a white woman's hand holding the bottom right corner.](https://d3gel9wqxksnxm.cloudfront.net/wp-content/uploads/2026/09/Witch-Bag-692x1000-1.jpg)
Cat Square Graph
Make 4
Key: Color A is purple and color B is black. (this key only applies to this square)
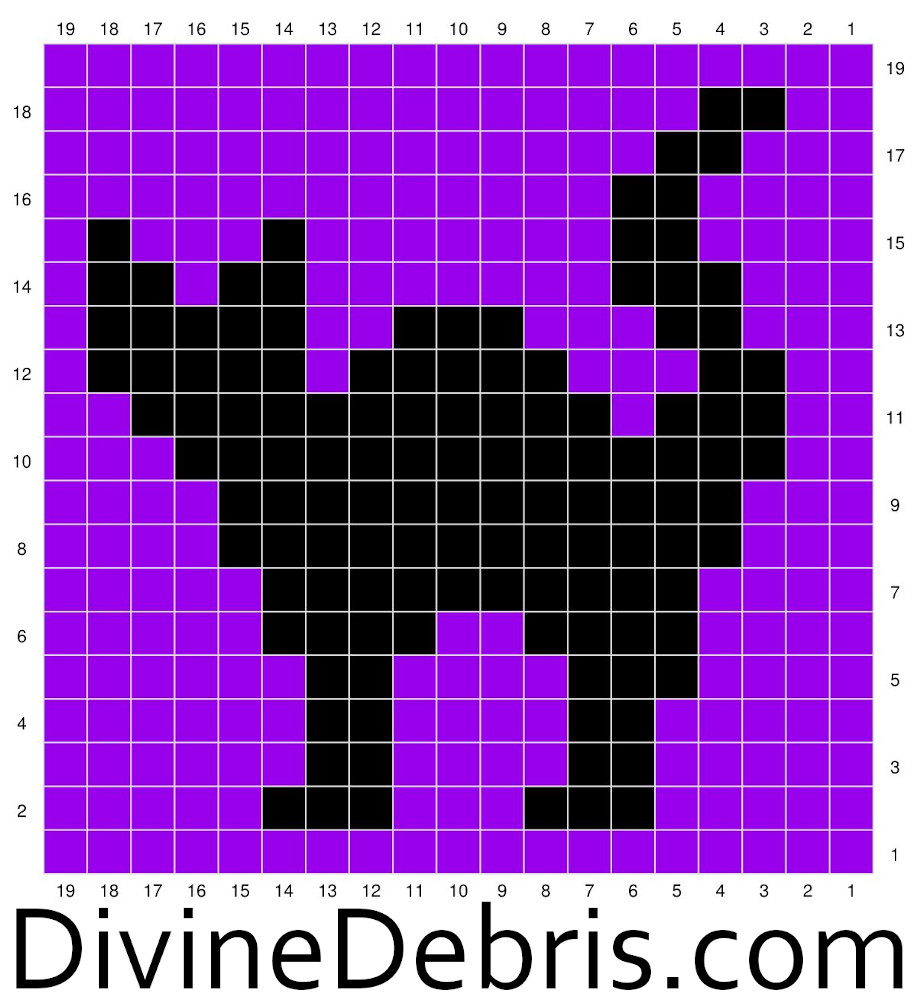
For the squares: begin with a ch 20 in color A, turn, and start in the 2nd ch from the hook. Each row begins with a “ch 1, turn” and all st counts are 19 sc.
Border
With the RS facing you, join color B in the first st on the other side of Row 1 of the coaster.
Row 1: B: Ch 1, sc into the next 19 sts, ch 1 at the corner, sc into the next 19 row ends, ch 1 at
the corner, sc into the next 19 sts of Row 19, ch 1 at the corner, sc down the next 19 row ends,
ch 1 at the corner, join with a slip st – 76 sc, 4 ch-1 spaces
Fasten off, weave in your ends. Block so your square measures 4.4” x 4.4”.
Ghost Crystal Ball Square Graph
Make 4
Key: Key: Color A is white, color B is black, and color C is green. (this key only applies to this square)
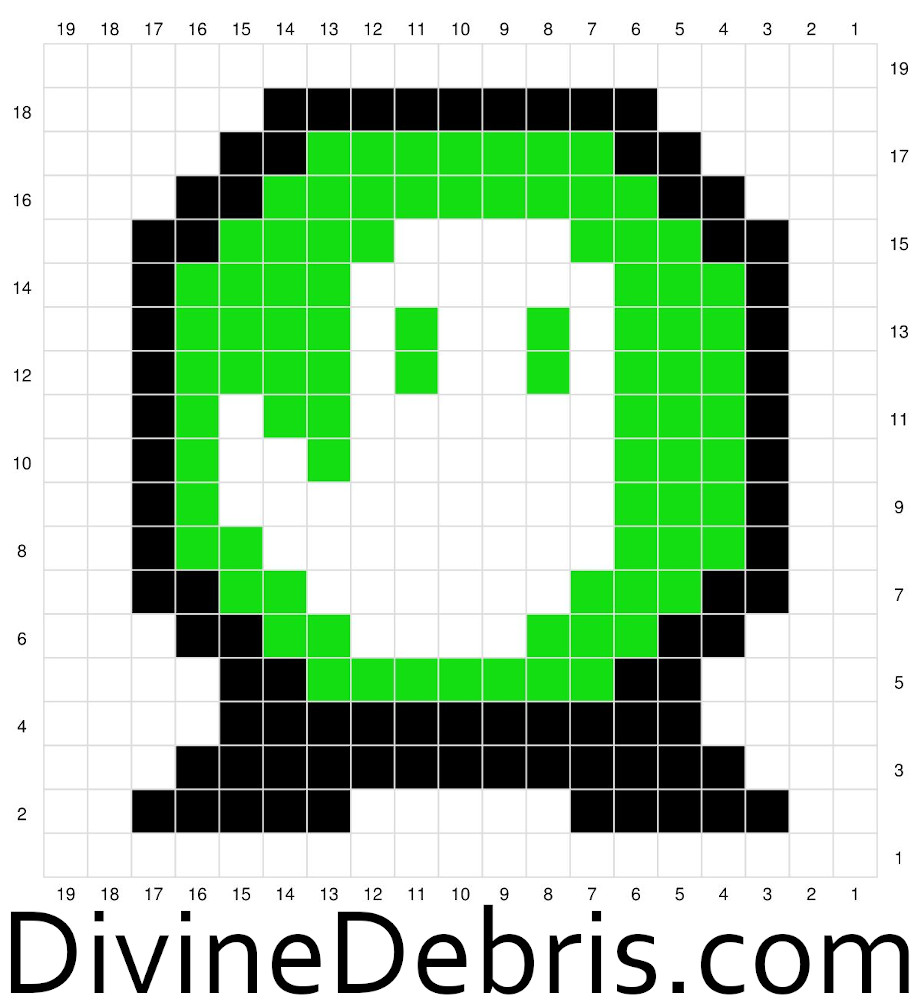
For the squares: begin with a ch 20 in color A, turn, and start in the 2nd ch from the hook. Each row begins with a “ch 1, turn” and all st counts are 19 sc.
Border
With the RS facing you, join color B in the first st on the other side of Row 1 of the coaster.
Row 1: B: Ch 1, sc into the next 19 sts, ch 1 at the corner, sc into the next 19 row ends, ch 1 at
the corner, sc into the next 19 sts of Row 19, ch 1 at the corner, sc down the next 19 row ends,
ch 1 at the corner, join with a slip st – 76 sc, 4 ch-1 spaces
Fasten off, weave in your ends. Block so your square measures 4.4” x 4.4”.
Witch Hat Square Graph
Make 3
Key: Color A is white, color B is black, and color C is purple. (this key only applies to this square)
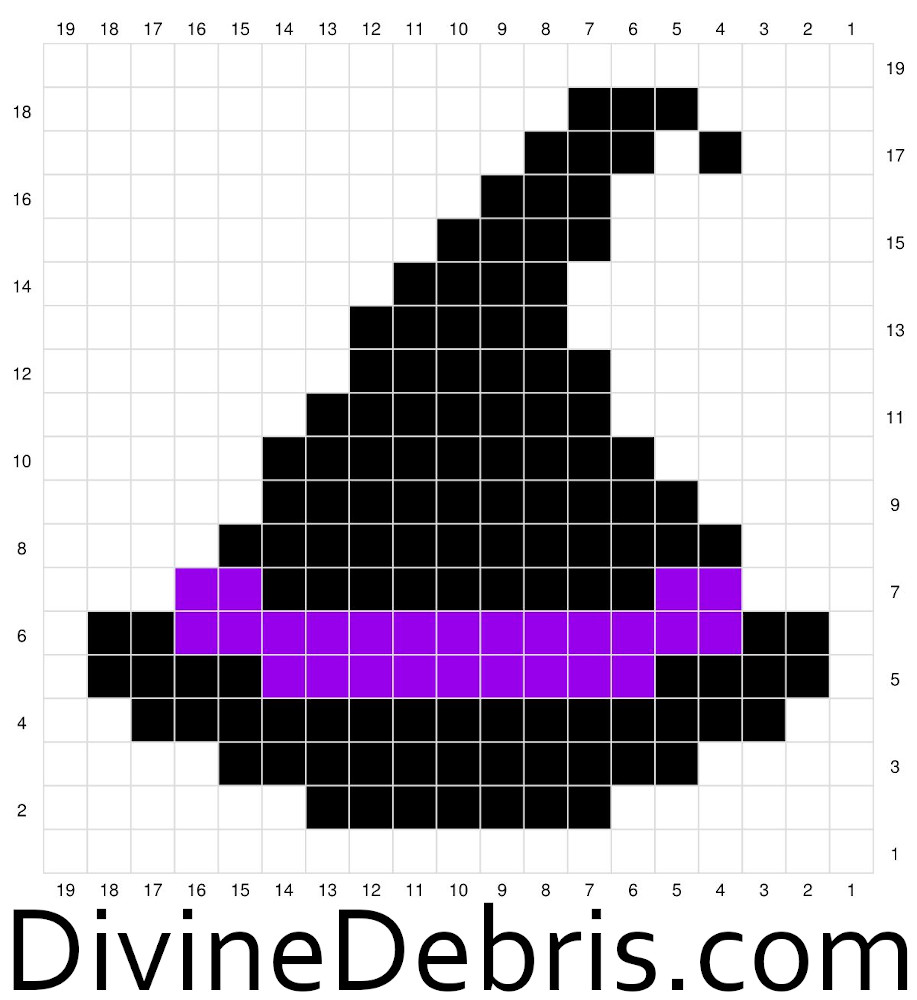
For the squares: begin with a ch 20 in color A, turn, and start in the 2nd ch from the hook. Each row begins with a “ch 1, turn” and all st counts are 19 sc.
Border
With the RS facing you, join color C in the first st on the other side of Row 1 of the coaster.
Row 1: C: Ch 1, sc into the next 19 sts, ch 1 at the corner, sc into the next 19 row ends, ch 1 at
the corner, sc into the next 19 sts of Row 19, ch 1 at the corner, sc down the next 19 row ends,
ch 1 at the corner, join with a slip st – 76 sc, 4 ch-1 spaces
Fasten off, weave in your ends. Block so your square measures 4.4” x 4.4”.
Spell Book Graph
Make 2
Key: Color A is black, color B is purple, color C is brown, and color D is yellow
(this key only applies to this square).
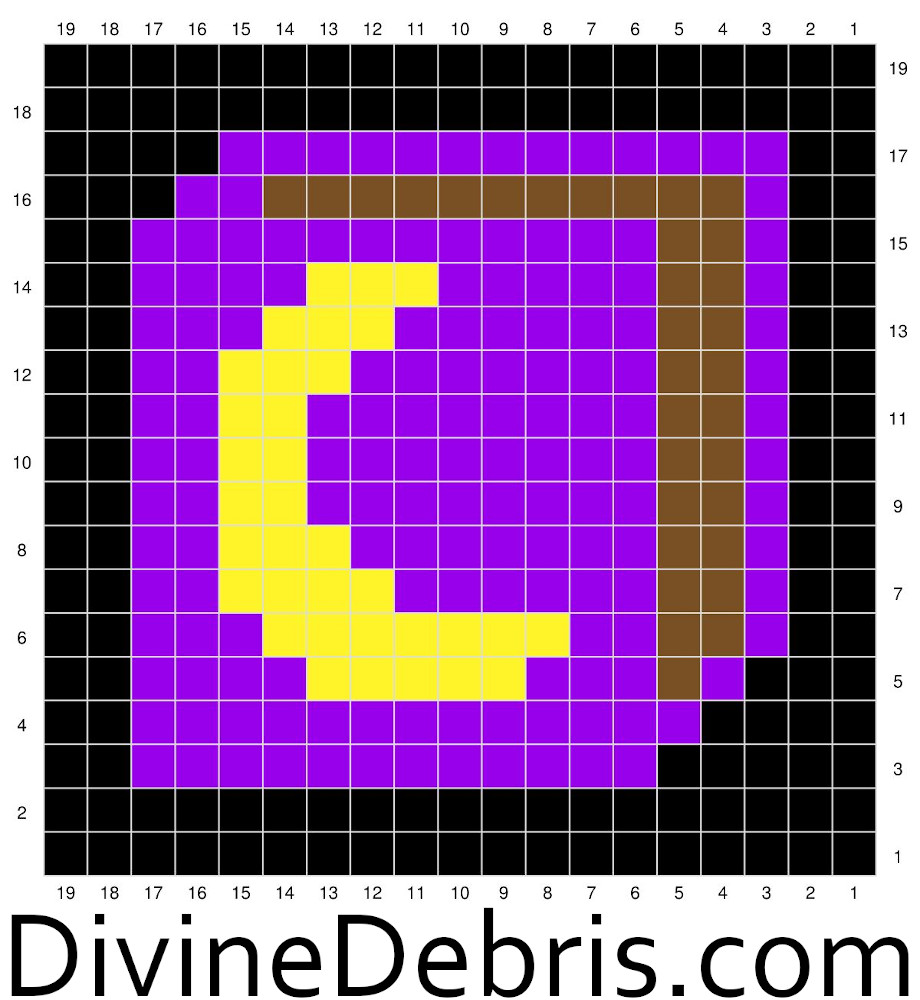
For the squares: begin with a ch 20 in color A, turn, and start in the 2nd ch from the hook. Each row begins with a “ch 1, turn” and all st counts are 19 sc.
Border
With the RS facing you, join color D in the first st on the other side of Row 1 of the coaster.
Row 1: D: Ch 1, sc into the next 19 sts, ch 1 at the corner, sc into the next 19 row ends, ch 1 at
the corner, sc into the next 19 sts of Row 19, ch 1 at the corner, sc down the next 19 row ends,
ch 1 at the corner, join with a slip st – 76 sc, 4 ch-1 spaces
Fasten off, weave in your ends. Block so your square measures 4.4” x 4.4”.
Assembly
- You should have a total of 13 squares (4 Ghost Crystal Balls, 4 Cats, 3 Witch Hats, and 2 Spell Books)
- You can use any method of seaming for this section. I used a back loop only slip st.
- Fasten off between each seam and weave in your ends securely.
- Be sure to also seam the ch1 at the corners of each square.
To better visualize how you need to assemble your bag, lay your squares in rows of: 2, 1, 2, 1, 2, 3, 2, with the first 3 rows of squares upside down. You want them to be upside down because when you seam the bag along the middle single square, they’ll all be facing up the same way. See the photo below for reference.
![[Image description] Patchwork Witch Bag assembly photo 1 - all 13 squares are seamed and are laying on an wooden background](https://d3gel9wqxksnxm.cloudfront.net/wp-content/uploads/2026/09/Witch-Bag-727x1000-1.jpg)
When your Bag is seamed to match the photo on the previous above, flip it over so that the wrong side is facing you like the photo below.
Follow Steps 1 – 3 on how to finish seaming the sides of your bag.
![[Image description] Patchwork Witch Bag assembly photo 1 - all 13 squares are seamed and are laying on an wooden background](https://d3gel9wqxksnxm.cloudfront.net/wp-content/uploads/2026/09/Witch-Bag-751x1000-1.jpg)
Step 1: Fold your bag along the dark blue line in the center so it looks like the photo below.
![[Image description] Patchwork Witch Bag assembly photo 3 - the 13 squares have been folded in half for further seaming.](https://d3gel9wqxksnxm.cloudfront.net/wp-content/uploads/2026/09/Witch-Bag-1000x724-1.jpg)
Step 2: Seam the green edges to the teal edges on the right-hand side of the bag. The photo below shows how it will line up.
![[Image description] Patchwork Witch Bag assembly photo 4 - close up on how to fold the right-hand side.](https://d3gel9wqxksnxm.cloudfront.net/wp-content/uploads/2026/09/Witch-Bag-777x1000-1.jpg)
Step 3: Seam the pink edges to the yellow edges on the left-hand side of the bag. The photo below shows how it will line up.
![[Image description] Patchwork Witch Bag assembly photo 5 - close up on how to fold the left-hand side.](https://d3gel9wqxksnxm.cloudfront.net/wp-content/uploads/2026/09/Witch-Bag-741x1000-1.jpg)
When your bag is seamed, it should look like the photo below.
Weave in all your ends. You can block the bag or the seams at this time if you’d like.
Move onto the Straps.
![[Image description] Patchwork Witch Bag assembly photo 6 - the body of the bag should now be complete](https://d3gel9wqxksnxm.cloudfront.net/wp-content/uploads/2026/09/Witch-Bag-1000x964-1.jpg)
Patchwork Witch Bag Straps
![[Image description] Patchwork Witch Bag Straps photo 1 - the body of the bag is complete and this shows where to start the straps](https://d3gel9wqxksnxm.cloudfront.net/wp-content/uploads/2026/09/Witch-Bag-1000x541-1.jpg)
![[Image description] Patchwork Witch Bag Straps photo 2 - close up on where to to start the straps](https://d3gel9wqxksnxm.cloudfront.net/wp-content/uploads/2026/09/Witch-Bag-1000x514-1.jpg)
In the left photo above, the blue arrow shows which side you need to start your straps on and in the right photo, the green arrow shows you where you start your first st (not the ch 1 at the corner).
![[Image description] Patchwork Witch Bag Straps photo 3 - photo showing where to skip a space for the straps](https://d3gel9wqxksnxm.cloudfront.net/wp-content/uploads/2026/09/Witch-Bag-500x320-1.jpg)
The photo above shows you (in purple) how you go up the square from where you joined your yarn, skip across a space (this is where the strap is) and work down another square. You will repeat this on the other side of the bag to create 2 straps.
Rnd 1: With color E (brown), pull up a loop in the indicated by the green arrow in the photo above (the first st, not the ch 1, to the left of the seam you made when you did Step 2 of the Assembly), sc into the next 19 sts of the square you’re on, ch 70, skip the ch 1 and next 19 sts on this square, skip where the 3 squares are joined and move to the next square to the left, skip the next 19 sts and ch 1 on the corner and sc into the next 19 sts of this square, moving to the other side of the bag, skip the ch 1 at the corner and where the 3 squares are joined and move to the next square to the left, skip ch 1 at the corner and sc into the next 19 sts of this square, ch 70, skip the ch 1 and next 19 sts on this square, skip where the 3 squares are joined and move to the next square to the left, skip the next 19 sts and ch 1 on the corner and sc into the next 19 sts of this square, skip the ch 1 at the corner and where the 3 squares are joined, join with a slip st – 76 sc, 2 ch 70 spaces
Rnd 2: E: Ch 1, turn, sc around (this includes sc and chs), join – 216 sc
Rnd 3: E: Ch 1, turn, sc around, join – 216 sc
Fasten off, color E, switch to color A (purple)
Rnds 4 – 5: A: Ch 1, turn, sc around, join – 216 sc
Fasten off, weave in all your ends. Block this section if you’d like.
Optional
Add a rnd of slip sts to Rnd 2 of the Straps using color D, add a rnd of slip sts to Rnd 3
with color E, and add a rnd of slip sts to Rnd 4 in color B. This will not only add an extra
pop of color but it will help deal with stretch in the Straps.
![[Image description] A white woman stands in front of a white wall holding the Patchwork Witch Bag out toward the viewer.](https://d3gel9wqxksnxm.cloudfront.net/wp-content/uploads/2026/09/Witch-Bag-731x1000-1.jpg)
You can pick up written instructions for the Patchwork Witch Bag crochet pattern in my Ravelry shop.