Happy August friends! How are you handling the heat?
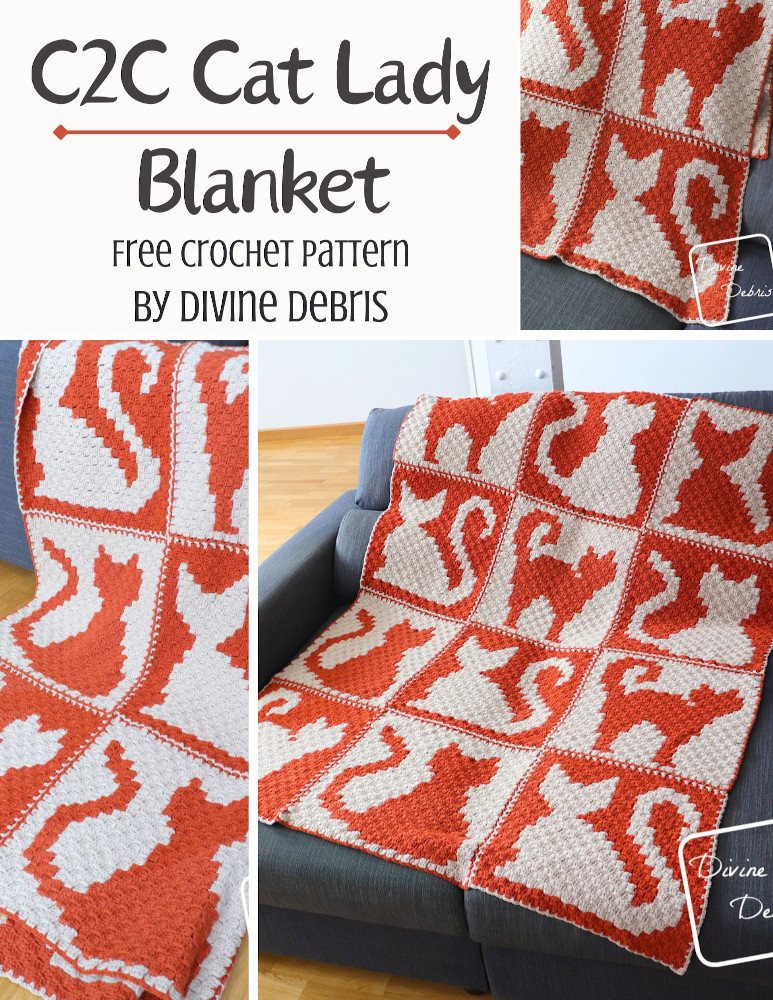
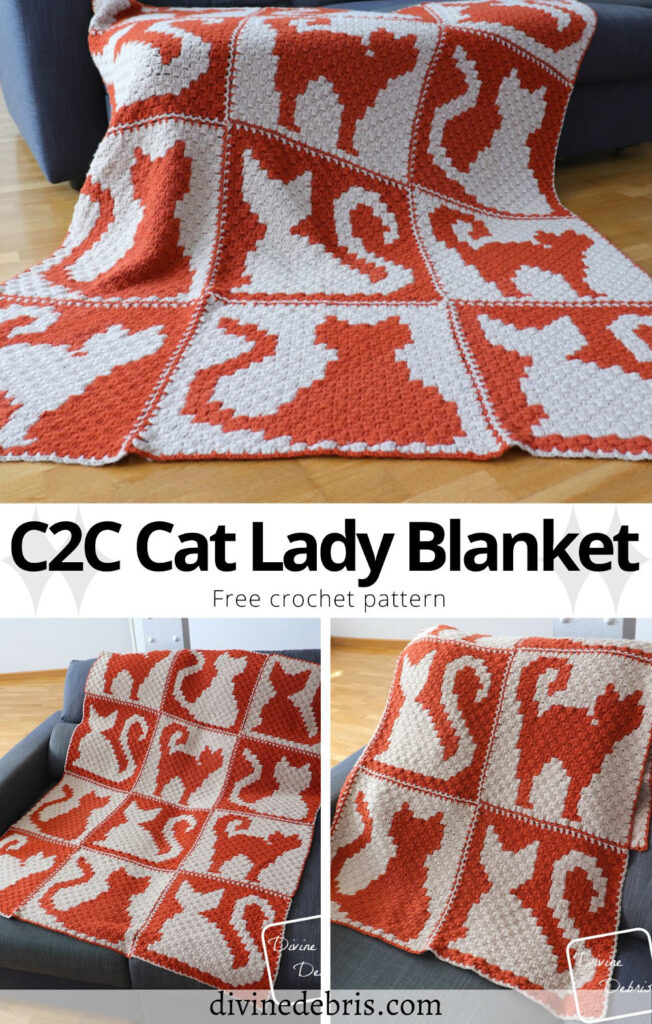
I know that I’m positively melting but that may be the peri, don’t know. But I do know it’s the perfect time to start some Fall projects, that way they’re ready for when it finally cools off. And that’s why I’ve released this week’s new C2C Cat Lady Blanket.
You may have already recognized it but yes, this is a variation on the Cat Lady Bag from 2024. That bag was so fun to make and so many other people liked it that I knew I wanted to make a blanket version of it some day. Of course, it took me more than 2 years to finally find the time to sit down and make some graph designs – with the two patterns being different techniques and different items (bag vs blanket) it wasn’t a 1 to 1 graph. Ya know?
And I am so, so excited about how this pattern has turned out. I made 6 different squares (because I find it easier to explain the inverse colors as as separate square rather than just a bunch of instructions) and arranged them in a fun checkerboard while alternating the cat designs. I know the blanket is a little wild but it’s a tribute to cats, so it fits don’t ya think? But luckily you can pick and chose the colors and squares you want to make your blanket in – it could be all one cat or all one color combination, you’re the crocheter it’s your work.
Now I’m glad I changed the technique for this blanket because I love C2C. Part of what makes C2C so fun is how it’s worked, on a bias or diagonal. You start in the bottom right-hand corner (or at least I do because I’m right-handed) and you increase at the beginning of the row for 24 rows, then you decrease every row until 37 and you’re left with a square. It’s lovely and so fun because all the blocks consist of 3 dc, so it’s a stitch you can probably already do.
For this pattern I didn’t carry the unused yarn all the way throughout the individual squares. I instead did a bit of a mix, using floats along the back as well as bobbins. But that’s how I made it, so you can decide how you’d like to make it. If you’d like to see a video of me carrying the yarn, here’s one on Instagram. Just remember, as long as you keep some slack in the carried yarn and make sure to block your final square (this is the steamer I use), it’ll work up a beautiful little cat square.
Overall, I do hope you like this new cat inspired pattern. It’s a fun little ode to our furry friends. I am a cat person and always have been, they’re definitely my favorite animal and I think they’re just a great inspiration 😀 And if you’d like to skip all the ads here find the written instructions, you can pick those up in my Ravelry shop. Pdf sales help me keep making patterns year after year. Thank you!
Please note: I was provided the yarn for this pattern by Lion Brand Yarn for the purposes of designing the C2C Cat Lady Blanket crochet pattern, with compensation. I’ve been using Pound of Love yarn for years and I love it. It works up really well and I love it for designing blanket patterns. This post contains affiliate links. If you purchase through any of the links in this post, I may be compensated. You can purchase a kit for this blanket pattern through Lion Brand Yarn’s website here.
Copyright @ Divine Debris 2024. No part of this document may be reproduced or transmitted in any form by any means, electronic, mechanical, photocopying, or otherwise, without prior written permission from the author. This explicitly includes making videos of the pattern for social media platforms. Sales of finished products are permitted, but the designer requests that you link back to the pattern and credit Divine Debris with the original design under the Creative Commons Attribution-Share Alike license. If you have any questions, comments or concerns please contact info@divinedebris.com.
(this post contains affiliate links)
If you appreciate my patterns I hope you’d consider purchasing an ad-free pdf of this pattern in my Ravelry shop and Lovecrafts shop!
Where to purchase the C2C Cat Lady Blanket Pattern


![[Image description] Top down look at 5 C2C Cat Lady Squares laying on a white background with a white woman's feet in the lower right-hand corner.](https://d3gel9wqxksnxm.cloudfront.net/wp-content/uploads/2026/08/cat-lady-blanket-wip.jpeg)
Level
Intermediate (need to know how to read a graph and corner to corner crochet)
Materials
- US G (4.00 mm) crochet hook
- Worsted/ medium/ size #4 weight yarn
- 2 colors
- Blanket: 29.6 oz/ 1887 yds ea color
- Square: 4.6 oz/ 293 yds (total)
- 1.7 oz – 2.9 oz/ 108 – 185 yds ea color
- I used Pound of Love by Lion Brand Yarn for this pattern.
- 2 skeins each of Pumpkin Spice and Sugar Cookie
- Notions: scissors, measuring tape, yarn needle
Gauge
- 6 blocks x 6 rows = 4.5″ (blocked)
Notes
- You can purchase the easy to print version of this pattern for a fee in my Ravelry shop.
- This is a C2C pattern consisting of 12 individually squares. Each square is worked from the bottom right corner to the top left corner and are the same amount of rows high vs blocks wide, so you don’t have to worry about increasing on one side and decreasing on the other.
- Each C2C block consists of a ch 3 and of 3 double crochets.
- If you’re unfamiliar with C2C be sure to check out a tutorial like this one by Meghan Makes Do.
- When all the squares are complete, you will create a border around the first one, and all the subsequent squares are joined using the border in a join-as-you-go method. Instructions can be found on the bottom of the post.
- In the sample the inactive yarn is not carried behind active yarn in the blocks. You can also carry the yarn, but be sure to leave enough slack that it doesn’t distort the square.
- Blocking is suggested for this pattern.
- The blanket features a checkerboard design, with the colors reversed every other square.
- The instructions (graph and written) are for 12 squares of each color arrangement. Feel free to adjust this as you’d like.
- For all squares you will be increasing Rows 1 – 24 and decreasing Rows 25 – 47.
- The squares without a border are 18” x 18” when completed and blocked, when seamed into the blanket the addition of the border brings the blanket’s overall measurement to approximately 54” x 72” – 57” x 76”.
- In the photos: Color A is orange (Pound of Love in Pumpkin Spice) and color B is tan (Pound of Love in Sugar Cookie).
- You can buy a kit for this pattern from Lion Brand Yarn here.
Blocked C2C Cat Lady Blanket Crochet Pattern Finished Product Details (approx not including fringe)
| Square | Blanket |
| 18” x 18” (not including border) | 54” x 72” – 57” x 76” (includes border) |

![[Image description] The C2C Cat Lady Blanket lays at an slight angle on a gray couch.](https://d3gel9wqxksnxm.cloudfront.net/wp-content/uploads/2026/08/Cat-Lady-Blanket-979x1000-1.jpg)
C2C Cat Lady Blanket Crochet Pattern
Cat Lady Blanket Square A1 Graph
Make 1
Key: color A is brown and color B is white.
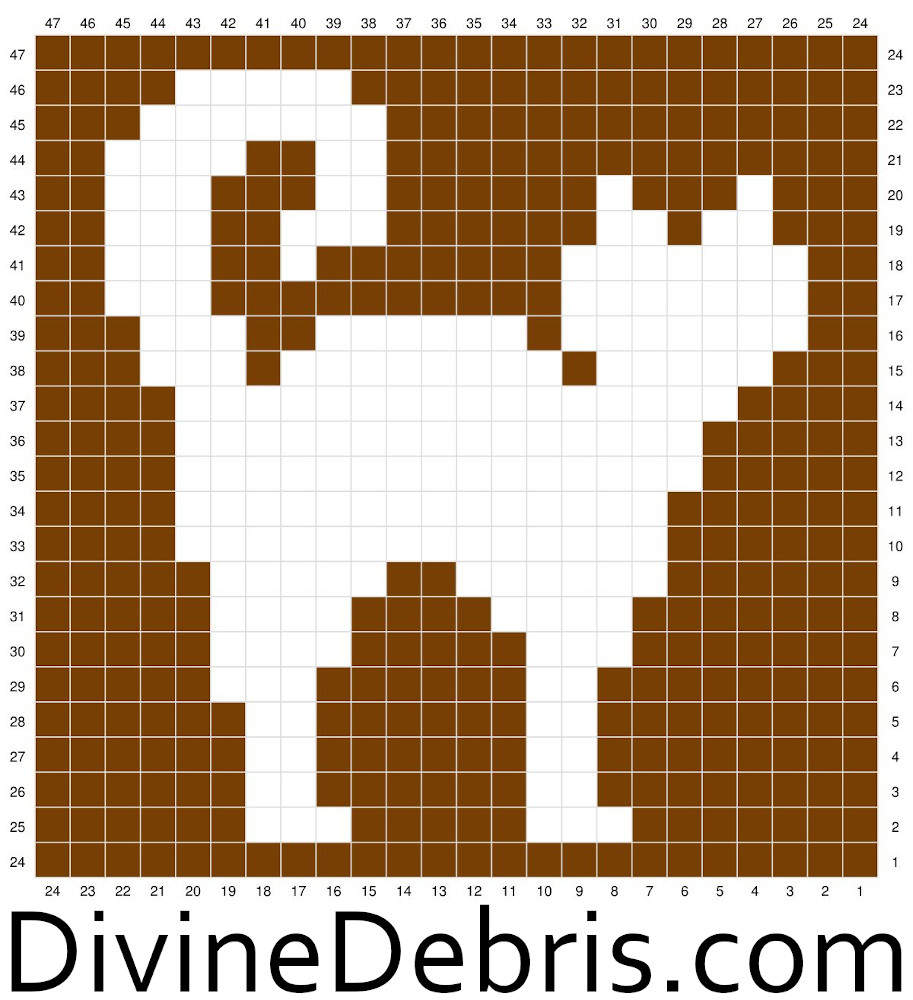
This square is worked from the bottom right-hand corner to the top left-hand corner. Rows 1 – 24 and decreasing Rows 25 – 47.
When you’re done with your square, block it so it measures 18″ x 18″ and then move onto the Border and Seaming instructions on the bottom of this page. If you’d like the written instructions for this pattern in an easy to follow pdf, you can purchase them on Ravelry here or buy the kit from Lion Brand Yarn here.
Cat Lady Blanket Square A2 Graph
Make 3
Key: color A is brown and color B is white.
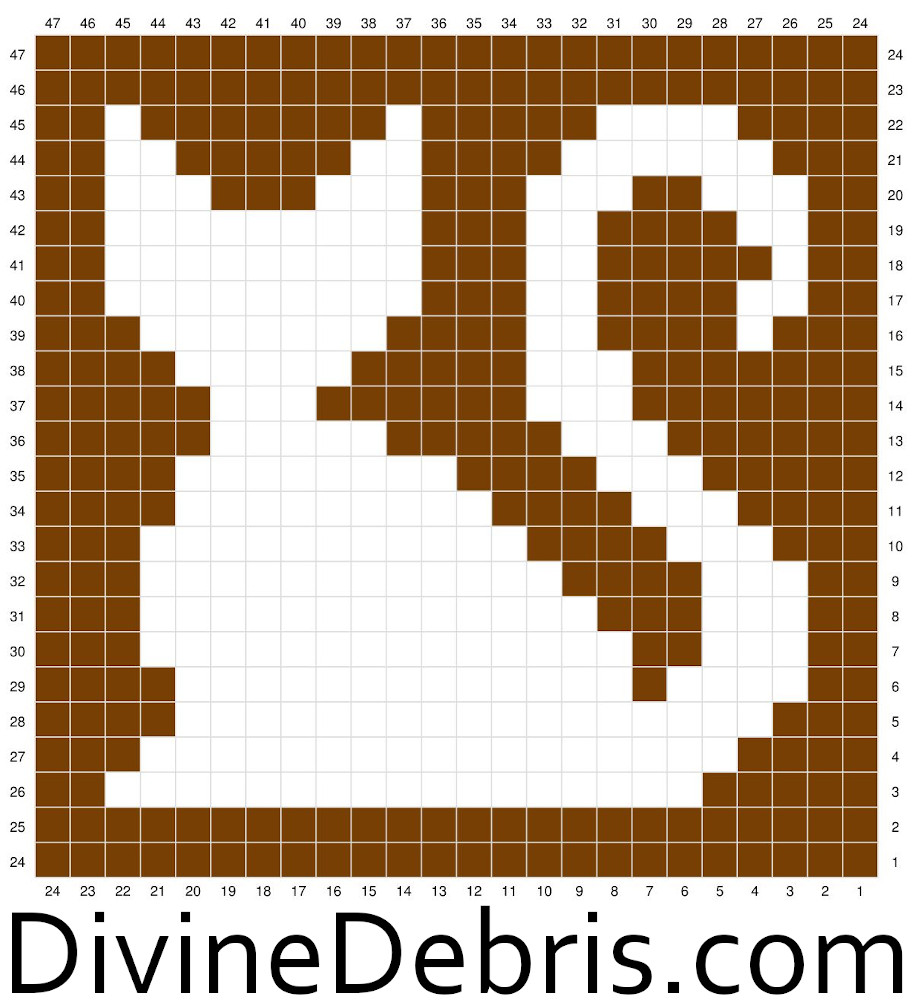
This square is worked from the bottom right-hand corner to the top left-hand corner. Rows 1 – 24 and decreasing Rows 25 – 47.
When you’re done with your square, block it so it measures 18″ x 18″ and then move onto the Border and Seaming instructions on the bottom of this page. If you’d like the written instructions for this pattern in an easy to follow pdf, you can purchase them on Ravelry here or buy the kit from Lion Brand Yarn here.
Cat Lady Blanket Square A3 Graph
Make 2
Key: color A is brown and color B is white.
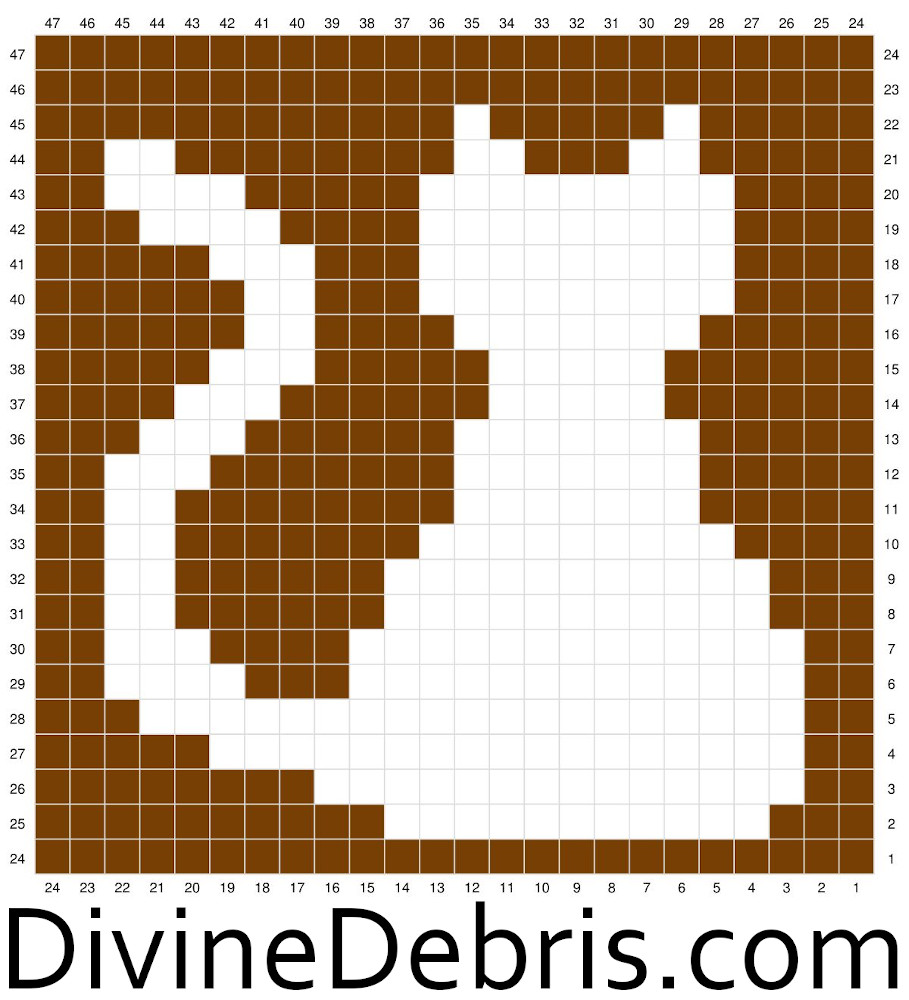
This square is worked from the bottom right-hand corner to the top left-hand corner. Rows 1 – 24 and decreasing Rows 25 – 47.
When you’re done with your square, block it so it measures 18″ x 18″ and then move onto the Border and Seaming instructions on the bottom of this page. If you’d like the written instructions for this pattern in an easy to follow pdf, you can purchase them on Ravelry here or buy the kit from Lion Brand Yarn here.
Cat Lady Blanket Square B1 Graph
Make 3
Key: color A is white and color B is brown.
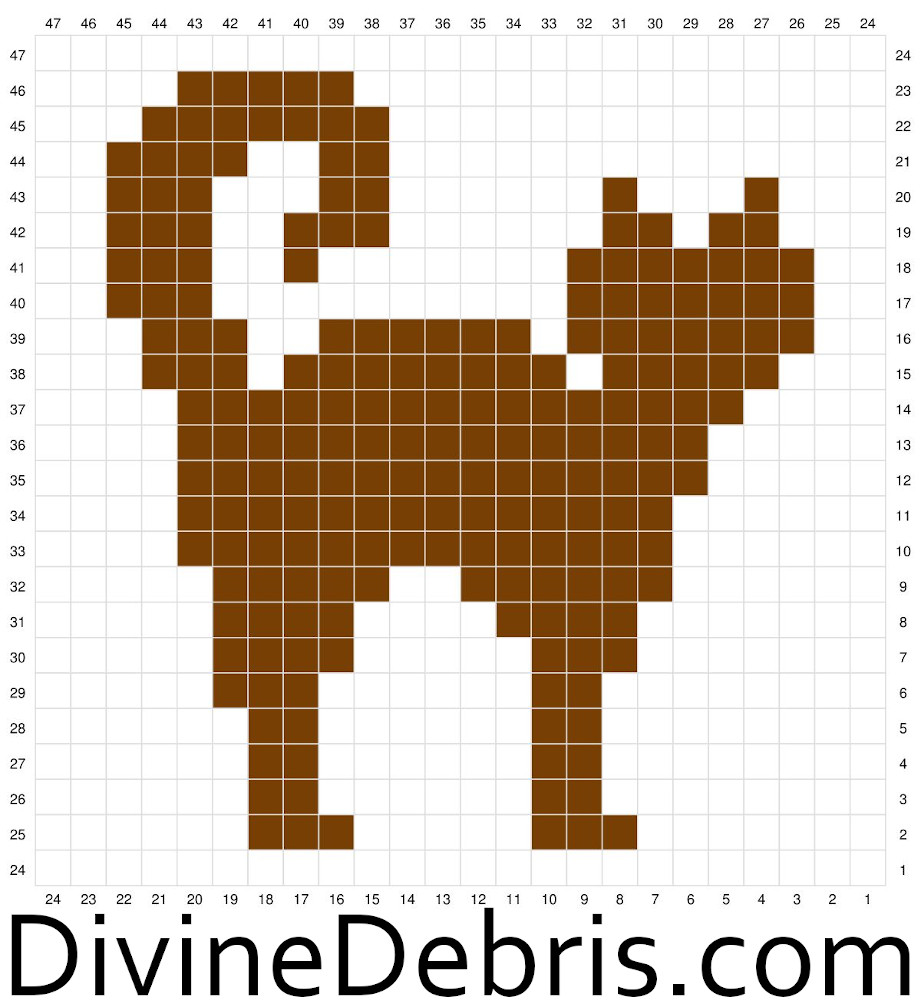
This square is worked from the bottom right-hand corner to the top left-hand corner. Rows 1 – 24 and decreasing Rows 25 – 47.
When you’re done with your square, block it so it measures 18″ x 18″ and then move onto the Border and Seaming instructions on the bottom of this page. If you’d like the written instructions for this pattern in an easy to follow pdf, you can purchase them on Ravelry here or buy the kit from Lion Brand Yarn here.
Cat Lady Blanket Square B2 Graph
Make 1
Key: color A is white and color B is brown.
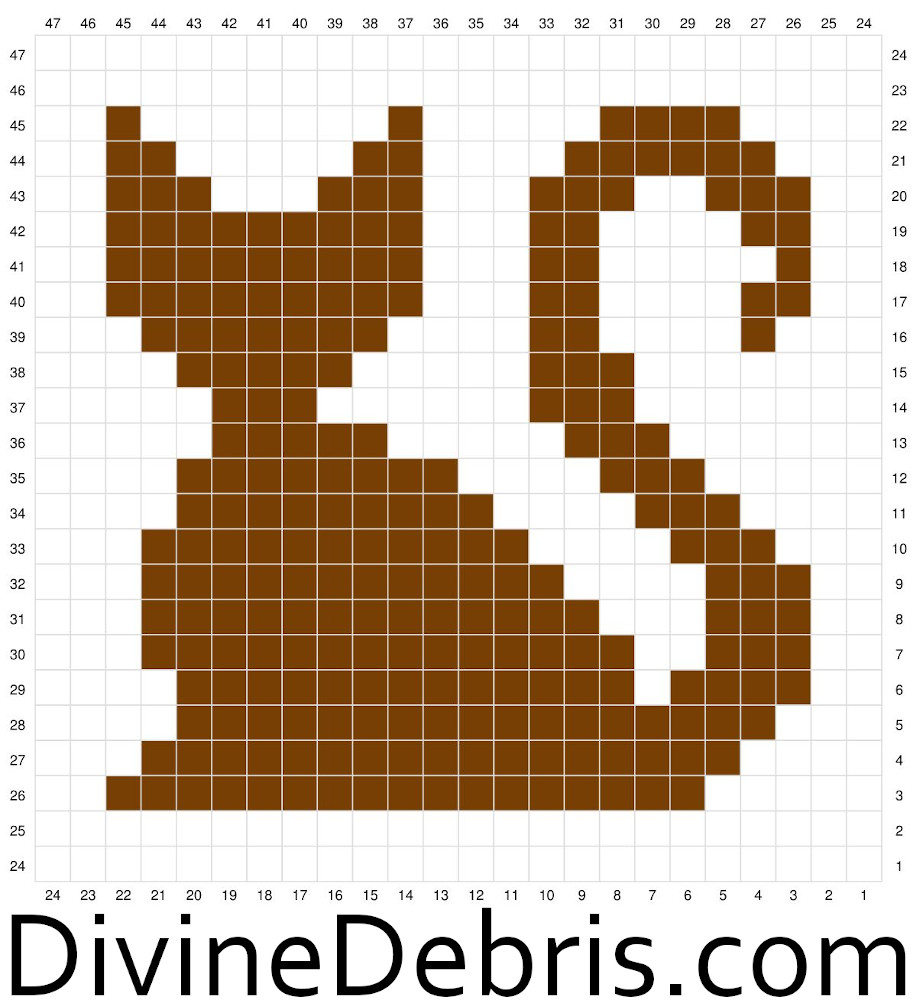
This square is worked from the bottom right-hand corner to the top left-hand corner. Rows 1 – 24 and decreasing Rows 25 – 47.
When you’re done with your square, block it so it measures 18″ x 18″ and then move onto the Border and Seaming instructions on the bottom of this page. If you’d like the written instructions for this pattern in an easy to follow pdf, you can purchase them on Ravelry here or buy the kit from Lion Brand Yarn here.
Cat Lady Blanket Square B3 Graph
Make 2
Key: color A is white and color B is brown.
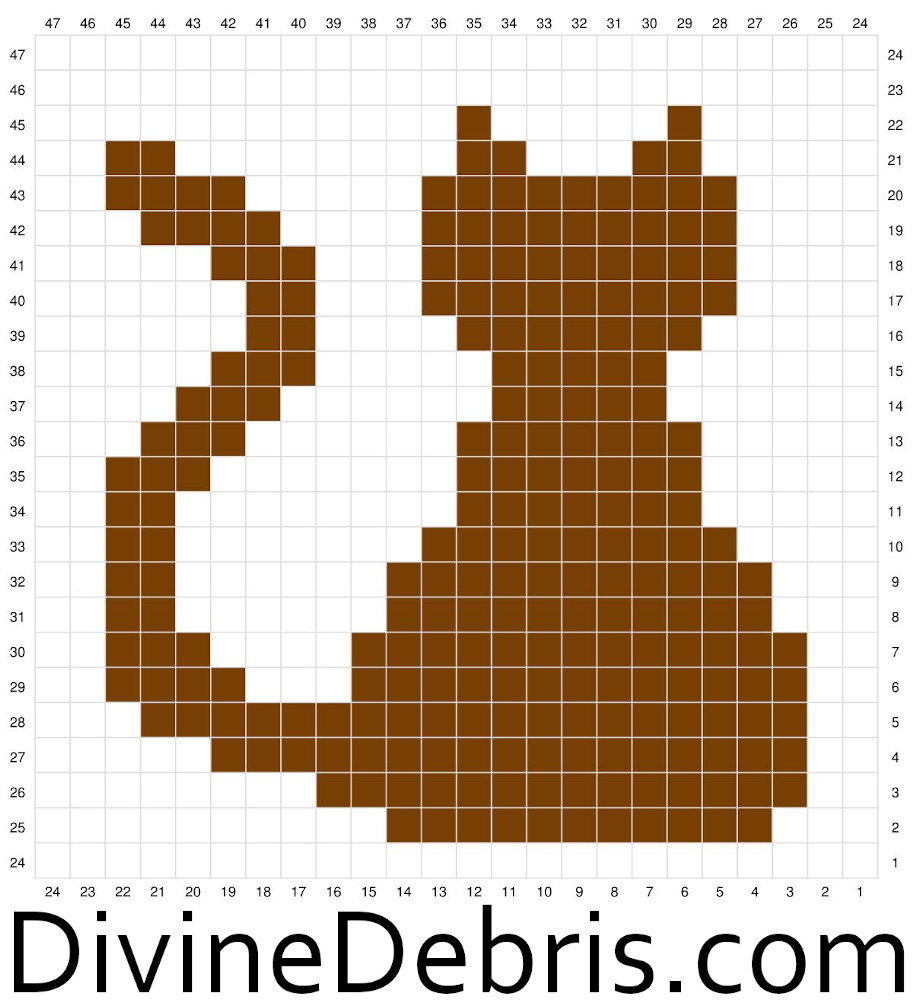
This square is worked from the bottom right-hand corner to the top left-hand corner. Rows 1 – 24 and decreasing Rows 25 – 47.
When you’re done with your square, block it so it measures 18″ x 18″ and then move onto the Border and Seaming instructions on the bottom of this page. If you’d like the written instructions for this pattern in an easy to follow pdf, you can purchase them on Ravelry here or buy the kit from Lion Brand Yarn here.
Graph for square arrangement
If you’d like to make sure your C2C Cat Lady Blanket matches mine in the photos, be sure to follow the graph below and match your cat squares to the ones listed below.
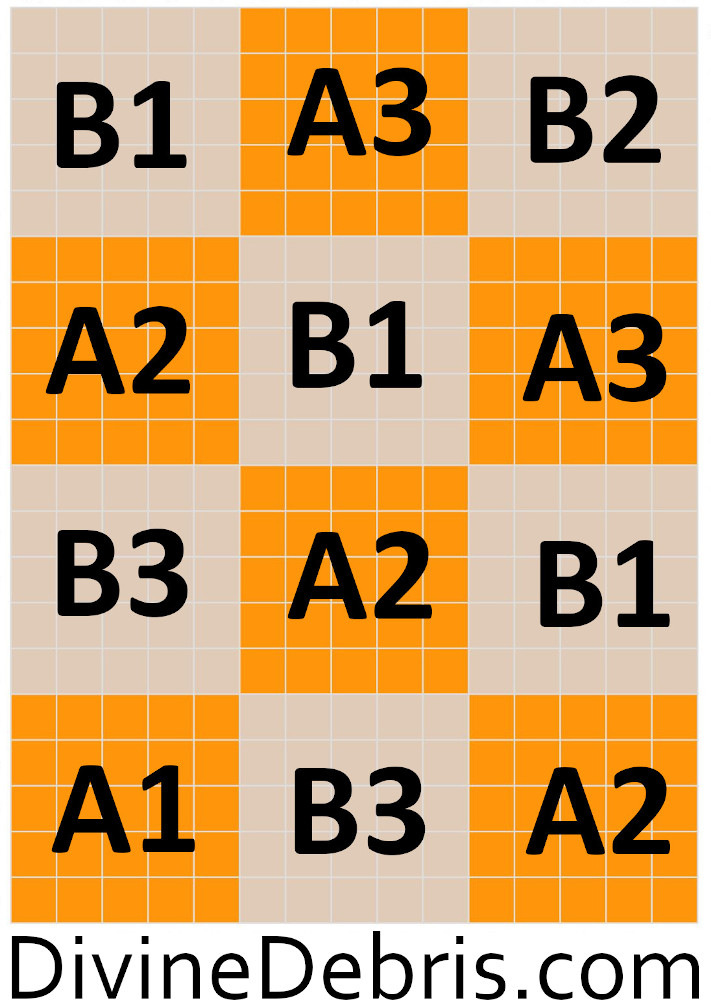
Seaming for the C2C Cat Lady Blanket
For the first square you will create a border that subsequent squares are joined to: with the RS facing you, create a slipknot on your hook (this will make your first sc a standing st, if you’d
rather pull up a loop and ch 1 to create your sc you can), sc into the first st on the corner (this
can be a ch-3 space or a dc), [ch 3 and skip the next block, *sc into the space between the blocks, ch 3 and skip the next block,* repeat from * to * across until you get to the last block, sc
into the last st of the block, ch 3, sc into the same st as the last sc,] repeat from [ to ] twice
more, ch 3 and skip the next block, *sc into the space between the block, ch 3 and skip the next block,* repeat from * to * across until you get to the last block, sc into the last st of the block,
ch 3 and slip st into the first st. Fasten off, weave in your ends and block your square if desired.
For the 2nd square and on: with the RS facing you line up the new square with the square or
squares you want to join it to. Repeat the instructions for the first square until you get to the
edge or edges where you want to join your squares.
Starting at the corner: sc into the last st of the block, ch 1, slip st into the corner ch-3 of the
square you’re joining to, ch 1, sc into the same st as the last sc, *ch 1, slip st into the next ch-3 of the square you’re joining to, ch 1, skip the next block, sc into the space between the blocks,*
repeat from * to * the rest of the way down the side. If you’re joining multiple squares, repeat
the corner and side instructions until you get back to your first st, join with a slip st.
Fasten off, weave in your ends and block your square if desired.
Here’s a photo tutorial for this seaming method.
Looking for written instructions? Buy them on Ravelry here.
![[Image description] Floor angle look at the C2C Cat Lady Blanket laying partially on the floor in front of a couch.](https://d3gel9wqxksnxm.cloudfront.net/wp-content/uploads/2026/08/Cat-Lady-Blanket-1000x587-1.jpg)

73 Free Crochet Pet Themed Patterns - Hookfully
Monday 7th of September 2026
[…] Game Crochet PatternBy Nicki’s Homemade CraftsPuppy Dog Tank Top PatternBy CoCo Crochet LeeC2C Cat Lady Blanket PatternBy Divine DebrisCat Bookmark Free Crochet PatternBy Stitch by FayMarlow Crochet Dog Free PatternBy A Crocheted […]
Christa
Saturday 22nd of August 2026
Hi! I made your bag with the ghost, candy corn, skull, and jack-o’-lantern. It turned out great, but my patterns aren’t as… crisp as yours. (Granted it was my first one and you legit MAKE these lol.) I’m going to make a couple of the squares for your cat lady blanket into a bag for my friend. Do you have any suggestions for keeping the pattern more crisp? Thank you so much!! You have awesome tutorials and I’ve gotten so many compliments on the bag!!
Divine Debris
Monday 31st of August 2026
Hi! I have lots of information on how I keep the squares looking tidy in the posts for them - like the Patchwork Halloween Bag. Between lots of practice and using good even tension, just keep the carried yarn as far down the WS of the squares as possible, or use bobbins if you'd prefer. And just in case it helps, there is a Cat Lady Bag pattern available :)