Happy June bag fans! With Be Brave Bag pattern released on the 6th and now the Kieran Bag crochet pattern, it’s a good month to like crochet bags here on my blog 😀
So this week’s pattern was inspired by 2 things primarily – my Kieran line (specifically the Kieran Basket) and the Lucinda Bag. I made the Lucinda Bag using 24/7 Cotton from Lion Brand Yarn and loved how it worked up as a bag, nice and sturdy with good texture definition, that I knew I wanted to make another bag with it.
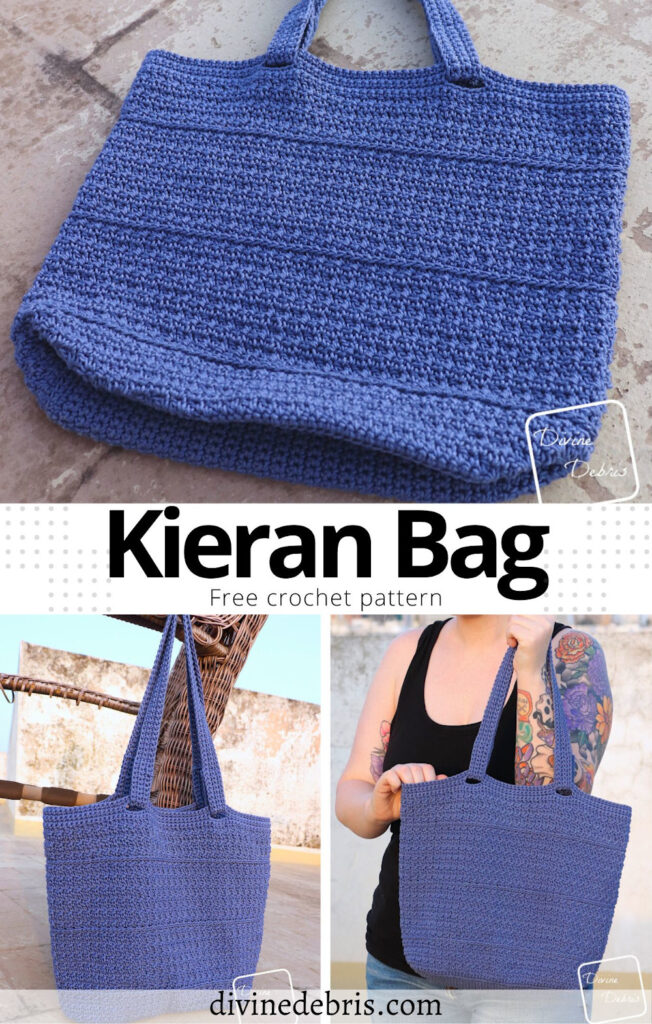
Also like the Lucinda Bag, this design is worked in 3 sections – the base, the sides, and the straps. The straps are worked separately, in long pieces, and then woven through the chain-5 spaces you made on the top few rows of the bag. This gives both designs a really fun look IMO, a little more interesting than simple straps worked in the round on the bag. Sometimes it’s fun to mix things up, ya know?
Like all the other designs in my Kieran Line, this design uses the Crumpled Griddle Stitch. In the traditional Griddle Stitch you repeat sc/ dc across a row with an even stitch count and then when you work back into the row you work still work sc/ dc, so you’re working dc into sc and sc into dc to achieve the texture. And with the Crumpled Griddle Stitch you work the stitch mostly the same – an even stitch count and a sc/dc repeat but it’s the following rows that change & you work you will work sc into sc and dc into dc to create the texture. It’s that fun? If you’d like a video, here’s a quick one of me making the stitch repeat on Instagram.
I hope you like this addition to the Kieran Line. It’s such a fun pattern and super easy – which is pretty nice IMO. It’s just a good time to relax and enjoy a pattern that doesn’t require you to pay 100% attention… like 80% or so is good. Maybe less if you’re a really badass 😀 Thank you so much for visiting my blog!
Please note: I was provided the yarn for this pattern by Lion Brand Yarn for the purposes of designing a kit and used it for the Kieran Bag crochet pattern, with compensation. I wasn’t provided the yarn with the expectations of positive or negative reviews but I love using 24/7 Cotton, it works up so well and it’s super sturdy and the colors are lovely! And I was commissioned to make this pattern and you can buy a kit for this pattern on Lion Brand’s website. This post contains affiliate links. If you purchase yarn through any of the links in this post, I may be compensated. And do not make videos using my patterns.
Copyright @ Divine Debris 2025. No part of this document may be reproduced or transmitted in any form by any means, electronic, mechanical, photocopying, or otherwise, without prior written permission from the author. Sales of finished products are permitted, but the designer requests that you link back to the pattern and credit Divine Debris with the original design under the Creative Commons Attribution-Share Alike license. If you have any questions, comments or concerns please contact info@divinedebris.com.
(this post contains affiliate links, if you make a purchase I may earn a commission)

If you appreciate my patterns I hope you’d consider purchasing an ad-free pdf of this pattern in my Ravelry shop and Lovecrafts shop (coming soon)!
Where to purchase the Kieran Bag crochet pattern


![[Image description] A close up view of the Kieran Bag hanging from a wooden chair frame, from a upward angle position, against a speckled background.](https://d3gel9wqxksnxm.cloudfront.net/wp-content/uploads/2025/06/Kieran-Bag-744x1000-1.jpg)
Language
American English
Level
Easy
Materials
- US H (5.00 mm) crochet hook
- Size #4 worsted weight yarn
- 10.5 oz/ 510 yds
- I used 24/7 Cotton from Lion Brand Yarn in Denim
- Notions: scissors, measuring tape, yarn needle
Gauge
- 17 sc x 15 rows = 4”
- For gauge: Chain an even amount of chs that will give you an over 4” swatch (your row st count needs to be odd), sc into the 2nd ch from the hook, *dc into the next st, sc into the next st,* repeat from * to * across. Row 2: Ch 1, turn, sc into the first sc, *dc into the next dc, sc into the next sc,* repeat from * to * across. Repeat row 2 as many times as you need to get more than 4” swatch then measure a center section.
Terms/ Stitches used
- Sk: Skip
- St: Stitch
- Ch: Chain
- Rnd: Round
- RS: Right side
- Sc: Single crochet
- Dc: Double crochet
- FLO: Front loop only
- Hdc: Half double crochet
- Join: Join rnds with a slip st
- BTLO: Back third loop only (explained below)
Special stitches
- Back third loop only (BTLO): When looking at the front of the st you will have the 2 loops on top of the hdc (the V on top), lean the st towards you and will see the third loop that runs along the back of the st. This is the loop you will work into. This st is also known as the Camel Stitch. Please note on the rnds where you work this st you will be looking at the back of the previous row’s hdc, so the third loop will be facing you.
Notes
- The pdf for this pattern is available on Ravelry.
- This pattern is worked from the bottom up in 3 sections: the Base, the Sides, and the Straps. The Straps are worked separately and sewn to the Sides.
- The Base and Straps are worked in back and forth rows and the Sides are worked in the round with a slip st into the first st to join.
- There are turns each row/ round. This helps to keep the seam relatively in the same place. If your seam has traveled by the time you reach round 92, feel free to fasten of and attach your yarn so it lines up with the corner.
- The ch 1 at the beginning of some the rows/ rnds does not count as a st.
- The ch 3 at the beginning of some of the rnds does count as a st. Feel free to replace it with your favorite dc chain alternative if you’d like.
- The sample in the photos was made using 3 skeins of 24/7 Cotton by Lion Brand Yarn in the color Denim.
Approx Finished Product Details for the Kieran Bag crochet pattern
| Height | Width | Base |
| 11.25” – 11.5” (Sides only, does not include the Straps) | 15” – 15.25” (laid flat) | 2.75″ – 10″ |
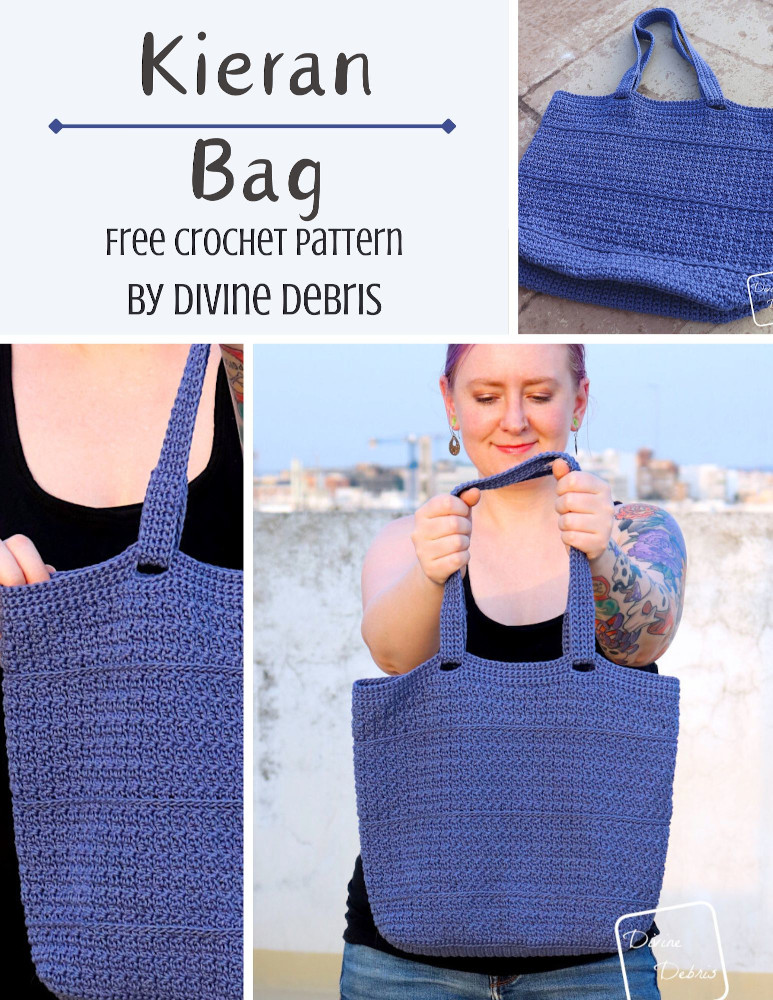
![[Image description] A white woman with purple hair stands in front of a city view with the Kieran Bag positioned straight out toward the viewer.](https://d3gel9wqxksnxm.cloudfront.net/wp-content/uploads/2025/06/Kieran-Bag-683x1000-1.jpg)
![[Image description] A white woman with purple hair stands in front of a city view with the Kieran Bag positioned straight out toward the viewer.](https://d3gel9wqxksnxm.cloudfront.net/wp-content/uploads/2025/06/Kieran-Bag-683x1000-1.jpg.webp)
Kieran Bag Crochet Pattern Instructions
Base
Row 1: Ch 16, sc into the 2nd ch from the hook and across – 15 sc
Rows 2 – 50: Ch 1, turn, sc across – 15 sc
Sides
Please note: the next rnd is worked all the way around the piece you just made.
(RS) Rnd 51: Ch 1, turn, sc into the next 15 sts, ch 1 at the corner and rotate your piece 90 degrees to the right, sc into the next 50 row ends, ch 1 at the corner and rotate your piece 90 degrees to the right, sc into the next 15 sts, ch 1 at the corner and rotate your piece 90 degrees to the right, sc into the next 50 row ends, ch 1 at the corner and rotate your piece 90 degrees to the right, slip st into the first st – 130 sc
Please note: The next rnd is worked FLO and you will skip the ch 1 sts at the corners.
Rnd 52: Ch 1, turn, sc around, join – 130 sc
Rnd 53: Ch 1, turn, sc into the first st, dc into the next st, *sc into the next st, dc into the next st,* repeat from * to * the rest of the way around, join – 65 sc, 65 dc
Rnd 54: Ch 3 (counts as a dc here and throughout), turn, sc into the next sc, *dc into the next dc, sc into the next sc,* repeat from * to * the rest of the way around, join – 65 sc, 65 dc
Rnds 55 – 58: Repeat Rnds 53 – 54, twice more.
Rnd 59: Ch 1, turn, hdc around, join – 130 hdc
Rnd 60: Ch 3, turn, sc into the BTLO of the next st, *dc into the BTLO of the next st, sc into the BTLO of the next st,* repeat from * to * the rest of the way around, join – 65 sc, 65 dc
Rnd 61: Ch 1, turn, sc into the first st, dc into the next st, *sc into the next st, dc into the next st,* repeat from * to * the rest of the way around, join – 65 sc, 65 dc
Rnd 62: Ch 3, turn, sc into the next sc, *dc into the next dc, sc into the next sc,* repeat from * to * the rest of the way around, join – 65 sc, 65 dc
Rnds 63 – 70: Repeat Rnds 61 – 62, a total of 4 more times.
Rnds 71 – 82: Repeat Rnds 59 – 70, once more.
Rnds 83 – 84: Repeat Rnds 59 – 60, once more.
Rnds 85 – 88: Repeat Rnds 61 – 62, twice more.
Rnd 89: Repeat Rnd 61, once more.
Rnds 90 – 91: Ch 1, turn, sc around, join – 130 sc
Please note: The next round is where the holes for your Straps are created. If your seam has traveled, fasten off and line it back up with the corner. Make sure you’re working with the WS facing you when you begin.
Rnd 92: Ch 1, turn, sc into the next 10 sts, ch 5, sk the next 5 sts, sc into the next 20 sts, ch 5, sk the next 5 sts, sc into the next 35 sts, ch 5, sk the next 5 sts, sc into the next 20 sts, ch 5, sk the next 5 sts, sc into the next 25 sts, join – 110 sc, 4 ch-5 spacesRnd 93: Ch 1, turn, sc around (this include the ch sts), join – 130 sc
Rnd 94: Ch 1, turn, sc around, join – 130 sc
Fasten off, weave in all your ends. Feel free to block your bag if you’d like.
Straps
(make 2)
Row 1: Ch 101, sc into the 2nd ch from the hook and across – 100 sc
Rows 2 – 5: Ch 1, turn, sc across – 100 sc
Fasten off, block if necessary.
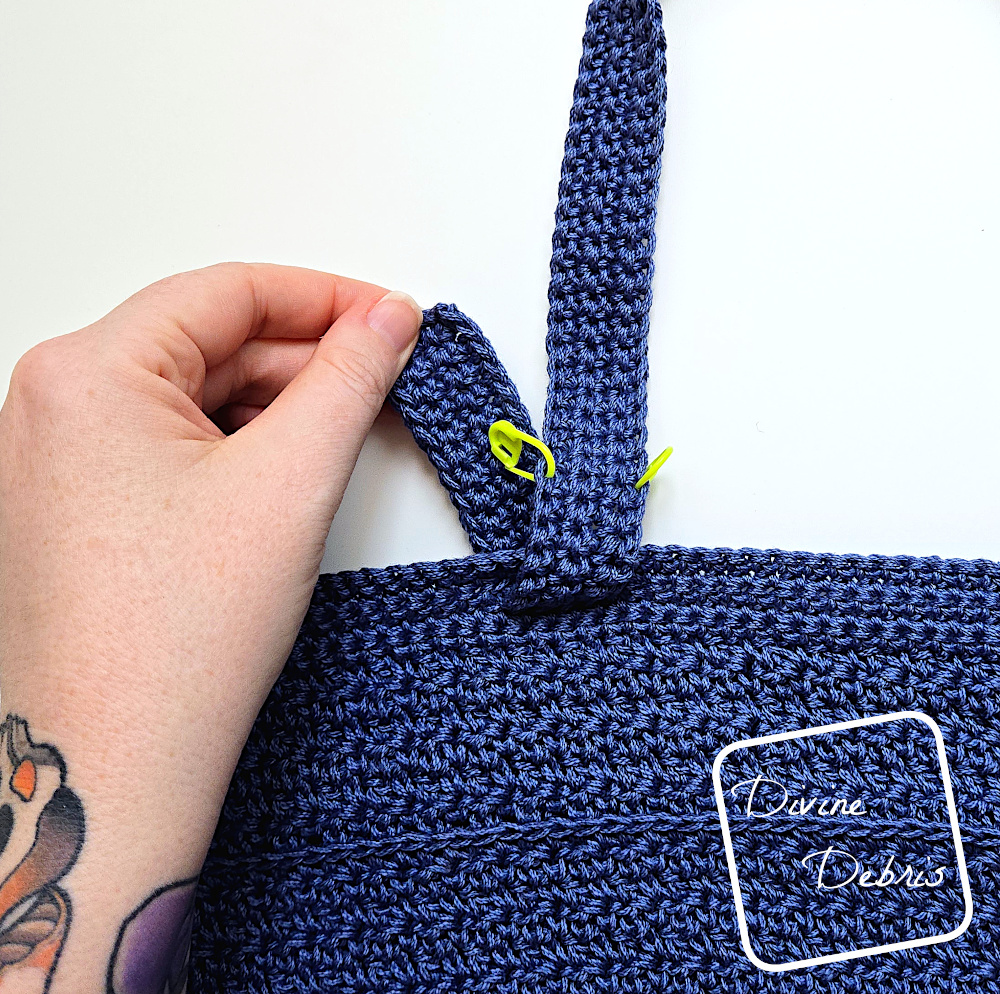
Kieran Bag crochet pattern Straps Assembly
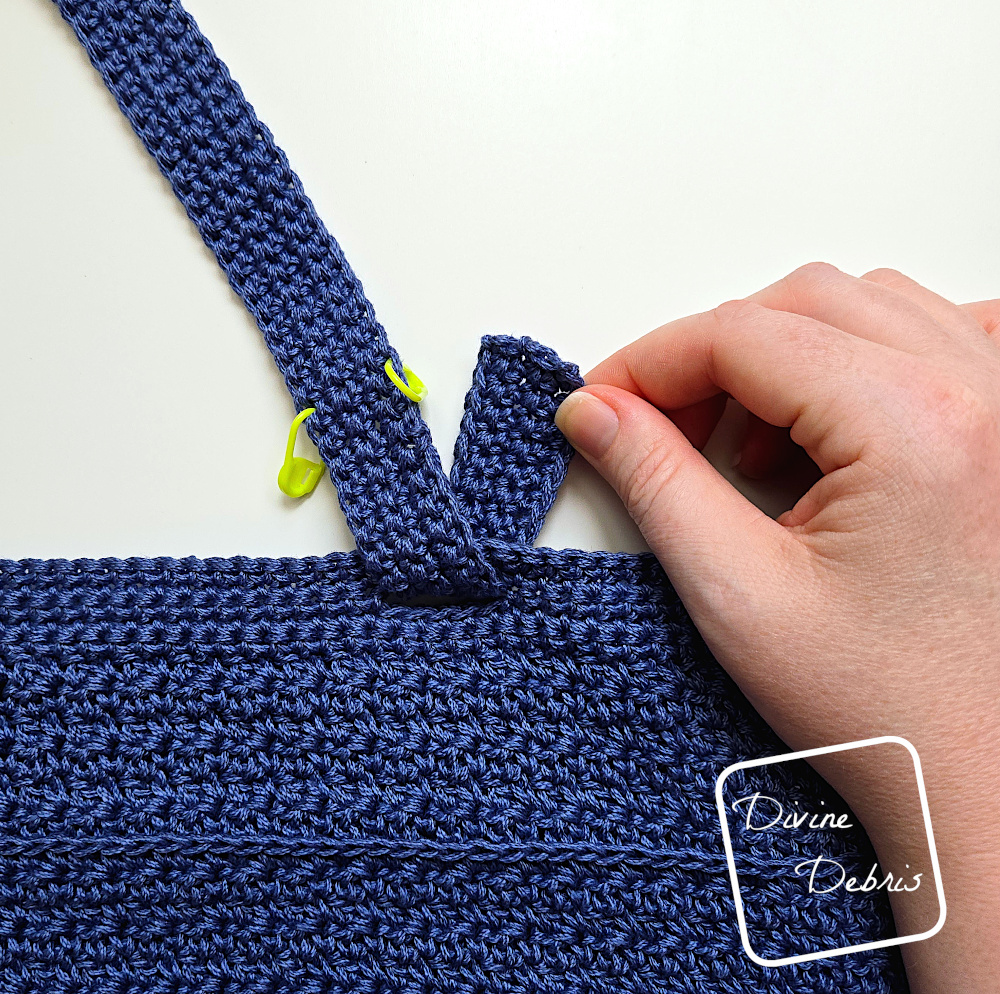
Take one of your straps and mark 20 sts in on both ends with your stitch markers. Next, with the RS facing you, position your bag so that 2 of the ch 5 spaces from Rnd 92 are facing you. With the Strap you marked with your stitch markers, pull your strap through the right ch 5 space, so that the end of the strap is on the inside of the bag, and fold the 20 st section in half, lining the end sts of the strap with the stitch markers. Sew the end of the strap to the sts you marked with your stitch markers. Repeat this process with the left ch 5 space and the other side of the same strap. Flip your whole bag around and use your other strap and the other 2 ch 5 spaces to attach your second strap.
Optional: With any yarn you have left over you can use slip stitches to reinforce the straps by adding surface crochet along the length of the Straps like I did on my Be Brave Bag.
You can pick up the Kieran Bag Crochet Pattern pdf in my Ravelry shop. Or buy the kit from Lion Brand Yarn (coming soon).