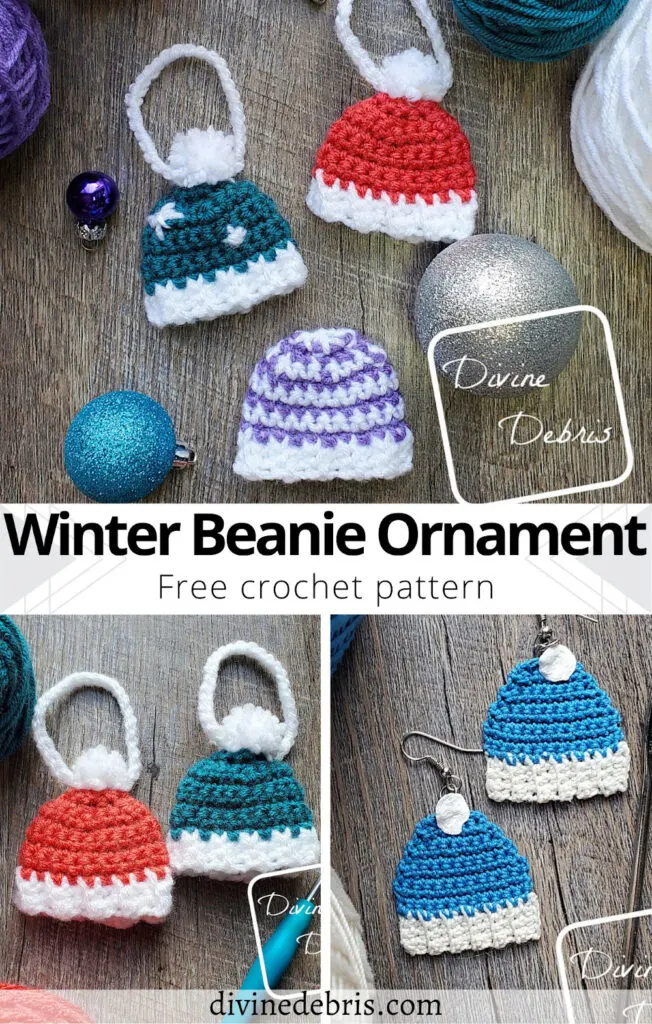
What does winter mean to you? Do you think of cold? Do you think of hand made goods? Do you think of hot cocoa or gifts? Or maybe you think of your favorite hat. Well, this week’s new pattern is trying to bring out the happy feelings of the classic beanie, with the Winter Beanie Ornament crochet pattern.
A nice ribbed band, a simple shape, and of course you can’t forget a nice fluffy pompom – the classic winter beanie is one most of us definitely know. I grew up in Utah and most years we would be lost without something to keep our ears warm, and so I always turned to my trusted winter beanie. It’s a staple in my house and has always been. And since I started making my own, I have so very many but the classic always hold a special place in my heart.
Now I kept the design simple so you can customize as you’d like. I think any kind of scrap yarn would be perfect for this pattern. Or make it in stripes or even add some polka dots with puffy paint. It’s totally up to you how you customize this piece. There’s so much room to make this design special for everyone you make it for. It would be great on a tree or as a tag for a gift bag.
Better still, you can make a pair of earrings. You know that earrings are some of my favorite things to make so I always like to include them for small projects like this. You can easily adapt the ornament as written to a nice 3d style but I liked a little more flat and easy one for myself. And just like the ornament, this would look great in polka dots. I almost did that myself but I think I’ll wait until the pattern is released to get too wild with decorations. I think it’s better to leave it simple than to overwhelm people with options.
Anyway, I do hope you like this little festive design. It’s great for all winter holidays and you can adapt it to fit your home decor as you’d like.
Don’t forget to wash and wear your masks and be kind. Have a happy December friends.
Copyright @ Divine Debris 2022. No part of this document may be reproduced or transmitted in any form by any means, electronic, mechanical, photocopying, or otherwise, without prior written permission from the author. Sales of finished products are permitted, but the designer requests that you link back to the pattern and credit Divine Debris with the original design under the Creative Commons Attribution-Share Alike license. If you have any questions, comments or concerns please contact info@divinedebris.com.
(this post contains affiliate links, if you make a purchase I may earn a commission)
If you appreciate my weekly patterns I hope you’d consider purchasing an ad-free pdf of this pattern in my Ravelry shop and Lovecrafts shop!
Thank you to all my patrons on Patreon!
Where to purchase the Winter Beanie Ornament crochet pattern
Level
Easy
Materials
- G/ 4.00 mm crochet hook
- Worsted weight/ size #4 yarn
- 2 colors
- Less than 1 oz ea
- I used just stash yarn
- US 1.90 mm steel crochet hook
- Size 10 crochet thread
- Less than .1 oz total
- 2 colors
- I used Aunt Lydia’s Size 10 crochet thread
- Jump rings
- Metal french hooks
- Jewelry pliers
- Fabric Stiffener (optional)
- Puffy Paint
- Notions: scissors, measuring tape, yarn needle
Gauge
- 1.90 mm: 10 sc x 8 rows = 1”
- 4.00 mm: 18 sc x 20 rows = 4”
Terms/ Stitches used
- Ch: Chain
- St: Stitch
- RS: Right side
- Sc: Single crochet
- BLO: Back loop only
- Join: Join with a slip st
- Sc2tog: Single crochet 2 sts together
Notes
- This pattern is worked in 3 parts: the Band, the Body, and the Finishing (where you can add a loop and pompom). The Band is worked in rows, back and forth, and then joined to create a ring then you will work the Body onto the row ends in the round. Then you can add a pompom and loop to hang it.
- The ch 1 at the beginning of the rows does not count as a stitch.
- Feel free to use fabric stiffener to stiffen your earrings to make them easier to wear.
- In the photos: color A is white and color B is any other color.
Approx Finished Product Details for the Winter Beanie Ornament crochet pattern
| Ornament Width 2.5″ | Ornament Height (not counting hanger) 2″ |
| Earrings Width Just under 1.5″ | Earrings Height (not counting rings or hook) 1.25″ |
Winter Beanie Ornament Crochet Pattern
Band
Row 1: A: Ch 4, sc into the 2nd ch from the hook and across – 3 sc
Rows 2 – 20: Ch 1, turn, sc BLO across – 3 sc
Fasten off leaving a tail long. Using your preferred method of seaming, seam Row 1 to Row 20 to form a ring.
Body
Pull up a loop in the first st to the left of the seam you made seaming together Row 1 to Row 20 of the Band.
Rnd 1: Ch 1, sc into each row end around, join – 20 sc
Rnds 2 – 5: Ch 1, turn, sc around, join – 20 sc
Rnd 6: Ch 1, turn, *sc into the next 2 sts, sc2tog the next 2 sts,* repeat from * to * around, join – 15 sc
Rnd 7: Ch 1, turn, *sc into the next st, sc2tog the next 2 sts,* repeat from * to * around, join – 10 sc
Rnd 8: Ch 1, turn, *sc2tog the next 2 sts,* repeat from * to * around, join – 5 sc
Fasten off leaving a tail, use the tail to close the top.
Finishing
Make an optional pompom in color A or attach a store bought one as you’d like on the top of the ornament.
For a hanger, ch 30 fasten off. Use the ends to secure the hanger to the top of your little beanie.
Winter Beanie Earring Crochet Pattern
Band
(RS)Row 1: A: Ch 5, sc into the 2nd ch from the hook and across – 4 sc
Rows 2 – 12: Ch 1, turn, sc BLO across – 4 sc
Fasten off, weave in your ends.
Body
With the WS facing, pull up a loop on one of the end rows of the Band.
Row 1: Ch 1, sc across – 12 sc
Rows 2 – 4: Ch 1, turn, sc across – 12 sc
Row 5: Ch 1, turn, sc2tog the first 2 sts, sc across until 2 sts remain, sc2tog the last 2 sts – 10 sc
Row 6: Ch 1, turn, sc across – 10 sc
Row 7: Ch 1, turn, sc2tog the first 2 sts, sc across until 2 sts remain, sc2tog the last 2 sts – 8 sc
Row 8: Ch 1, turn, sc across – 8 sc
Row 9: Ch 1, turn, sc2tog the first 2 sts, sc across until 2 sts remain, sc2tog the last 2 sts – 6 sc
Row 10: Ch 1, turn, sc2tog the first 2 sts, sc across until 2 sts remain, sc2tog the last 2 sts – 4 sc
Fasten off, weave in your ends.
Finishing
Like I do with all my earrings, I stiffened these with fabric stiffener. Just wet them down with the stiffener (I dilute it with water, so that it’s thinned out but not clear) and then lay them flat to dry completely. When they’re dry, attach the findings, such as jump rings and hooks, and wear. Feel free to add a pompom to the top of the earring with puffy paint.
You can pick up the Winter Beanie Ornament Pattern in my Ravelry shop.


![[Image description] Top down flat lay of three Winter Beanie Ornaments on a wood grain background, surrounded with Christmas ornaments and yarn](https://d3gel9wqxksnxm.cloudfront.net/wp-content/uploads/2022/12/Winter-Beanie-Ornament-1000x990-1.jpg.webp)


![[Image description] Top down flat lay of 2 Winter Beanie Ornament, one red one blue, on a wood grain background with cakes of yarn around the left side and a blue crochet hook on the bottom right](https://d3gel9wqxksnxm.cloudfront.net/wp-content/uploads/2022/12/Winter-Beanie-Ornament-1000x880-1.jpg.webp)
![[Image description] Top down flat lay of a red Winter Beanie Ornament on a wood grain background](https://d3gel9wqxksnxm.cloudfront.net/wp-content/uploads/2022/12/Winter-Beanie-Ornament-866x1000-1.jpg.webp)
![[Image description] Top down view of the Winter Beanie Ornament Earrings in blue on a wood grain background. A crochet hook sits on the right and cakes of crochet thread on the left.](https://d3gel9wqxksnxm.cloudfront.net/wp-content/uploads/2022/12/Winter-Beanie-Ornament-931x1000-1.jpg.webp)
![[Image description] A white woman with purple hair stands in front of a green bush looking to the side, holding the bottom of a blue Winter Beanie Ornament Earring toward the camera.](https://d3gel9wqxksnxm.cloudfront.net/wp-content/uploads/2022/12/Winter-Beanie-Ornament-762x1000-1.jpg.webp)

Deb
Tuesday 6th of December 2022
The Winter Beanie Ornament pattern is delightful! And the earrings.......love those!! Thank you for sharing your talent with all of us. Appreciate you!!