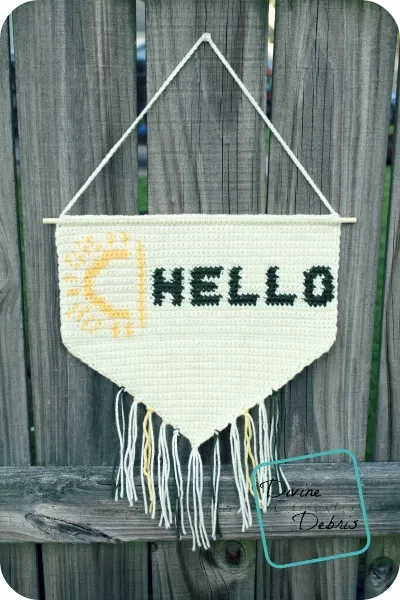
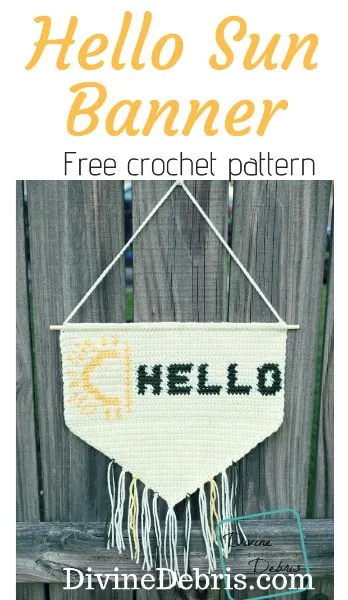
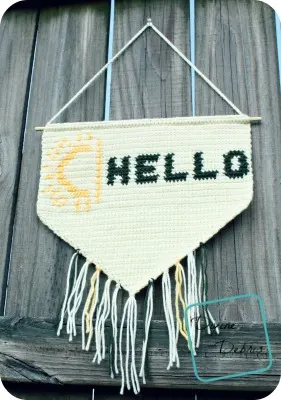
So this week’s design is something new for me and I’m really excited to share this with you, that’s why I’ve posted so many photos of it on social media the last week. I always try to create new and fun ways to use crochet and this week is a prime example of that… introducing tapestry wall art designed by me! For my first wall art/ hanging I wanted to come up with something nice and fun, and maybe later I’ll be silly like subversive cross stitch or something. Actually, I want to create series out of this, the next one will say be different but also feature the half sun on it and you’ll just have to keep an eye out for it later. Anyway, I hope you really like this design because I had a lot of fun making it.
Materials:
- US G (4.00 mm) crochet hook
- Worsted/ medium/ size #4 weight yarn
- 2 oz/ 123 yards
- I just used random yarn I had left over, probably Bernat Super Value
- Yarn needle
- Wooden dowel or stick
- Measuring tape
Gauge:
- 4.5” x 4.5” = 19 dcs x 9 rows
Terms/ stitches used:
- RS: right side
- Ch: chain
- St: stitch
- Slip st: slip stitch
- Sc: single crochet
- Sc2tog: single crochet 2 stitches together
- Sc3tog: single crochet 3 stitches together

Notes:
- The ch 1 at the beginning of the rows does not count as a stitch.
- This pattern is worked back and forth with a turn at the beginning/ end of the row.
- This pattern is worked in parts: 1st: the graphing/ tapestry portion, 2nd: the attaching the dowel part, 3rd: the triangle bottom and the fringe.
- When attaching the dowel, you crochet around the dowel into the stitches below, this keeps it in place.
- You need to know how to create a slip knot on your hook for this pattern.
- All of the stitches in this pattern are single crochets, because of this the instructions only tells you how many stitches to do in what color, this is what the number in the parenthesis means.
- The finished item might be a big misshapen and the sides might curl (mine did) so you’re probably going to need to block this before you hang it.
- Rather than changing, cutting, and weaving in the ends of all the colors, the yarn is carried in the photos. Here’s a great tutorial on color changes. In this pattern, the active yarn is worked over the inactive.
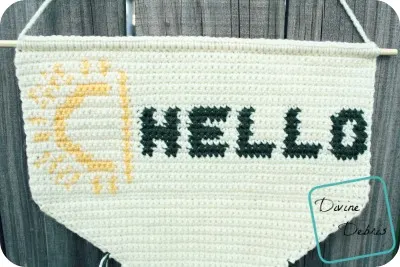
- Color A is off white, Color B is yellow and Color C is dark green.
Finished measurements:
- Height: 11.5″ (top of dowel to point)
- Width: 13.25″

Hello Sun Banner Crochet Pattern Instructions
Main graphing portion:
(RS) Row 1: A: Ch 60, sc into the second ch from the hook and across – 59 scs
Row 2: A: Ch 1, turn, (11), B: (1), A: (2), B: (1), A: (44) – 59 scs
Row 3: A: Ch 1, turn, (44), B: (1), A: (2), B: (1), A: (4), B: (1), A: (6) – 59 scs
Row 4: A: Ch 1, turn, (4), B: (1), A: (2), B: (1), A: (3), B: (1), A: (2), B: (1), A: (2), B: (1), A: (41) – 59 scs
Row 5: A: Ch 1, turn, (41), B: (1), A: (8), B: (1), A: (2), B: (1), A: (5) – 59 scs
Row 6: A: Ch 1, turn, (3), B: (1), A: (2), B: (1), A: (3), B: (5), A: (2), B: (1), A: (41) – 59 scs
Row 7: A: Ch 1, turn, (41), B: (1), A: (2), B: (6), A: (4), B: (1), A: (2), B: (1), A: (1) – 59 scs
Row 8: A: Ch 1, turn, (2), B: (1), A: (2), B: (1), A: (2), B: (4), A: (5), B: (1), A: (41) – 59 scs
Row 9: A: Ch 1, turn, (2), C: (4), A: (3), C: (6), A: (2), C: (6), A: (2), C: (6), A: (2), C: (2), A: (2), C: (2), A: (2), B: (1), A: (7), B: (3), A: (3), B: (1), A: (3) – 59 scs
Row 10: A: Ch 1, turn, (6), B: (3), A: (8), B: (1), A: (2), C: (2), A: (2), C: (2), A: (2), C: (6), A: (2), C: (6), A: (2), C: (6), A: (2), C: (6), A: (1) – 59 scs
Row 11: A: Ch 1, turn, (1), C: (2), A: (2), C: (2), A: (6), C: (2), A: (6), C: (2), A: (6), C: (2), A: (2), C: (2), A: (2), C: (2), A: (2), B: (1), A: (9), B: (3), A: (5) – 59 scs
Row 12: A: Ch 1, turn, (1), B: (3), A: (1), B: (2), A: (10), B: (1), A: (2), C: (6), A: (2), C: (5), A: (3), C: (2), A: (6), C: (2), A: (6), C: (2), A: (2), C: (2), A: (1) – 59 scs
Row 13: A: Ch 1, turn, (1), C: (2), A: (2), C: (2), A: (6), C: (2), A: (6), C: (2), A: (3), C: (5), A: (2), C: (6), A: (2), B: (1), A: (10), B: (2), A: (5) – 59 scs
Row 14: A: Ch 1, turn, (5), B: (2), A: (10), B: (1), A: (2), C: (2), A: (2), C: (2), A: (2), C: (2), A: (6), C: (2), A: (6), C: (2), A: (6), C: (2), A: (2), C: (2), A: (1) – 59 scs
Row 15: A: Ch 1, turn, (1), C: (6), A: (6), C: (2), A: (6), C: (2), A: (2), C: (6), A: (2), C: (2), A: (2), C: (2), A: (2), B: (1), A: (10), B: (2), A: (1), B: (3), A: (1) – 59 scs
Row 16: A: Ch 1, turn, (5), B: (3), A: (9), B: (1), A: (2), C: (2), A: (2), C: (2), A: (2), C: (6), A: (2), C: (2), A: (6), C: (2), A: (7), C: (4), A: (2) – 59
Fasten off Color C.
Row 17: A: Ch 1, turn, (41), B: (1), A: (8), B: (3), A: (6) – 59 scs
Row 18: A: Ch 1, turn, (3), B: (1), A: (3), B: (3), A: (7), B: (1), A: (41) – 59 scs
Row 19: A: Ch 1, turn, (41), B: (1), A: (6), B: (3), A: (2), B: (1), A: (2), B: (1), A: (2) – 59 scs
Row 20: A: Ch 1, turn, (1), B: (1), A: (2), B: (1), A: (4), B: (6), A: (2), B: (1), A: (41) – 59 scs
Row 21: A: Ch 1, turn, (41), B: (1), A: (2), B: (5), A: (3), B: (1), A: (2), B: (1), A: (3) – 59 scs
Row 22: A: Ch 1, turn, (5), B: (1), A: (2), B: (1), A: (8), B: (1), A: (41) – 59 scs
Row 23: A: Ch 1, turn, (41), B: (1), A: (2), B: (1), A: (2), B: (1), A: (3), B: (1), A: (2), B: (1), A: (4) – 59 scs
Row 24: A: Ch 1, turn, (6), B: (1), A: (4), B: (1), A: (2), B: (1), A: (44) – 59 scs
Row 25: A: Ch 1, turn, (44), B: (1), A: (2), B: (1), A: (11) – 59 scs
Fasten off Color B.
Row 26: A: Ch 1, turn, (59) – 59 scs
Fasten off, weave in all your ends.
Triangle piece:
Flip the whole piece around so that you’re scing along the other side of the original ch from row 1 of the main graphing portion.
(RS) Row 1: Color A: Create a slip knot on your hook, sc2tog the first 2 sts, sc into the next 55 sts, sc2tog the last 2 sts – 57 scs (includes the sc2togs)
Row 2: Ch 1, turn, sc2tog the first 2 sts, sc into the next 53 sts, sc2tog the last 2 sts – 55 scs
Row 3: Ch 1, turn, sc2tog the first 2 sts, sc into the next 51 sts, sc2tog the last 2 sts – 53 scs
Row 4: Ch 1, turn, sc2tog the first 2 sts, sc into the next 49 sts, sc2tog the last 2 sts – 51 scs
Row 5: Ch 1, turn, sc2tog the first 2 sts, sc into the next 47 sts, sc2tog the last 2 sts – 49 scs
Row 6: Ch 1, turn, sc2tog the first 2 sts, sc into the next 45 sts, sc2tog the last 2 sts – 47 scs
Row 7: Ch 1, turn, sc2tog the first 2 sts, sc into the next 43 sts, sc2tog the last 2 sts – 45 scs
Row 8: Ch 1, turn, sc2tog the first 2 sts, sc into the next 41 sts, sc2tog the last 2 sts – 43 scs
Row 9: Ch 1, turn, sc2tog the first 2 sts, sc into the next 39 sts, sc2tog the last 2 sts – 41 scs
Row 10: Ch 1, turn, sc2tog the first 2 sts, sc into the next 37 sts, sc2tog the last 2 sts – 39 scs
Row 11: Ch 1, turn, sc2tog the first 2 sts, sc into the next 35 sts, sc2tog the last 2 sts – 37 scs
Row 12: Ch 1, turn, sc2tog the first 2 sts, sc into the next 33 sts, sc2tog the last 2 sts – 35 scs
Row 13: Ch 1, turn, sc2tog the first 2 sts, sc into the next 31 sts, sc2tog the last 2 sts – 33 scs
Row 14: Ch 1, turn, sc2tog the first 2 sts, sc into the next 29 sts, sc2tog the last 2 sts – 31 scs
Row 15: Ch 1, turn, sc2tog the first 2 sts, sc into the next 27 sts, sc2tog the last 2 sts – 29 scs
Row 16: Ch 1, turn, sc2tog the first 2 sts, sc into the next 25 sts, sc2tog the last 2 sts – 27 scs
Row 17: Ch 1, turn, sc2tog the first 2 sts, sc into the next 23 sts, sc2tog the last 2 sts – 25 scs
Row 18: Ch 1, turn, sc2tog the first 2 sts, sc into the next 21 sts, sc2tog the last 2 sts – 23 scs
Row 19: Ch 1, turn, sc2tog the first 2 sts, sc into the next 19 sts, sc2tog the last 2 sts – 21 scs
Row 20: Ch 1, turn, sc2tog the first 2 sts, sc into the next 17 sts, sc2tog the last 2 sts – 19 scs
Row 21: Ch 1, turn, sc2tog the first 2 sts, sc into the next 15 sts, sc2tog the last 2 sts – 17 scs
Row 22: Ch 1, turn, sc2tog the first 2 sts, sc into the next 13 sts, sc2tog the last 2 sts – 15 scs
Row 23: Ch 1, turn, sc2tog the first 2 sts, sc into the next 11 sts, sc2tog the last 2 sts – 13 scs
Row 24: Ch 1, turn, sc2tog the first 2 sts, sc into the next 9 sts, sc2tog the last 2 sts – 11 scs
Row 25: Ch 1, turn, sc2tog the first 2 sts, sc into the next 7 sts, sc2tog the last 2 sts – 9 scs
Row 26: Ch 1, turn, sc2tog the first 2 sts, sc into the next 5 sts, sc2tog the last 2 sts – 7 scs
Row 27: Ch 1, turn, sc2tog the first 2 sts, sc into the next 3 sts, sc2tog the last 2 sts – 5 scs
Row 28: Ch 1, turn, sc2tog the first 2 sts, sc into the next st, sc2tog the last 2 sts – 3 scs
Row 29: Ch 1, turn, sc3tog the next 3 sts – 1 sc
Fasten off, weave in all your ends.
Dowel part:
Color A: Go back to the top of the piece and holding the dowel against row 26, sc around the wooden dowel and into row 26 below it – 59 scs
Do not fasten off yet. Ch 80, skip the whole row (58 scs) and slip st into the first st (where you began the last row)
Fasten off, weave in all your ends.
Optional:
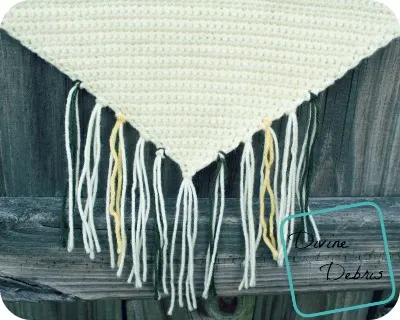
Add some tassels to the bottom of the triangle. I did this every 3rd row from row 29 but only did 5 tassels up the sides. You can do this however you’d like. This is a good tutorial on how to add fringe to a project. There’s a photo of it above near the section on the triangle piece.
You’re probably going to want to block the final product before you hang it up. Mine was a bit weirdly shaped and wouldn’t lay flat so I did a bit of wet blocking to get it to be flat. And I was talking to some people on Facebook and we got the idea if you want to hang this on your front door, you could add a weather proofer or sealant to make it last longer in the elements.
Tada! There’s my first attempt at making a fun wall hanging item. I hope you like it!
See ya next week.
This post is linked to Hookin’ on Hump Day #123.

MarMar
Tuesday 30th of August 2016
Thanks for sharing the pattern! It's lovely. I'm not an expert with tapestry crochet even when I can follow the instructions but I would like to know if it's made from bottom to top or the other way around, just to have in mind how should it look like :)
Divine Debris
Tuesday 30th of August 2016
It's worked from the bottom of the tapestry portion up and then the triangle is added after you're finished with the tapestry portion. :D
Katie
Friday 29th of July 2016
Thank you for sharing this! It's just what I was looking for. Please pardon the maybe dumb question (I'm a newbie crocheter) but why is the triangle part worked separately? If I'm making a plain white banner, could I just start from the top and work down through the decreases?
Divine Debris
Friday 29th of July 2016
Yeah, if you're not going to be adding the text you can work the pattern from the top down. I tend to write patterns from the bottom up so that's why the triangle is worked separately on this pattern. In the future I might do a top down pattern.
KnotTheorist
Tuesday 19th of July 2016
What a fun project! Thanks for sharing.