![[Image description] A white woman with purple hair looks at the camera and uses her hand to show off her red topped Stuffed Mushroom crochet earring.](https://d3gel9wqxksnxm.cloudfront.net/wp-content/uploads/2021/05/MushroomEarrings-848x1000-1.jpg)
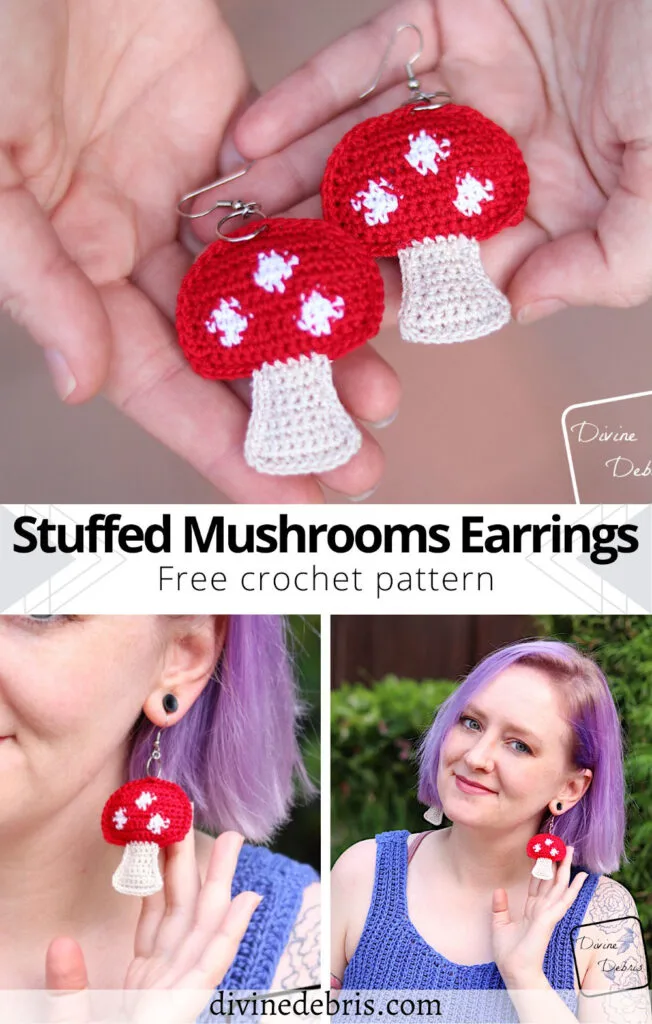
It’s May! A new month means new patterns here and you know what, I’m super excited about that. I have been wearing these earrings for a minute and they just make me so happy, because they’re still. I hope you’re ready for the Stuffed Mushrooms Earrings Pattern.
I like to make earrings quite a bit and every couple of months I try to release a new pattern. I started making earrings years ago because they work up fast and ensure you can wear crochet any time it strikes you. No need to hide your crochet when it gets warm. Ya know? And these earrings… well they were inspired by last month’s C2C Mushroom square that I just loved.
And can I say these earrings grow on you? Because they totally do! I did these ones in traditional colors but I also have some larger ones I’m using to make a wall-hanging. I’m just making the individual mushrooms in bulky weight yarn and then I’m going to sew them to a banner. Now those are not red caps but yellow or variegated… I even have a purple I’m going to use. That’s what makes this pattern so fun and versatile – you get to choose the adventure you want to go on! What a blast, right?
I hope you have fun making these earrings or if you make it into a tiny amigurumi using any other weight yarn, I’d love to see that too. I bet those would be just as cute. It’s a quick and simple pattern, so you can experiment as you’d like. Ooh! A garland would be so cute… so many ideas. Do I know any friends who like mushrooms?
Anyway… I hope you like this pattern and give it a try.
This post is linked Loop Scoop #13
(this post contains affiliate links)


If you appreciate my weekly patterns I hope you’d consider purchasing an ad-free pdf of this pattern in my Ravelry shop and Lovecrafts shop!
Thank you Janet and Jean for becoming my newest patrons on Patreon!
Where to purchase the Stuffed Mushrooms Earrings Pattern crochet pattern


![[Image Description] 2 Red topped crochet mushrooms sit on top of a tan skein of crochet thread and a skein of white and red thread are visible at the top of the photo](https://d3gel9wqxksnxm.cloudfront.net/wp-content/uploads/2021/05/MushroomEarrings-1000x831-1.jpg)
Level
Easy
Materials
- US 1.90 mm steel crochet hook
- Size 10 crochet thread
- Less than .1 oz total
- 3 colors
- Details in the Notes
- Needle that will weave in your ends
- Polyfil or stuffing
- Jump rings
- Metal french hooks
- Jewelry pliers
Gauge
- 10 sc x 8 rows = 1”
Terms/ Stitches used
- Ch: chain
- St: stitch
- Sc: single crochet
- Sc2tog: sc 2 sts together
Notes
- This pattern is worked in 3 sections: the Cap, the Stem, and the Seaming.
- The ch 1 at the beginning of the rows does not count as a stitch.
- The Cap is worked in 2 colors, with the red being carried behind the white. You can do this section in 1 color and add the dots of white later with surface crochet, cross stitch or Puffy Paint if you’d like.
- In the photos: Color A is the red, color B is white, and color C is beige. Aunt Lydia’s Size 10 crochet thread was used. Less than .1 oz of each color used.
Approx finished product details (does not count findings/rings or hooks)
| Height | Width |
| 2.25” – 2.5” | 1.75” |
![[Image description] A pair of red topped stuffed mushroom crochet earrings laying in on a bed of wood chips](https://d3gel9wqxksnxm.cloudfront.net/wp-content/uploads/2021/05/MushroomEarrings-1000x778-1.jpg)
Stuffed Mushrooms Earrings Pattern Instructions
Cap
(make 2 per stuffed mushroom)
Row 1: A: Ch 16, sc into the second ch from the hook and across — 15 sc
(RS) Row 2: A: Ch 1 turn, sc twice into the first st, sc into the next 2 sts, switch to B and sc into the next 2 sts, switch to A and sc until the last st, sc twice into the last st — 17 sc
Row 3: A: Ch 1, turn, sc into the next 3 sts, change to B and sc into the next 2 sts, switch to A and sc into the next 5 sts, switch to B and sc into the next 4 sts, switch to A and sc into the last 3 sts — 17 sc
Row 4: A: Ch 1, turn, sc into the next 4 sts, change to B and sc into the next 2 sts, switch to A and sc into the next 5 sts, switch to B and sc into the next 4 sts, switch to A and sc into the last 2 sts — 17 sc
Row 5: A: Ch 1, turn, sc into the next 3 sts, switch to B and sc into the next 2 sts, switch to A and sc into the next 12 sts — 17 sc
Row 6: A: Ch 1, turn, sc into the next 7 sts, switch to B and sc into the next 2 sts, switch to A and sc into the next 8 sts — 17 sc
Row 7: A: Ch 1, turn, sc2tog the first 2 sts, sc into the next 5 sts, switch to B and sc into the next 4 sts, switch to A and sc into the next 4 sts, sc2tog the last 2 sts — 15 sc (counts both sc and sc2tog here and throughout)
Row 8: A: Ch 1, turn, sc2tog the first 2 sts, sc into the next 4 sts, switch to B and sc into the next 2 sts, switch to A and sc into the next 5 sts, sc2tog the last 2 sts — 13 sc
Fasten off color B.
Row 9: A: Ch 1, turn, sc2tog the first 2 sts, sc into the next 9 sts, sc2tog the last 2 sts — 11 sc
Row 10: A: Ch 1, turn, sc2tog the first 2 sts, sc into the next 7 sts, sc2tog the last 2 sts — 9 sc
Fasten off, weave in all your ends. Move onto the Stem.
Stem
Row 1: With the RS facing you, flip your whole piece around and create a slipknot on your hook with color C, skip 5 sts toward the center on the other side of the original ch row of the Cap, sc into the next 5 sts — 5 sc
Rows 2 – 6: Ch 1, turn, sc across – 5 sc
Row 7: Ch 1, turn, sc twice into the first st, sc into the next the next 3 sts, sc twice into the last st — 7 sc
Row 8: Ch 1, turn, sc twice into the first st, sc into the next 5 sts, sc twice into the last st — 9 sc
Row 9: Ch 1, turn, sc into the next 9 sts — 9 sc
Fasten off, weave in all your ends.
![[Image description] Red topped mushrooms in 3 stages from left to right, only the cap, the cap and the stem, and the seamed stuffed cap and mushroom](https://d3gel9wqxksnxm.cloudfront.net/wp-content/uploads/2021/05/MushroomEarrings-1000x519-1.jpg)
Seaming
Take 2 of your already finished Mushrooms, hold them together so the wrong side is touching and the Caps and Stems edges line up. With color A, create a slipknot on your hook and start in the first st to the left of the last st of Row 1 of the Stem (you’ll be working into the Cap here), sc into the next 5 sts (of both Mushrooms here and throughout the Seaming), rotate your piece so you’re working along the row ends of the Cap, sc into the next 10 row ends, rotate your piece so you’re working along the top of the Cap, sc into the next 9 sts, rotate your piece so you’re working along the row ends, sc into the next 10 row ends, rotate your piece so you’re working along the bottom side of the Cap, sc into the next 5 sts until you meet the Stem (you can stuff the Cap of the Mushroom here with stuffing), switch to color C and rotate you piece so you’re working along the row ends of the Stem, sc into the next 9 rows ends of the Stem, rotate your piece so you’re working along Row 9 of the Stem, sc into the next 9 sts, rotate your piece so you’re working along the row ends of the Stem (be sure to stuff the Stem here if you’re going to), sc into the next 9 row ends, join — 66 sc
For earrings: Attach jump rings and then hooks to the middle st on the top of the Mushroom and enjoy!