
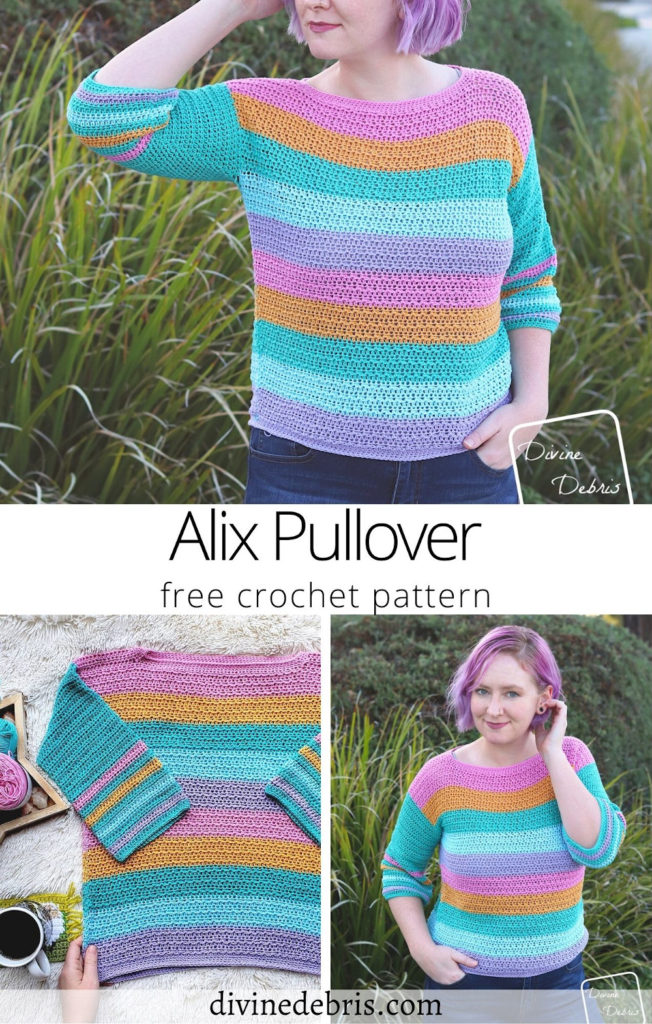
![[Image description] A white woman with purple hair stands in front of green bushes in the striped Alix Pullover crochet pattern](https://d3gel9wqxksnxm.cloudfront.net/wp-content/uploads/2021/04/Alix-Pullover-722x1000-2.jpg)
Hey! Remember the Alix Bag? It came out last month? Lots of fun colors and texture? Ok, well, I hope you remember it because this week’s design is what inspired that bag – say hello to the Alix Pullover crochet pattern!
Ok, so I want to address the elephant – garments take a lot of time to make, write up, and test. I wanted to have this done sooner but I needed to give my testers enough time to work on it so that I knew that you’d get a good product. But luckily that wait is now over and we can all enjoy the Alix Pullover and I’m so glad. I had so much fun working this design up that I couldn’t wait to release it. I’ve been showing it off for months on my IG.
Also, next up, I wanted to talk about the #NoShadesofGrey campaign that I was asked to participate in for Hobbii. They sent me the yarn and commissioned this pattern and I had a blast making this design. If you followed along on Instagram you got to see it develop. It’s another wonderful pattern in my year of “texture and color fun” and I hope you like it.
Thank you for visiting and following along with my crochet journey.
I hope where ever you are you’re having a great time and being safe and healthy. Hugs friends. Wash your hands and masks.
Please note: I was provided the yarn for this pattern by Hobbii for the purposes of designing the Alix Pullover crochet pattern, with compensation. I wasn’t provided the yarn with the expectations of positive or negative reviews but I did enjoy using this yarn. It was the first time using Twister but it won’t be the last.
This post is linked to Loop Scoop 12
(this post contains affiliate links)
If you appreciate my weekly patterns I hope you’d consider purchasing an ad-free pdf of this pattern in my Ravelry shop and Lovecrafts shop!
Thank you Winnie and Maria for becoming my newest patrons on Patreon!
Where to purchase the Alix Pullover crochet pattern


![[Image description] Unfinished striped Alix Pullover lays on a white background with a hand holding the right bottom edge and a cup of coffee on the left side](https://d3gel9wqxksnxm.cloudfront.net/wp-content/uploads/2021/04/Alix-Pullover-1000x1000-1.jpg)
Level
Easy
Materials
- US G (4.00 mm) crochet hook
- Size #2 fine weight yarn
- Amounts and measurements are listed in the Finished Product Details section below
- I used 5 colors
- I used Twister Solid for this project
- Notions: scissors, measuring tape, yarn needle
Gauge
- 15 hdc x 12 rows = 4” (blocked)
Terms/ Stitches used
- RS: right side
- Rnd: round
- St: stitch
- Ch: chain
- Sc: single crochet
- Sc2tog: sc 2 sts together
- BTLO: back third loop only (explained below)
- Hdc: half double crochet
- Hdc2tog: hdc 2 sts together
Notes
- BTLO: (back third loop only): when looking at the stitch you will have the 2 loops on top of the hdc (the V on top), lean the stitch towards you and will see the third loop that runs along the back of the stitch. This is the loop you will work into. This stitch is also known as the Camel Stitch. Please note that when you work this stitch you will be looking at the back of the previous row’s hdc, so the third loop will be facing you.
- This pattern is worked 4 sections: the Front/Back Pieces, the Sleeves, the Neck, and the Waistband. The Front/Back pieces are worked back and forth, with a turn at the beginning/ end of the row. The Sleeves, Neck, and Waistband are worked in the round with a slip st into the first st to join the rnds.
- The ch 1 at the beginning of some rows/rnds does not count as a stitch.
- Blocking is recommended for this pattern.
- To allow for the striping to match the photos, the XS/SM/MD/LG are all 21” in height and 1X/2X/3X/4X/5X are 27.5” in height. Feel free to add or subtract rows to make your Front/Back Pieces shorter or longer and adjust the striping. Just make sure your Sleeve holes are the same size as listed in the pattern.The sample in the photos is the medium size. This pattern was made with Twister Solid by Hobbii; color A is purple (Light Purple), color B is blue (Iceberg), color C is green (Mint), color D is yellow (Corn), color E is pink (Light Pink).
Approx finished product details (measurements may vary by gauge and yarn used)
| XS | Small | Medium |
| Height: 21”Across: 17” (Body) Fits Chest: 28″ – 30″ Yarn: A: 1.7 oz| 210 yds B: 1.2 oz| 149 yds C: 2.7 oz| 334 yds D: 1.2 oz| 149 yds E: 1.5 oz| 186 yds | Height: 21”Across: 19” (Body) Fits Chest: 32″ – 34″ Yarn: A: 1.8 oz| 223 yds B: 1.3 oz| 161 yds C: 2.8 oz| 347 yds D: 1.3 oz| 161 yds E: 1.8 oz| 223 yds | Height: 21”Across: 21” (Body) Fits Chest: 36″ – 38″ Yarn: A: 1.9 oz| 235 yds B: 1.4 oz| 173 yds C: 3 oz| 371 yds D: 1.4 oz| 173 yds E: 1.9 oz| 235 yds |
| Large | 1X | 2X |
| Height: 21”Across: 23” (Body) Fits Chest: 40”- 42” Yarn: A: 2.1 oz| 260 yds B: 1.5 oz| 186 yds C: 3.1 oz| 384 yds D: 1.5 oz| 186 yds E: 2 oz| 248 yds | Height: 27”Across: 25” (Body) Fits Chest: 44″ – 46″ Yarn: A: 2.8 oz| 347 yds B: 2.2 oz| 272 yds C: 3.9 oz| 483 yds D: 2.2 oz| 272 yds E: 2.8 oz| 347 yds | Height: 27” Across: 27” (Body) Fits Chest: 48″ – 50″ Yarn: A: 3 oz| 371 yds B: 2.4 oz| 297 yds C: 4 oz| 495 yds D: 2.4 oz| 297 yds E: 3 oz| 371 yds |
| 3X | 4X | 5X |
| Height: 27” Across: 29” (Body) Fits Chest: 52″ – 54″ Yarn: A: 3.2 oz| 396 yds B: 2.5 oz| 309 yds C: 4.3 oz| 532 yds D: 2.5 oz| 309 yds E: 3.1 oz| 384 yds | Height: 27”Across: 31” (Body) Fits Chest: 56″ – 58″ Yarn: A: 3.4 oz| 421 yds B: 2.8 oz| 347 yds C: 4.5 oz| 557 yds D: 2.8 oz| 347 yds E: 3.6 oz| 446 yds | Height: 27”Across: 33” (Body) Fits Chest: 60″ – 62″ Yarn: A: 3.5 oz| 433 yds B: 2.9 oz| 359 yds C: 4.7 oz| 582 yds D: 2.9 oz|359 yds E: 3.5 oz| 433 yds |
![[Image description] Camel stitch example with the back third loop highlighted,](https://d3gel9wqxksnxm.cloudfront.net/wp-content/uploads/2021/03/Camel-Stitch.jpg)
![[Image description] Striped Alix Pullover crochet pattern lays flat on a white background with a hand and cup of coffee off to the left](https://d3gel9wqxksnxm.cloudfront.net/wp-content/uploads/2021/04/Alix-Pullover-1000x1001-1.jpg)
Alix Pullover Crochet Pattern Instructions
Alix Pullover Front Piece
Sizing as follows: XS (SM, MD, LG, 1X)(2X, 3X, 4X, 5X)
(RS) Row 1: A: Ch 65 (73, 79, 87, 95)(103, 109, 117, 125), hdc into the 3rd st from hook and into the next 62 (70, 76, 84, 92)(100, 106, 114, 122) sts — 64 (72, 78, 86, 94)(102, 108, 116, 124) hdc
Row 2: Ch 1, turn, hdc into the first st, *hdc BTLO into the next st, hdc into the next st* repeat from * to * 30 (34, 37, 41, 45)(49, 52, 56, 60) times, hdc into the last st — 64 (72, 78, 86, 94)(102, 108, 116, 124) hdc
Row 3: Ch 1, turn, hdc across — 64 (72, 78, 86, 94)(102, 108, 116, 124) hdc
Row 4: Ch 1, turn, hdc into the first st, *hdc into the next st, hdc BTLO into the next st, * repeat from * to * 30 (34, 37, 41, 45)(49, 52, 56, 60) times, hdc into the last st — 64 (72, 78, 86, 94)(102, 108, 116, 124) hdc
Row 5: repeat row 3.
Row 6: repeat row 2.
Sizes XS – LG, fasten off color A and switch to color B.
Sizes 1X – 5X, continue below.
| Sizes XS/SM/MD/LG only Row 7: B: repeat row 3. Rows 8 – 12: repeat rows 2 – 6. Fasten off color B and switch to color C. Rows 13 – 18: C: repeat row 3 then rows 2 – 6. Fasten off color C and switch to color D. Rows 19 – 24: D: repeat row 3 then rows 2 – 6. Fasten off color D and switch to color E. Rows 25 – 30: E: repeat row 3 then rows 2 – 6. Fasten off color E and switch to color A. Rows 31 – 36: A: repeat row 3 then rows 2 – 6. | Fasten off color A and switch to color B. Rows 37 – 42: B: repeat row 3 then rows 2 – 6. Fasten off color B and switch to color C. Rows 43 – 48: C: repeat row 3 then rows 2 – 6. Fasten off color C and switch to color D. Rows 49 – 54: D: repeat row 3 then rows 2 – 6. Fasten off color D and switch to color E. Rows 55 – 60: E: repeat row 3 then rows 2 – 6. Do not fasten off. Move onto Neck Rows. |
Front Piece Neck Rows
Right Section
Row 61: E: Ch 1, turn, hdc into the next 10 (14, 17, 21) sts — 10 (14, 17, 21) hdc
Rows 62 – 66: Ch 1, turn, hdc across — 10 (14, 17, 21) hdc
Fasten off leaving a tail long enough to seam the sts you have on this section.
Left Section
Row 61: E: Create a slipknot on your hook (this will make your next st a standing hdc) skip 44 sts from the last st you made on Row 60 of the Right Section, hdc into the next 10 (14, 17, 21) sts — 10 (14, 17, 21) hdc
Rows 62 – 66: Ch 1, turn, hdc across — 10 (14, 17, 21) hdcFasten off leaving a tail long enough to seam the sts you have on this section. Block your piece
Block the piece so it’s 17” x 20”, (19” x 20”, 21” x 20”, 23” x 20”) with the Neck Rows being 2” high.
Alix Pullover Back Piece
Repeat Rows 1 – 60 of the Front Piece.
Block the piece so it’s 17” x 20, (19” x 20”, 21” x 20”, 23” x 20”).
Sizes 1X/2X/3X/4X/5X only
Rows 7 – 8: repeat rows 3 – 4.
Fasten off color A and switch to color B.
| Row 9: B: repeat row 3. Rows 10 – 16: repeat rows 2 – 8. Fasten off color B and switch to color C. Rows 17 – 24: C: repeat row 3 then rows 2 – 8. Fasten off color C and switch to color D. Rows 25 – 32: D: repeat row 3 then rows 2 – 8. Fasten off color D and switch to color E. Rows 33 – 40: E: repeat row 3 then rows 2 – 8. Fasten off color E and switch to color A. Rows 41 – 48: A: repeat row 3 then rows 2 – 8. | Fasten off color A and switch to color B. Rows 49 – 56: B: repeat row 3 then rows 2 – 8. Fasten off color B and switch to color C. Rows 57 – 64: C: repeat row 3 then rows 2 – 8. Fasten off color C and switch to color D. Rows 65 – 72: D: repeat row 3 then rows 2 – 8. Fasten off color D and switch to color E. Rows 73 – 80: E: repeat row 3 then rows 2 – 8. Do not fasten off. Move onto Neck Rows. |
Back Piece Neck Rows
Right Section
Row 81: E: Ch 1, turn, hdc into the next 25 (29, 32, 36, 40) sts — 25 (29, 32, 36, 40) hdc
Rows 82 – 86: Ch 1, turn, hdc across — 25 (29, 32, 36, 40) hdc
Fasten off leaving a tail long enough to seam the sts you have on this section.
Left Section
Row 81: E: Create a slipknot on your hook (this will make your next st a standing hdc) skip 44 sts from the last st you made on Row 60 of the Right Section, hdc into the next 25 (29, 32, 36, 40) sts — 25 (29, 32, 36, 40) hdc
Rows 82 – 86: Ch 1, turn, hdc across — 25 (29, 32, 36, 40) hdcFasten off leaving a tail long enough to seam the sts you have on this section. Block your piece
Block the piece so it’s 25” x 26.5”, (27” x 26.5”, 29” x 26.5”, 31” x 26.5”, 33” x 26.5”) with the Neck Rows being 2” high.
Back Piece
Repeat Rows 1 – 80 of the Front Piece.
Block the piece so it’s 25” x 26.5”, (27” x 26.5”, 29” x 26.5”, 31” x 26.5”, 33” x 26.5”).
Seaming
Neck Rows
Using the tails you left on rows 66 or 86 of the Neck Rows, seam together the 10 (14, 17, 21, 25)(29, 32, 36, 40) sts on row 66/86 on the Front Piece to the first and last 10 (14, 17, 21, 25)(29, 32, 36, 40) sts on row 60/80 of the Back Piece in your preferred method of seaming.
Sides
Starting from Row 1, seam in your preferred method each the next 42 (42, 41, 41, 58)(58, 55, 55, 53) rows toward the Neck Rows. The 42 (42, 44, 44, 50)(50, 56, 56, 60) unworked rows is your Sleeve hole. Repeat seaming on the other side.
Sleeves
Sizing as follows: XS (SM, MD, LG, 1X)(2X, 3X, 4X, 5X)
Note:
-Begin the Sleeves with the RS facing you.
-Leave a tail long enough to sew closed any gaps in the armpit area when you create your slipknot.
Rnd 1: Create a slipknot on your hook with color C (this will make your first st a standing hdc), hdc into the first row end to the left of your seam, hdc into the next 1 (1, 5, 5, 5)(5, 5, 5, 7) row ends, hdc twice into the next row end, *hdc into the next 3 (3, 2, 2, 2)(2, 2, 2, 2) row ends, hdc twice into the next row end,* repeat from * to * 8 (8, 10, 10, 12)(12, 14, 14, 14) more times, hdc into the last 3 (3, 4, 4, 4)(4, 4, 4, 6) row ends, join — 52 (52, 56, 56, 64)(64, 72, 72, 76) hdc
Rnds 2 – 20: C: Ch 1, turn, hdc around, join — 52 (52, 56, 56, 64)(64, 72, 72, 76) hdc
Note: decrease (hdc2tog) evenly (every other rnd or every 4th rnd) until you get to the st count of 50 (50, 52, 52, 56)(56, 64, 64, 64) around. If you’d like a tighter or looser fit, feel free to decrease more or less than indicated here. The following rnds will just tell you the color changes. You don’t need to fasten off color C, you can drop it and pick it up as needed (if you’d like) but the instructions will not tell you to fasten off with color C until the end of the Sleeve.
| Rnds 21 – 22: E Fasten off color E and switch to color C. Rnds 23 – 24: C Rnds 25 – 26: D Fasten off color D and switch to color C. Rnds 27 – 28: C | Rnds 29 – 30: B Fasten off color B and switch to color C. Rnds 31 – 32: C Rnds 33 – 34: A Fasten off color A and switch to color C. Rnd 35: C |
Rnds 36 – 37: Ch 1, sc around, join — 50 (50, 52, 52, 56)(56, 64, 64, 64)
Fasten off, weave in your ends. Block your Sleeve if you blocked the Front/Back pieces so it’s approx 12.25” in length. Repeat instructions on the other Sleeve hole.
Neck
Rnd 1: Start with the Back Piece facing you, create a slipknot on your hook with color E and begin in the first Neck Row to the left of where you seamed the Front and Back together, *sc once into the next row end, sc twice into the next row end,* repeat from * to * twice, move to the Front Piece, sc into the next 44 sts, move to the next Neck Rows, repeat from * to * 3 times, move to the Back Piece, sc into the next 44 sts, join – 106 sc (all sizes)
Rnd 2: E: Ch 1, sc2tog the first 2 sts, sc into the next 5 sts, sc2tog the next 2 sts, sc into the next 44 sts, sc2tog the next 2 sts, sc into the next 5 sts, sc2tog the next 2 sts, sc into the next 44 sts, join — 102 sc
Rnd 3: Ch 1, sc2tog the first 2 sts, sc into the next 3 sts, sc2tog the next 2 sts, sc into the next 44 sts, sc2tog the next 2 sts, sc into the next 3 sts, sc2tog the next 2 sts, sc into the next 44 sts, join — 98 sc
Rnd 4: Ch 1, sc around, join — 98 sc
Fasten off, weave in your ends. Block if necessary.
Waistband
Rnd 1: A: Flip your whole piece around so that you’re working along the other side or Row 1 of the Front Piece, create a slipknot on your hook (this will make your next st a standing sc), sc into the next 64 (72, 78, 86, 94)(102, 108, 116, 124) sts, move to the Back Piece, sc into the next 64 (72, 78, 86, 94)(102, 108, 116, 124) sts, join — 128 (144, 156, 172, 188)(204, 216, 232, 248) sc
Rnds 2 – 4: Ch 1, sc around, join — 128 (144, 156, 172, 188)(204, 216, 232, 248) sc
Fasten off, weave in your ends. Block if you blocked the Body Pieces.
![[Image description] A white woman with purple hair looks down to the side not facing the camera standing in front of green bushes in the striped Alix Pullover crochet pattern](https://d3gel9wqxksnxm.cloudfront.net/wp-content/uploads/2021/04/Alix-Pullover-736x1000-2.jpg)

Lisa Hartmann
Sunday 28th of November 2021
Thank you so much!!😊 Now I can finish my Alix pullover!! 😉
Lisa Hartmann
Monday 22nd of November 2021
Rows 25-26 are missing for sizes xl-5x for the front panel. Or am I just missing them somewhere?! Thank you!!
Divine Debris
Monday 22nd of November 2021
Just hit "7" instead of "5" when I wrote 27. The pattern has been updated
Dene
Thursday 7th of October 2021
Love it. Living in the South #2 yarn is PERFECT (wish more patterns were used making #2)
Anna
Friday 7th of May 2021
Hi! What’s the name of the colors u used?
Divine Debris
Friday 7th of May 2021
Hi! The list of the colors and names can be found at last bullet point in the Notes section.